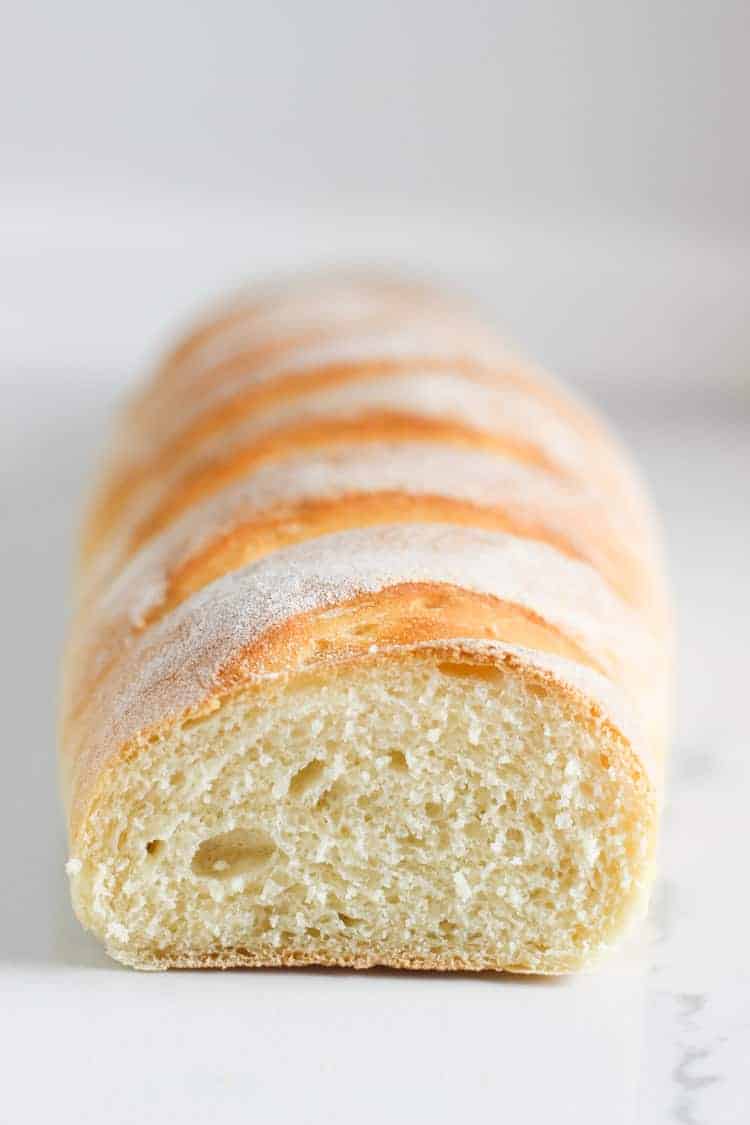
This easy recipe for homemade French bread will be a staple at your house. Soft and fluffy bread with a crispy crust, perfect for garlic bread, sandwiches or French bread pizzas!
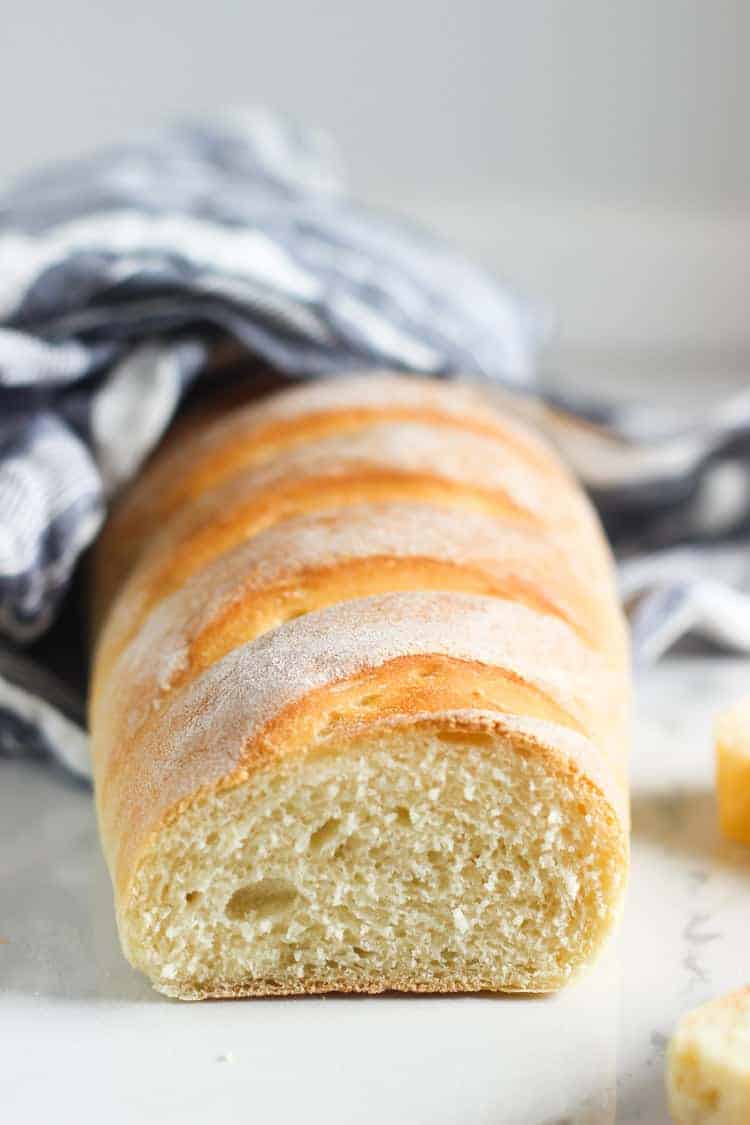
Time for another bread recipe! This French bread recipe is one of my favourite. I love making it just to snack on, it's the perfect addition to a cheese board or platter and makes the best ever garlic bread!
Step 1: Make the dough
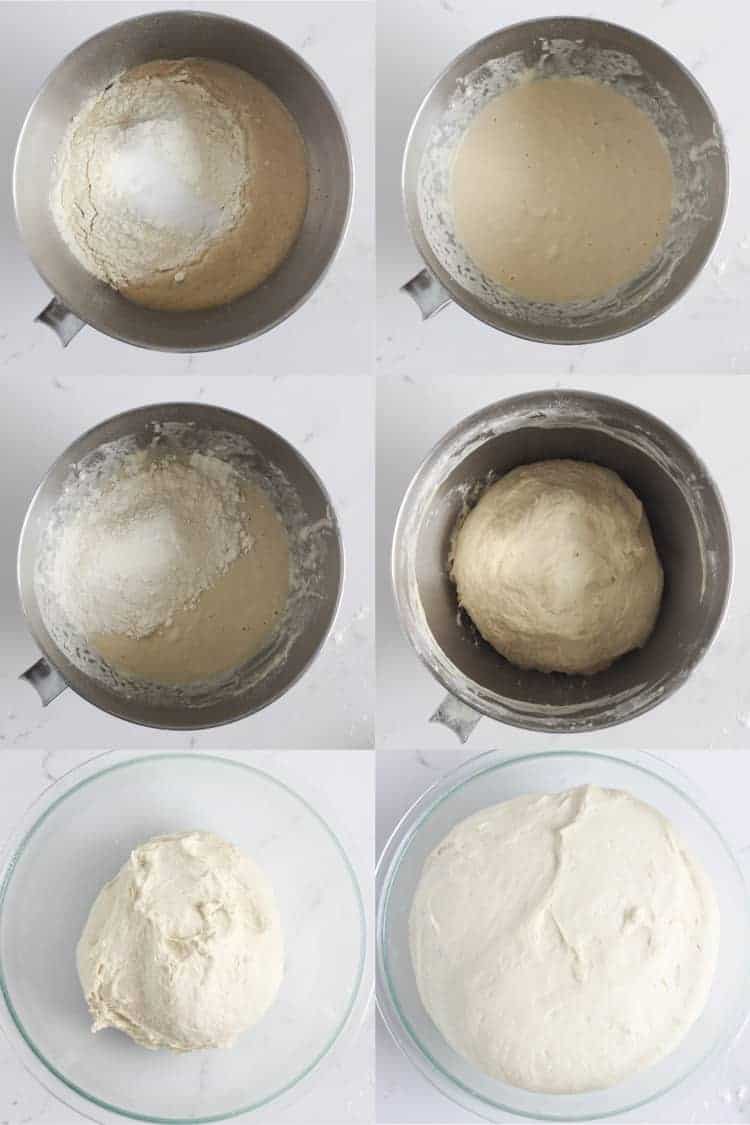
Add water, yeast and sugar to the bowl of a stand mixer and combine using the dough hook or add to a large bowl and whisk together if making by hand. Allow to sit for 5 minutes for the yeast to activate.
Add the salt and 2 cups of the flour and mix until combined either using the dough hook on the lowest speed or using a wooden spoon in a bowl. Slowly add the remaining flour until all combined and then knead for 7 minutes on the lowest speed of the mixer or for 10 minutes by hand or until the dough is soft and smooth, and when you make an indent in the dough with your finger, it springs back.
A wee note about the amount of flour to use - in the recipe I say 5-5 ½ cups. That's because there are so many variables when baking bread so keep adding flour until the dough comes together but is still slightly sticky. It should be sticking to the bottom of the bowl but not the sides. If you add too much flour, just add a little water to make it stickier again!
Step 2: First rise
Lightly oil a large bowl and once the dough is kneaded, transfer it to the oiled bowl, Cover with a clean tea towel and put in a warm place to rise until doubled in size (about 1 hour)
Step 3: Shape and second rise
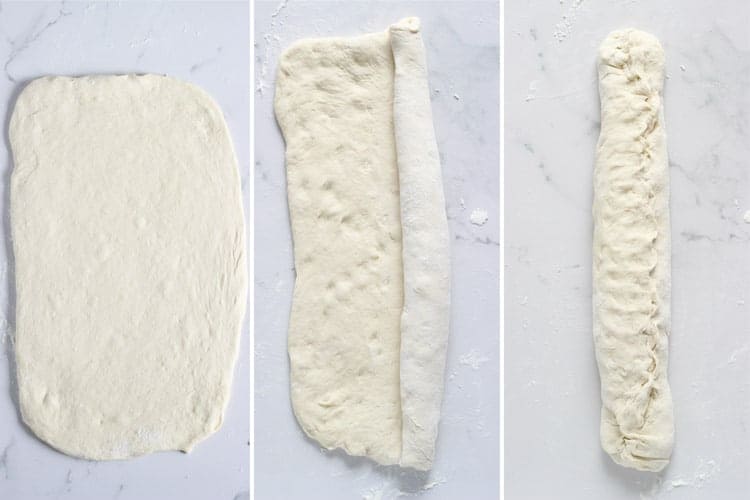
Once risen, gently punch the dough down and split it into 2 portions. Roll out each piece of dough into a rectangle approximately 30cm by 20cm and use your fingertips to make indents all over the dough to remove any air bubbles. Tightly roll the dough into a loaf shape, pressing together the seam - you may also want to tuck in the ends of the loaf. Repeat with the second loaf.
Carefully transfer the shaped loaf on to a baking tray lined with a silicone liner or baking paper and using a sharp knife, make diagonal slashes the whole way along the top of the loaf (about 10 slashes) Cover with a tea towel and put it back in the warm place to rise again until almost doubled in size - approximately 30 minutes.
During the second rise, heat the oven to 200°C/392°F

Step 4: Bake
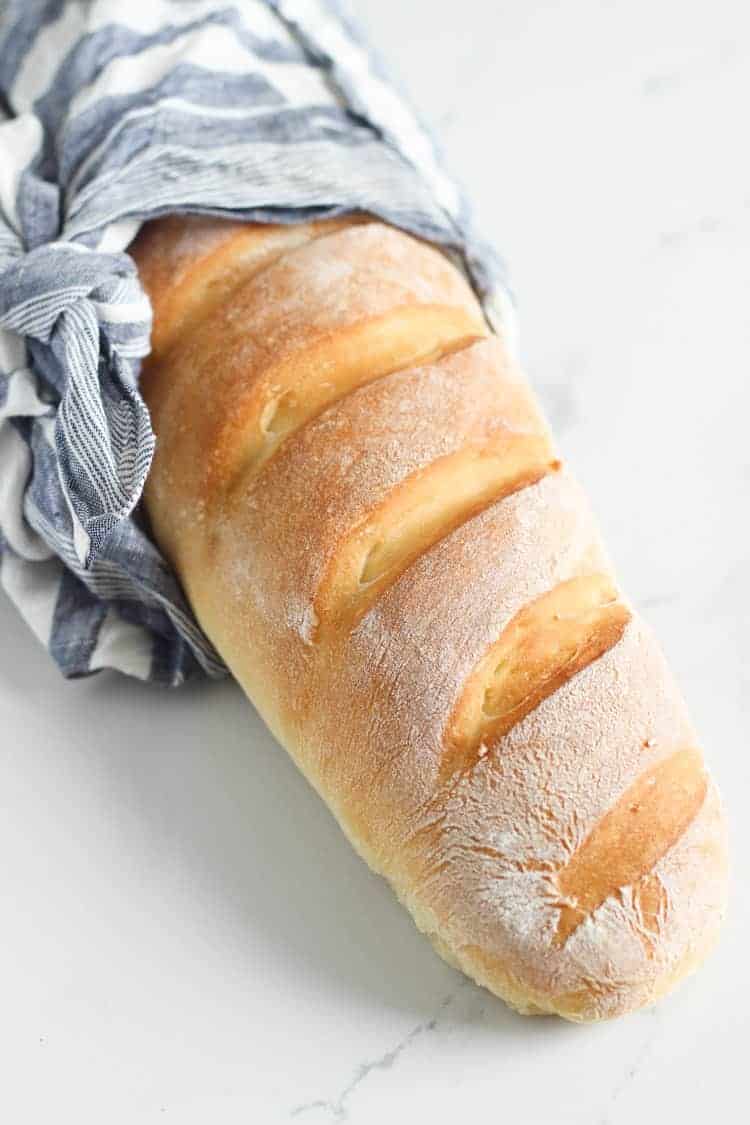
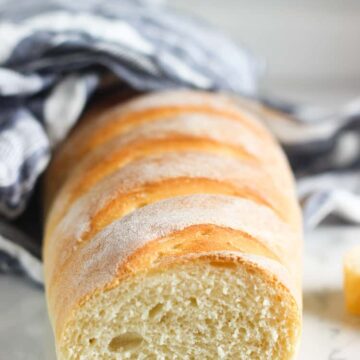
Once the bread has risen for the second time, carefully place in the oven and throw a few ice cubes in the bottom before you shut the door. This helps to make the crust crispy. I bake one loaf at a time, but if your oven has a convection setting, bake them both together. Bake the loaf for 25 minutes or until the loaf is golden brown and sounds hollow when tapped underneath. Once done, remove from the oven and bake the second loaf, adding more ice cubes to the oven.
That's it! Now the hardest part is letting the bread cool slightly before getting into it!
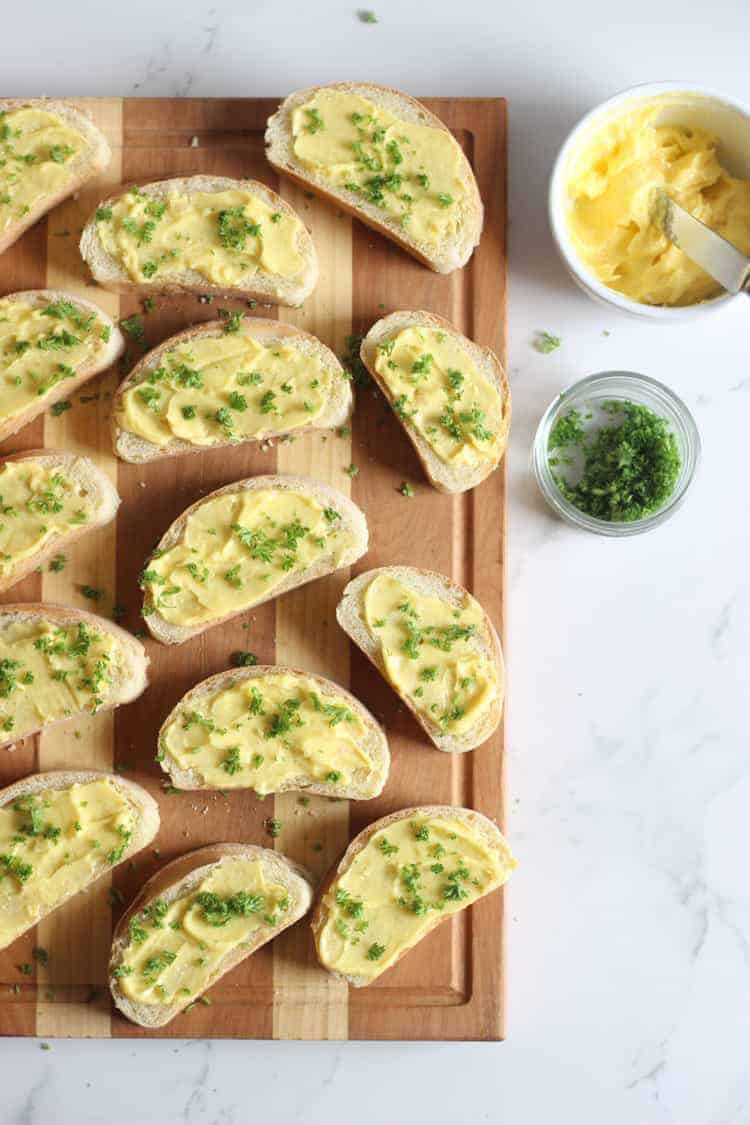
I love serving this French bread buttered with soup, as a sandwich bread or slicing it in half lengthways to make pizzas. It also makes the best garlic bread - either slice lengthways or in 2cm thick slices, spread with garlic butter and sprinkle with parsley and bake immediately, or freeze ready to use down the track!
Bread making FAQ's
What type of yeast should I use?
I always use active dried yeast - this yeast needs to be activated before using it in the dough. The reason I like using this yeast is that it's a safeguard to bread rising failure. You can actually see that the yeast is activated which is essential for the bread making process!
To activate active dry yeast, add it to a small amount of warm water (somewhere between 37-43°C/98-110°F) and sugar (the amount called for in the recipe) and whisk it around and leave it sitting for about 5-10 minutes. It will start to bubble and foam when it is ready. If this doesn’t happen your yeast may either be too old or the water may have been too hot or too cold. Throw it away and start again. When the yeast is activated using warm water it produces carbon dioxide gas, which causes the bread to rise. You can also use Surebake yeast, or instant yeast, which is a mixture of active dry yeast and bread improvers. This is typically used in breadmakers when all ingredients are added at the same time as it doesn’t need to be activated first.
What if my bread doesn't rise?
Your yeast may be old - see above for how to activate the yeast. If your yeast doesn't activate, it's no good. Throw it out and start again.
It may simply be too cold where you are trying to rise your bread! If it's cooler where you live, try putting the bread in the hot water cupboard or preheat the oven to 50°C and then turn off before placing the bread in there to rise.
How do I know when my bread is ready?
When the bread is golden brown and you tap the bottom of the loaf and it sounds hollow, it's done.
If you have an instant read thermometer you want the internal temperature of the bread to be 88°C/190°F - this post explains it and tested a few different types of breads - it's a really interesting read if you are keen to learn more about bread baking!
Why do you put ice into the oven before baking?
Ice cubes in a hot oven create steam which helps give the bread a crusty exterior - exactly what we want in a loaf of French bread!
Other bread recipes to try:
- Homemade hamburger buns
- Homemade Bagels
- Homemade English Muffins
- Homemade Soft Pretzels
- 4 ingredient No-Knead Bread
- Pizza Dough
SHOP THE RECIPE
Some of the links in this post are affiliate links, which pay me a small commission for my referral at no extra cost to you! Thank you for supporting The Kiwi Country Girl.
Here are some items I used to make this recipe:
Measuring cups & spoons| Mixing Bowls
Easy French Bread Recipe
Ingredients
- 2 cups warm water
- 1 Tablespoon active dry yeast
- 1 Tablespoon sugar
- 5-5 ½ cups flour (see notes)
- 2 teaspoons salt
Instructions
- Make the dough - Add water, yeast and sugar to the bowl of a stand mixer and combine using the dough hook or add to a large bowl and whisk together. Allow to sit for 5 minutes for the yeast to activate.
- Add 2 cups of the flour, the salt and mix until combined either using the dough hook on the lowest speed or using a wooden spoon in a bowl. Slowly add the remaining flour until all combined and then knead for 7 minutes on the lowest speed of the mixer or for 10 minutes by hand or until the dough is soft and smooth, and when you make an indent in the dough with your finger, it springs back.
- First rise - Lightly oil a large bowl and once the dough is kneaded, transfer it to the oiled bowl, Cover with a clean tea towel and put in a warm place to rise until doubled in size (about 1 hour)
- Shape and second rise - Once risen, gently punch the dough down and split it into 2 portions. Roll out each piece of dough into a rectangle approximately 30cm by 20cm and use your fingertips to make indents all over the dough to remove any air bubbles. Tightly roll the dough into a loaf shape, pressing together the seam - you may also want to tuck in the ends of the loaf. Repeat with the second loaf.
- Carefully transfer the shaped loaf on to a baking tray lined with a silicone liner or baking paper and using a sharp knife, make diagonal slashes the whole way along the top of the loaf (about 10 slashes) Cover with a tea towel and put it back in the warm place to rise again until almost doubled in size - approximately 30 minutes.
- During the second rise, heat the oven to 200°C/392°F
- Bake - Once the bread has risen for the second time, carefully place in the oven and throw a few ice cubes in the bottom before you shut the door. This helps to make the crust crispy. I bake one loaf at a time, but if your oven has a convection setting, bake them both together.
- Bake for 25 minutes or until the loaf is golden brown and sounds hollow when tapped underneath. Bake the second loaf.
- Allow to cool slightly on the bench before slicing and serving. Store bread in a bread bag or container on the bench for a day or two but it's best eaten on the day of baking.
Notes
If you tried and loved this recipe, please leave a comment and a rating below!

Helle says
Have you tried baking this in a perforated French bread pan?
Laura says
No but I have recently bought one so I will report back when I have tested it out!
Cheyne says
So easy and delicious. Simple and easy to follow instructions. Thanks so much! I’ve made this many times (usually for garlic bread!)
Sara says
Oh my this is delicious!!
Judy says
My first attempt at bread making.
Amazing result!
Thanks for the heads up re being flexible with flour quantity. Used 6 cups. Still sticky after first rise but dealt with by wetting hands rather than adding more flour. Was able to deal with the dough really well then.
Divided into 4 sticks on 2 trays to fit in oven and they ended up a really nice size. Thank you!!
Shelley says
First time I made this it was amazing! Crunchy with soft inside as promised. I’ve made it twice more subsequently but can’t seem to get the crust the same. It doesn’t look as rustic and goes soft once it cools. Is it my dough consistency, or another error I’m making? Any tips?!
Laura says
Hi Shelley. Oh that is annoying! I can't think what it could be specifically, just one of those annoying things! Maybe try adding more ice and increasing the oven temp slightly to begin with?
Joanne says
Made this yesterday, was easy to make and was so good, everyone wanted some as soon as it came out the oven. Definitely making again 😊
Rebecca Bell says
This is an amazing recipe, super easy and the teenager couldn't get enough of it. Yum Yum cant wait to try your other recipes 🙂
Kyra says
Hey Laura.. what do you mean by adding ice cubes to the bottom? bottom of what exactly? Thank you!
Laura says
Hi Kyra,
Sorry, the bottom of the oven! When you open it up to put the bread in, throw a couple of ice cubes on the bottom of the oven to create steam which helps to make the crust crispy. Laura
Kyra says
Thank you so much.. ❤️❤️
Leanne says
Easy recipe that works so well and tastes so yum. Will definitely be baking it again, it was a real crowd pleaser. Thanks for sharing it
Jade Komene says
Amazing easy bread .. Didn't wait till it cooled down.. So the butter was just dripping from the bread...
Deborah says
Just a question, if I'm using NZ high grade flour, do I need to use an improver as well as dried yeast? I've noticed that some people use Surebake yeast (with improvers added) when baking bread as they claim NZ flour is low in gluten. Thanks!
Laura says
Hi Deborah! No, I don't bother using an improver if I'm using dried yeast. Sometimes I use it if I'm making cinnamon rolls or something I want to be super fluffy but this bread doesn't need it 🙂
David says
Hi Laura, Where Can I buy improver for bread in Auckland ? Thanks.
Laura says
Hi David, I buy mine from Bin Inn so any bulk food store should have it. Laura