A step by step guide to canning/bottling peaches using a water bath canner. Perfect for beginners, home canned peaches are a delicious way to enjoy in season peaches year round.
If you are brand new to canning/bottling, these posts might be helpful to read first:
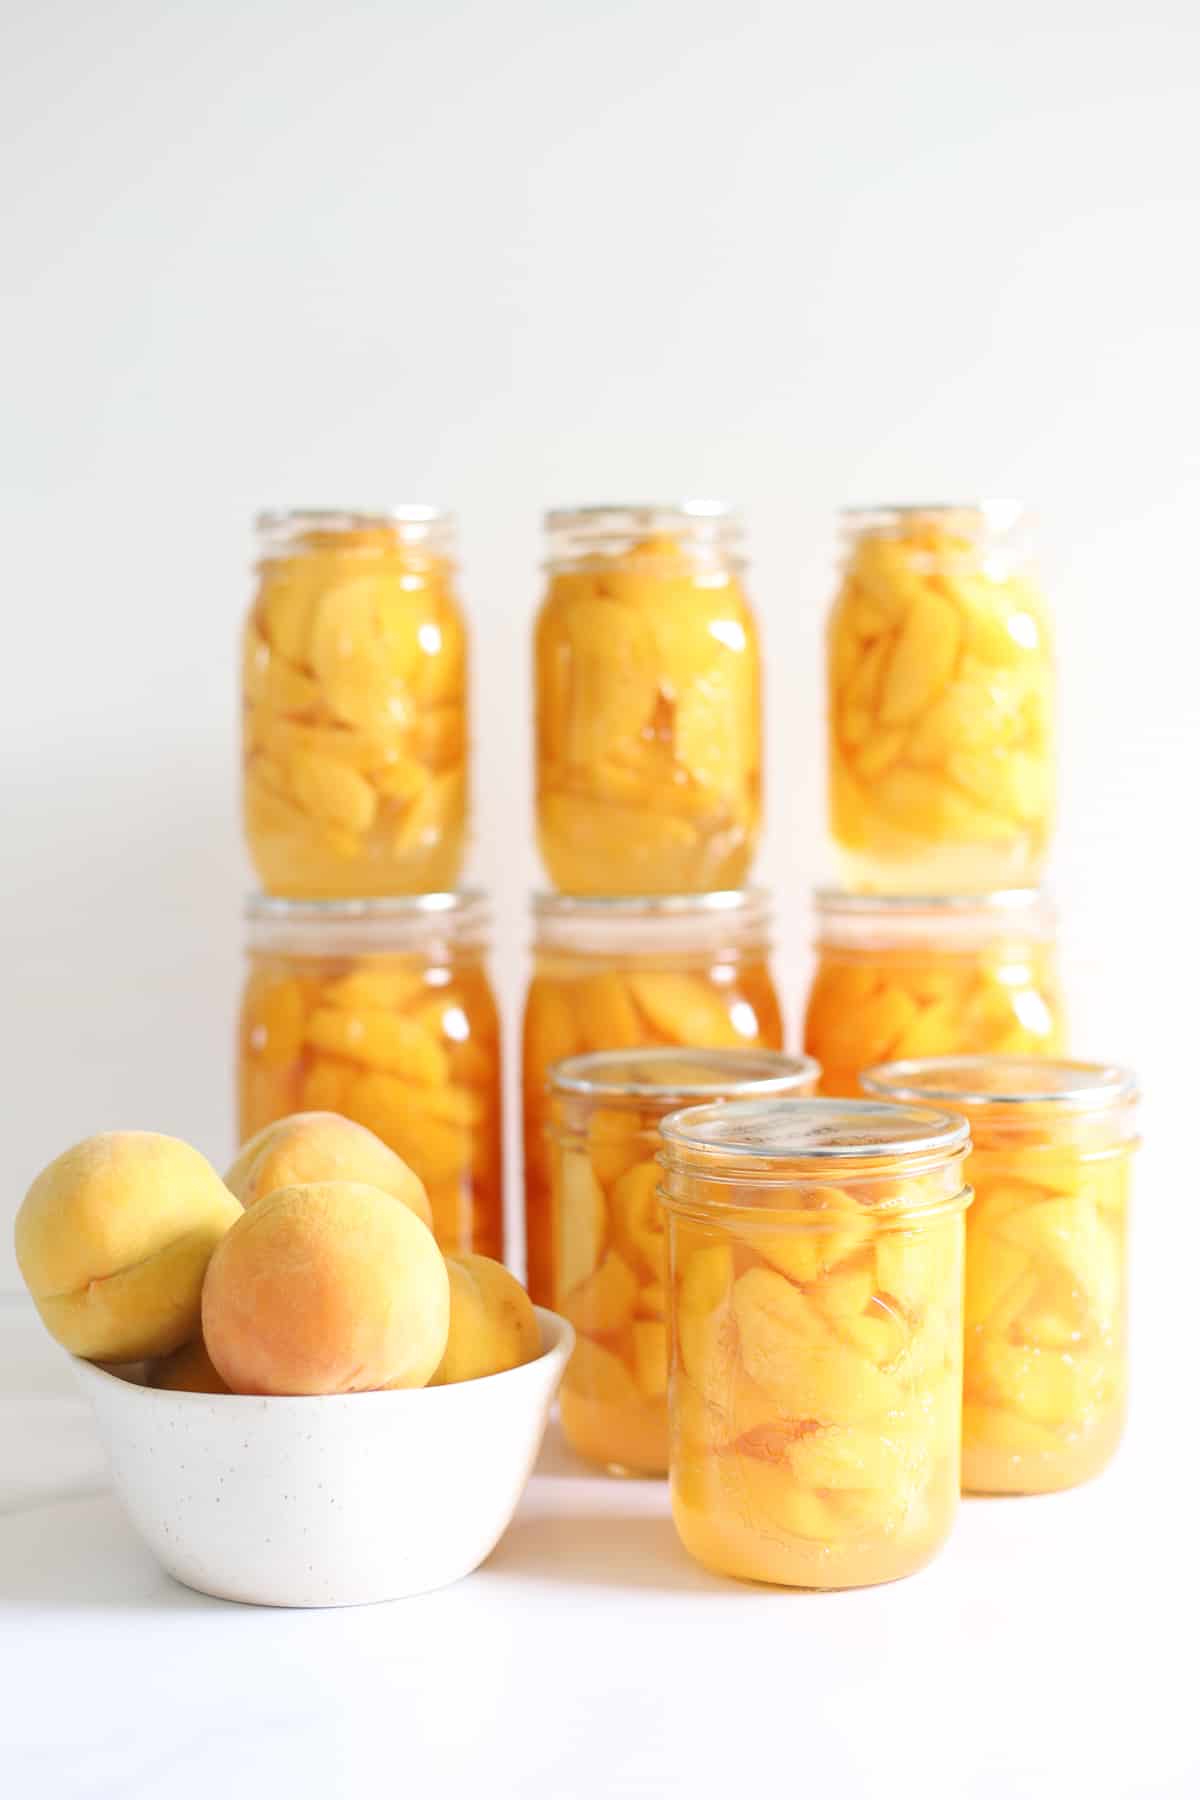
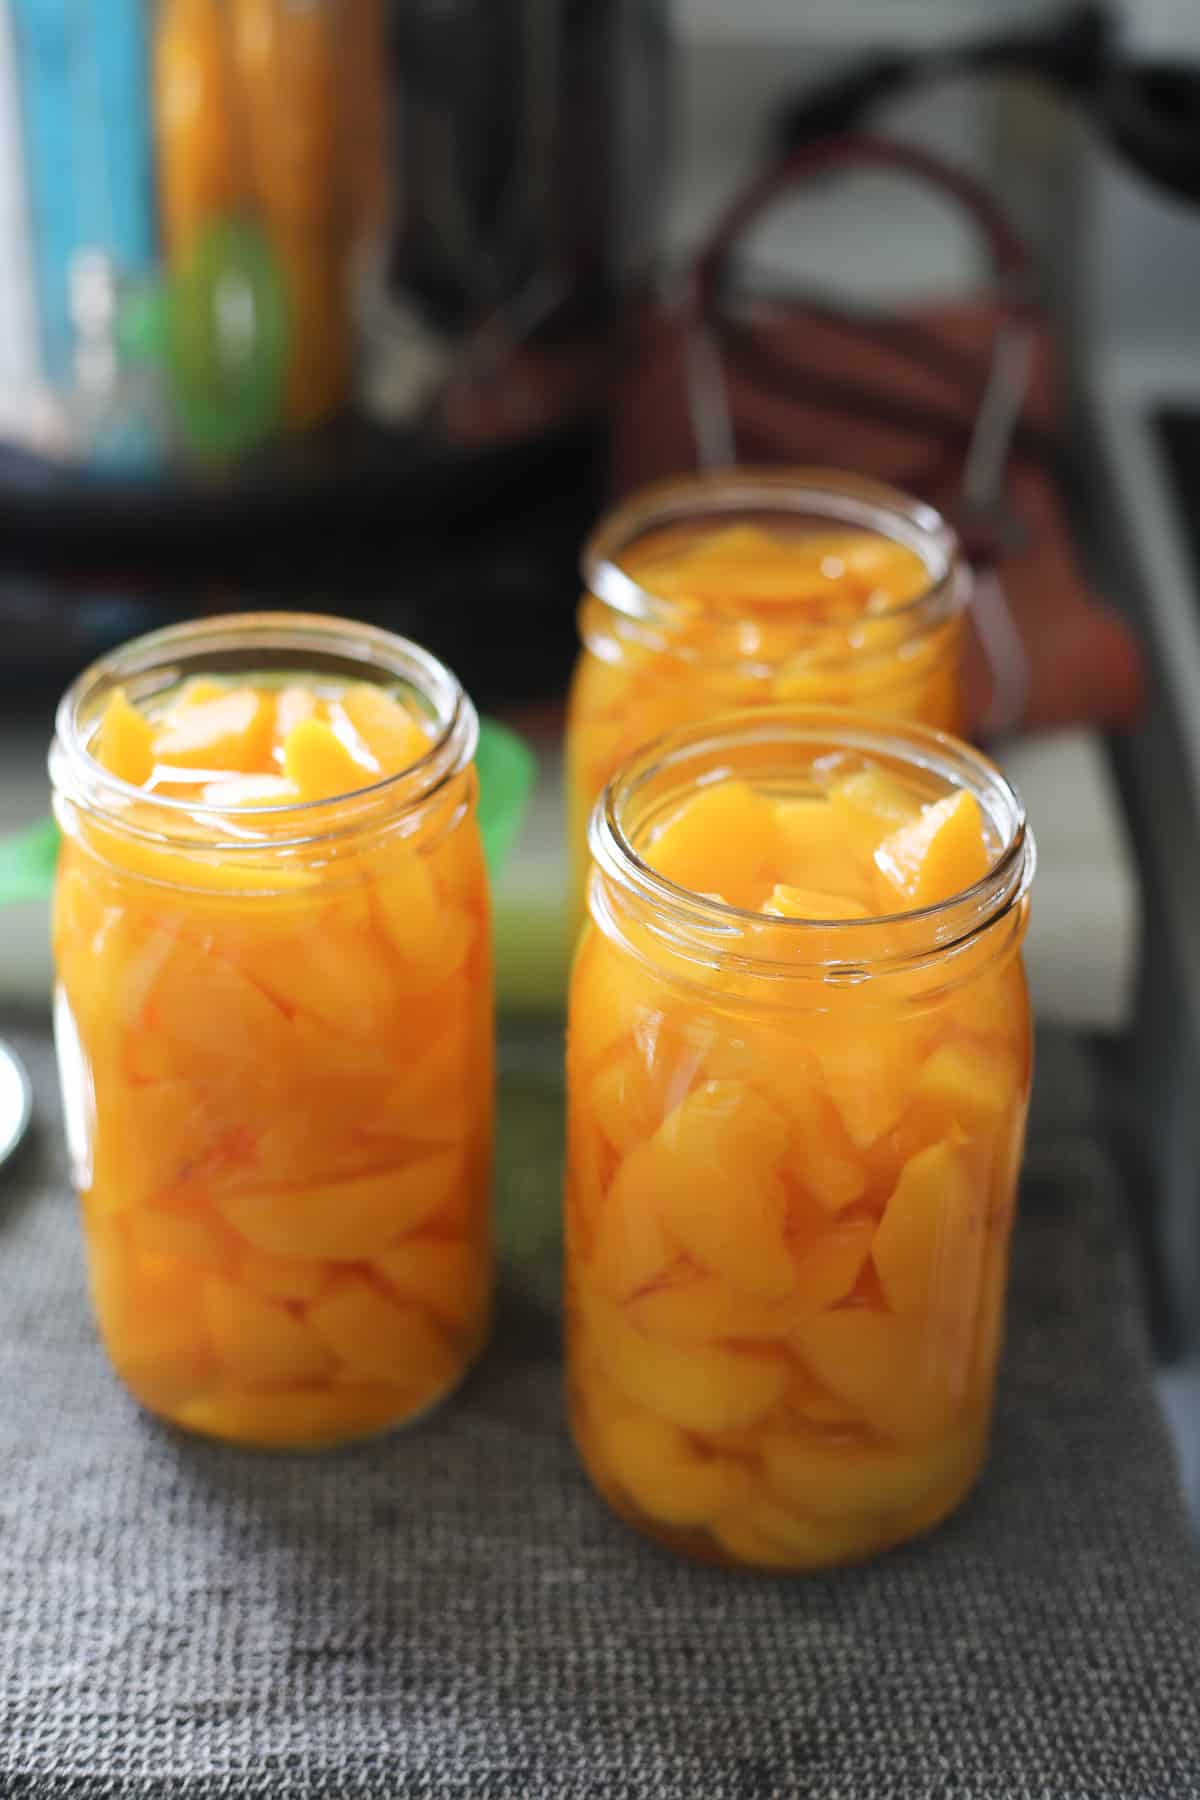
There is nothing than transports me back to my childhood quite like a bottle of golden queen peaches. I have such strong memories of boxes of peaches sitting on our kitchen bench as a child, watching my Mum and Grandma peeling, slicing and bottling the most flavourful in season peaches. Back then you could buy them for $1 per kilo! While it's certainly not as cost effective to do it now, it is still one thing that I will shell out for as it's worth it to me!
Back then, Mum used to use the overflow method to bottle her peaches. While many people still do this, I have completely moved away from this method and now only use the waterbath method to do my canning and bottling. I have found it to be much less messy and far more successful.
As this is the first post I have on how to bottle fruit using the water bath method, it's about to get super detailed in here. Think of this as the base post for all of your fruit preserving water bath questions and refer back to it when you need!
So buckle up and let's get into how to bottle peaches using the water bath method!
Ingredients needed:
- Peaches - you can use any variety of peaches but as far as I'm concerned, Golden Queen peaches are far superior than any other kind. They are slightly trickier to prepare as they are clingstone peaches but the effort that they take is worth it.
- Sugar - peaches are bottled in sugar syrup - you can adjust the ratio of sugar to water to your taste (more below) but this helps preserve the peaches both in the jar and once the jar is opened.
- Lemon juice - I slice my peaches into a bowl of water with lemon juice squeezed in. This stops the slices going brown while I am preparing them all.
Equipment needed:
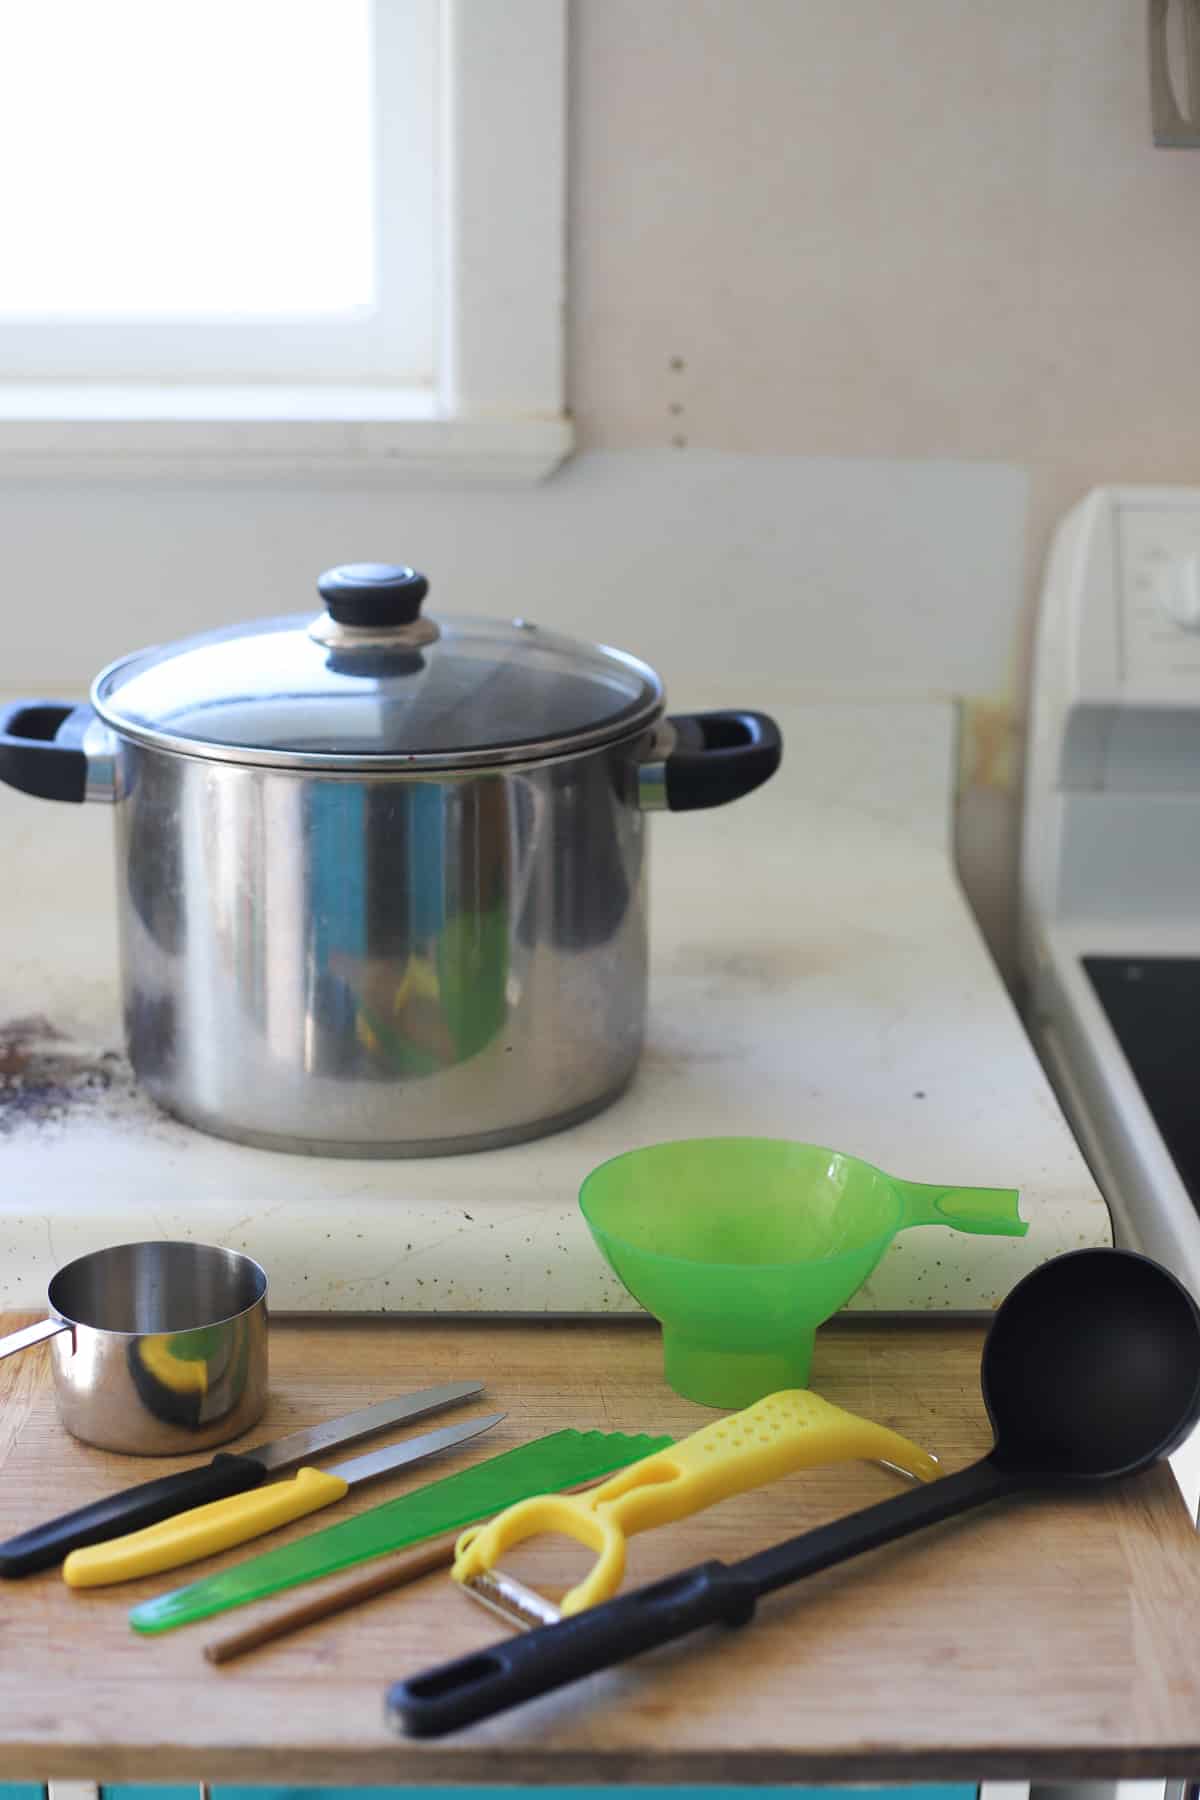
- Water bath canner or large stockpot with rack/trivet. If you don't have a water bath canner, just use the biggest pot you have. It needs to be deep enough that the full jars will be covered by at least 1 inch/2.5cm of water during processing. If you don't have a canning rack or trivet, use canning rings at the bottom of the pot so that the jars are not directly sitting on the bottom of the pot.
- Jars, lids and bands - as I talk about in my beginners guide to water bath canning/bottling post, you can reuse jars and bands/rings but you need new lids or seals each time. My preferred jars are Ball mason jars - quart (1L) and pint (500ml).
- Jar tongs - these make lifting hot jars out of boiling water a breeze and so much safer!
- Chopping board, peeler, knife, slotted spoon, rubber spatula or chopstick, tea towels and other general kitchen equipment
- Large bowl or container to hold the peaches in as you are slicing them so that they don't go brown.
How to bottle peaches
Step 1: Get prepared
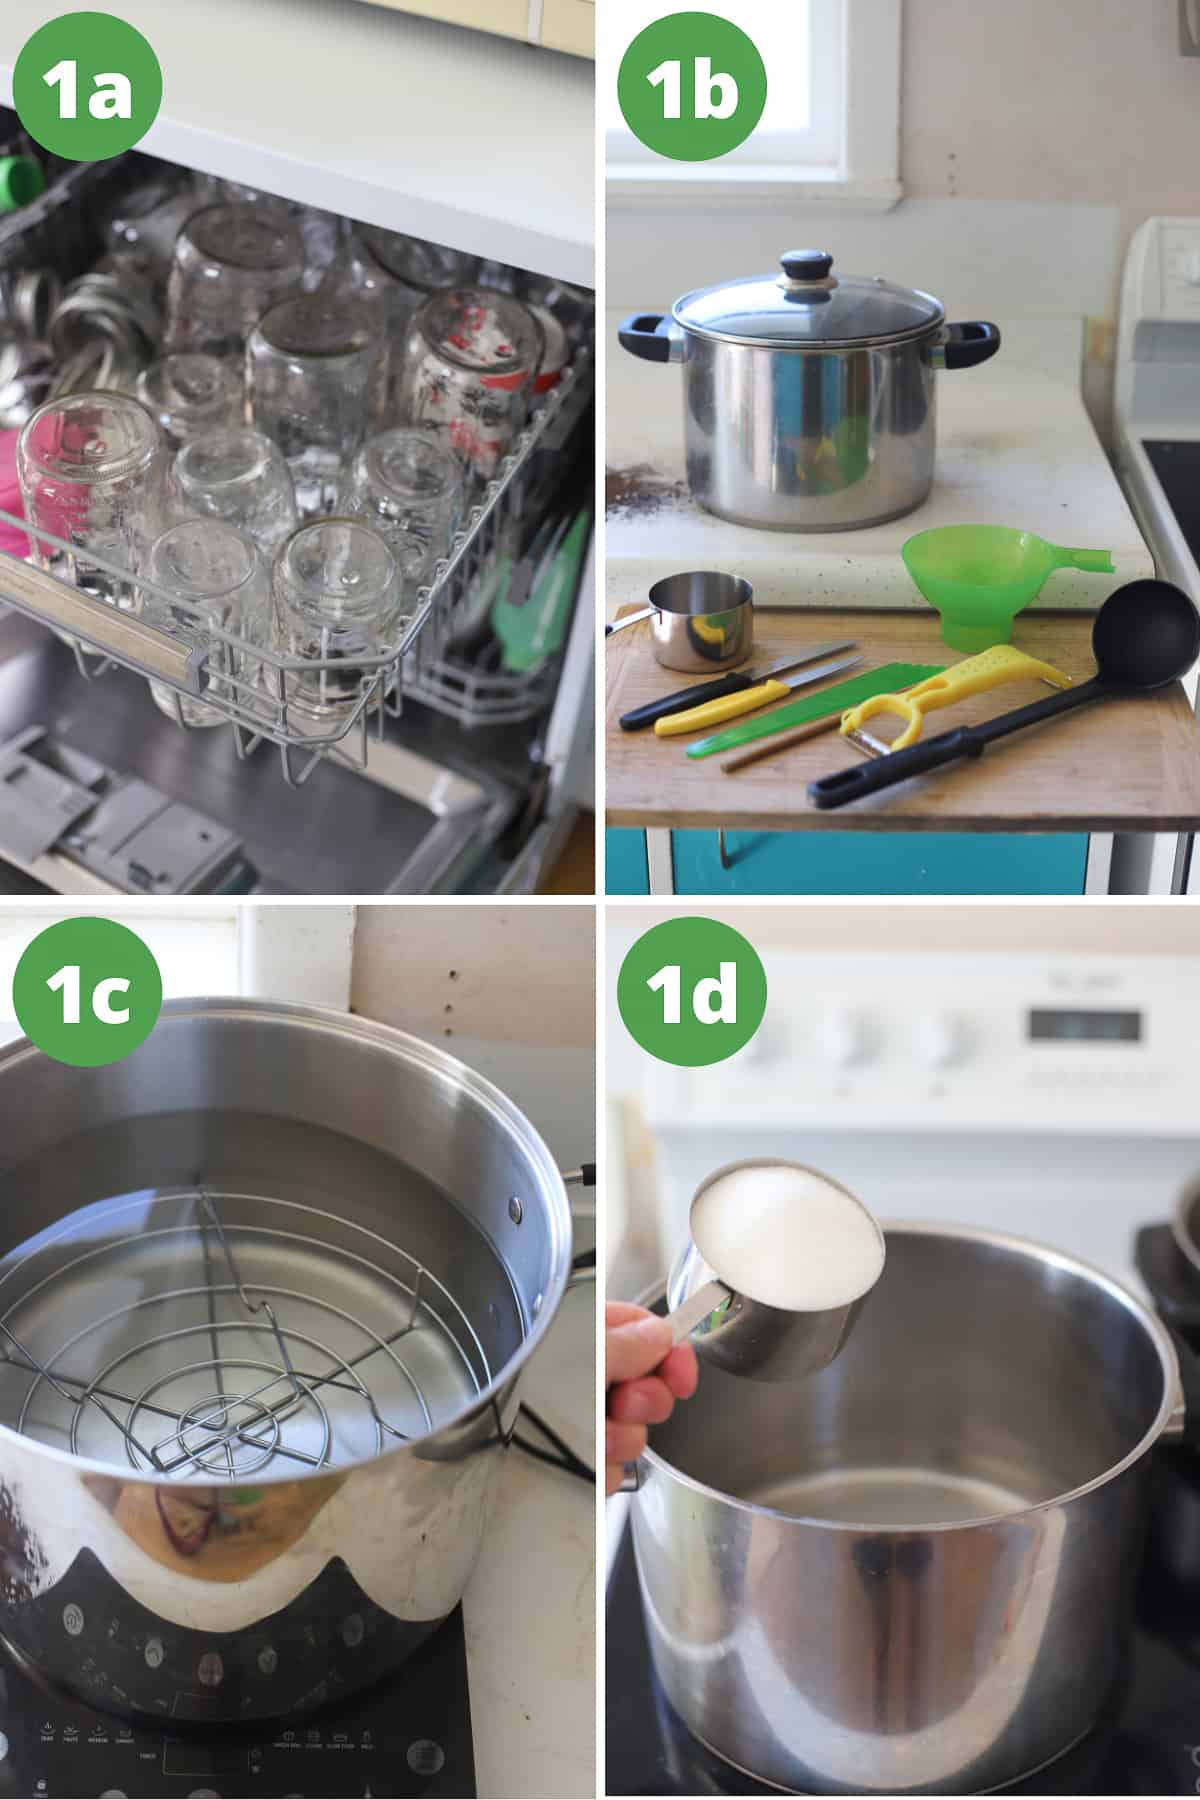
1a) Wash and sterilise jars
Wash jars well in warm soapy water and sterilise your jars. To sterilise the jars you can either run them through the dishwasher on sterilise cycle or place them in the water bath and boil for 10 minutes. Keeping the jars hot prevents them from breaking when filled with hot food. Lids and bands can be at room temperature, just make sure they are clean.
TIP: Always prepare more jars than you think you will need! There is nothing more annoying than running out of jars and having to wash/sterilise extras when you are mid way through the process!
1b) Prepare equipment
Get your kitchen equipment ready - tea towels, knives, peeler, chopping boards and anything else you think you might need.
1c) Prepare waterbath
Fill stockpot or water bath canner at least half-full with water. Cover and get it simmering - you will need enough water in the pot to cover the jars by 1 inch once they are in there.
1d) Make sugar syrup
Choose the sweetness of sugar syrup you prefer:
- Light syrup - 3 cups water to ½ cup sugar
- Medium syrup - 3 cups water to 1 cup sugar
- Heavy syrup - 3 cups water to 2 cups sugar
For peaches I prefer a medium syrup - it makes them nice and sweet without being sickly. And the juice makes fantastic jelly for the kids once the peaches have been eaten!
Add the sugar and water to a large pot and bring to the boil – boil for a couple of minutes until the sugar has dissolved and keep simmering until you are ready to use it. The liquid needs to be hot when it goes into the jars.
Step 2: Prepare peaches
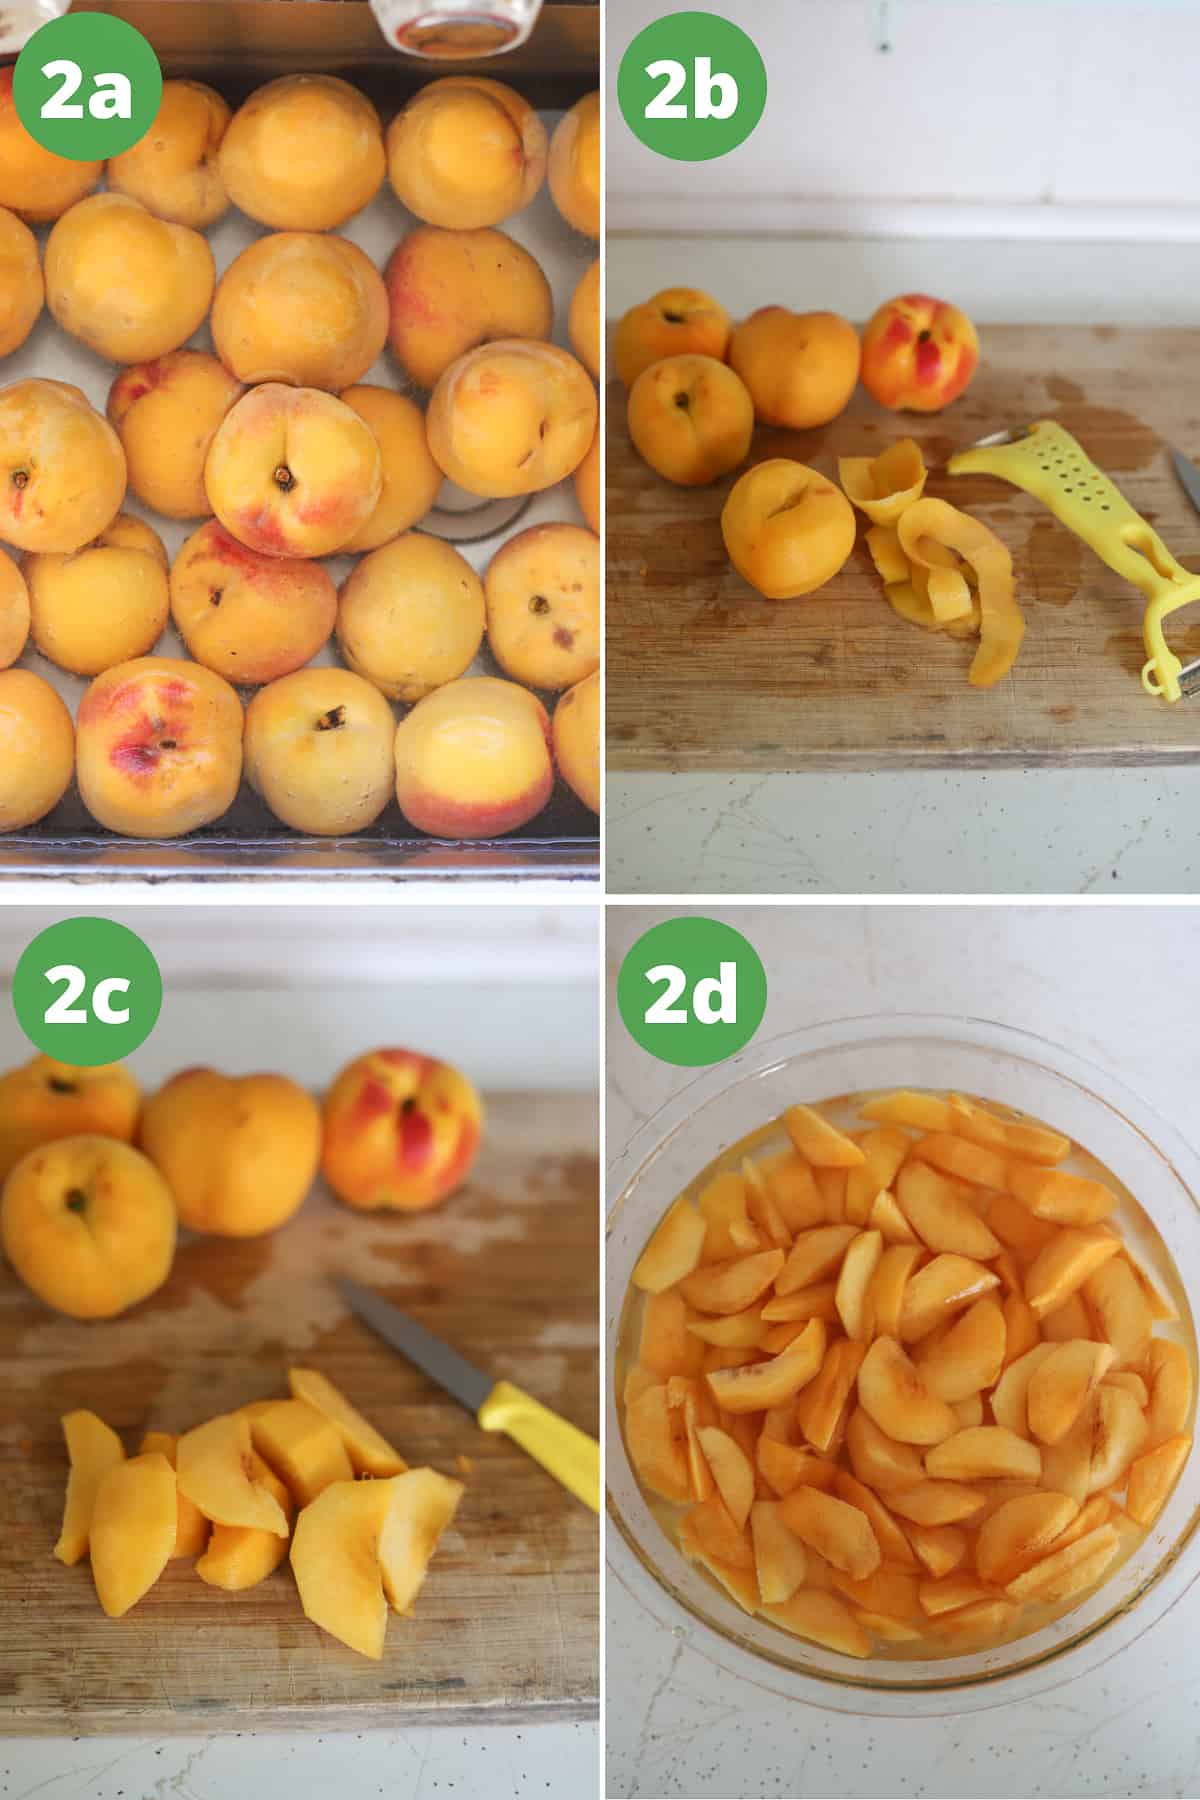
2a) Wash peaches
Even though you will peel the peaches, I still like to wash them first. Place the peaches in a sink full of cold water and lightly wipe them clean.
2b) Peel peaches
This may be controversial but I do not blanch my peaches to peel them! I'm not sure if it's the Golden Queen peaches but I have tried and tried cutting a cross in the bottom, blanching and plunging into ice water but I only end up getting frustrated with how hard they still are to peel.
I just use a good vegetable peeler and peel the skin right off the peaches. It's much quicker and much less fussing around for me!
If you really don't want to peel peaches, you can bottle them with the skins om but I prefer the my peaches peeled.
2c) Slice peaches
If you are bottling a freestone variety of peach that will just come away from the stone, you can halve the peaches and bottle them like that.
Golden Queen peaches are clingstone which means you need to slice the peach from around the stone. I like fairly thin sliced peaches so I slice each peach into about 8 slices.
2d) Place peach slices in lemon water
Fill a large bowl or container with cold water and squeeze in the juice from 1 lemon. As you slice the peaches, place them in the lemon water. This stops the slices from going brown while you are slicing the remaining peaches.
Step 3: Pack the jars
The important thing to remember when packing the jars is that both the jars and the fruit/syrup need to be hot. Pouring hot syrup into cold jars is when breakages happen, so make sure you leave the jars in either the dishwasher or oven until you are ready to use them. If you are new to preserving, it may help to fill one jar at a time with both fruit and syrup until you are confident to pack all the jars at once.
When it comes to packing the peaches you have 2 options:
- Hot pack
- Cold/raw pack
Hot pack - the peach slices are cooked in syrup and then packed into jars together. This slightly lessens the processing time and I find that the peaches fit better into the jars this way.
Cold/raw pack - the peach slices are packed into the jar and then you add the hot syrup. These jars require a slightly longer processing time.
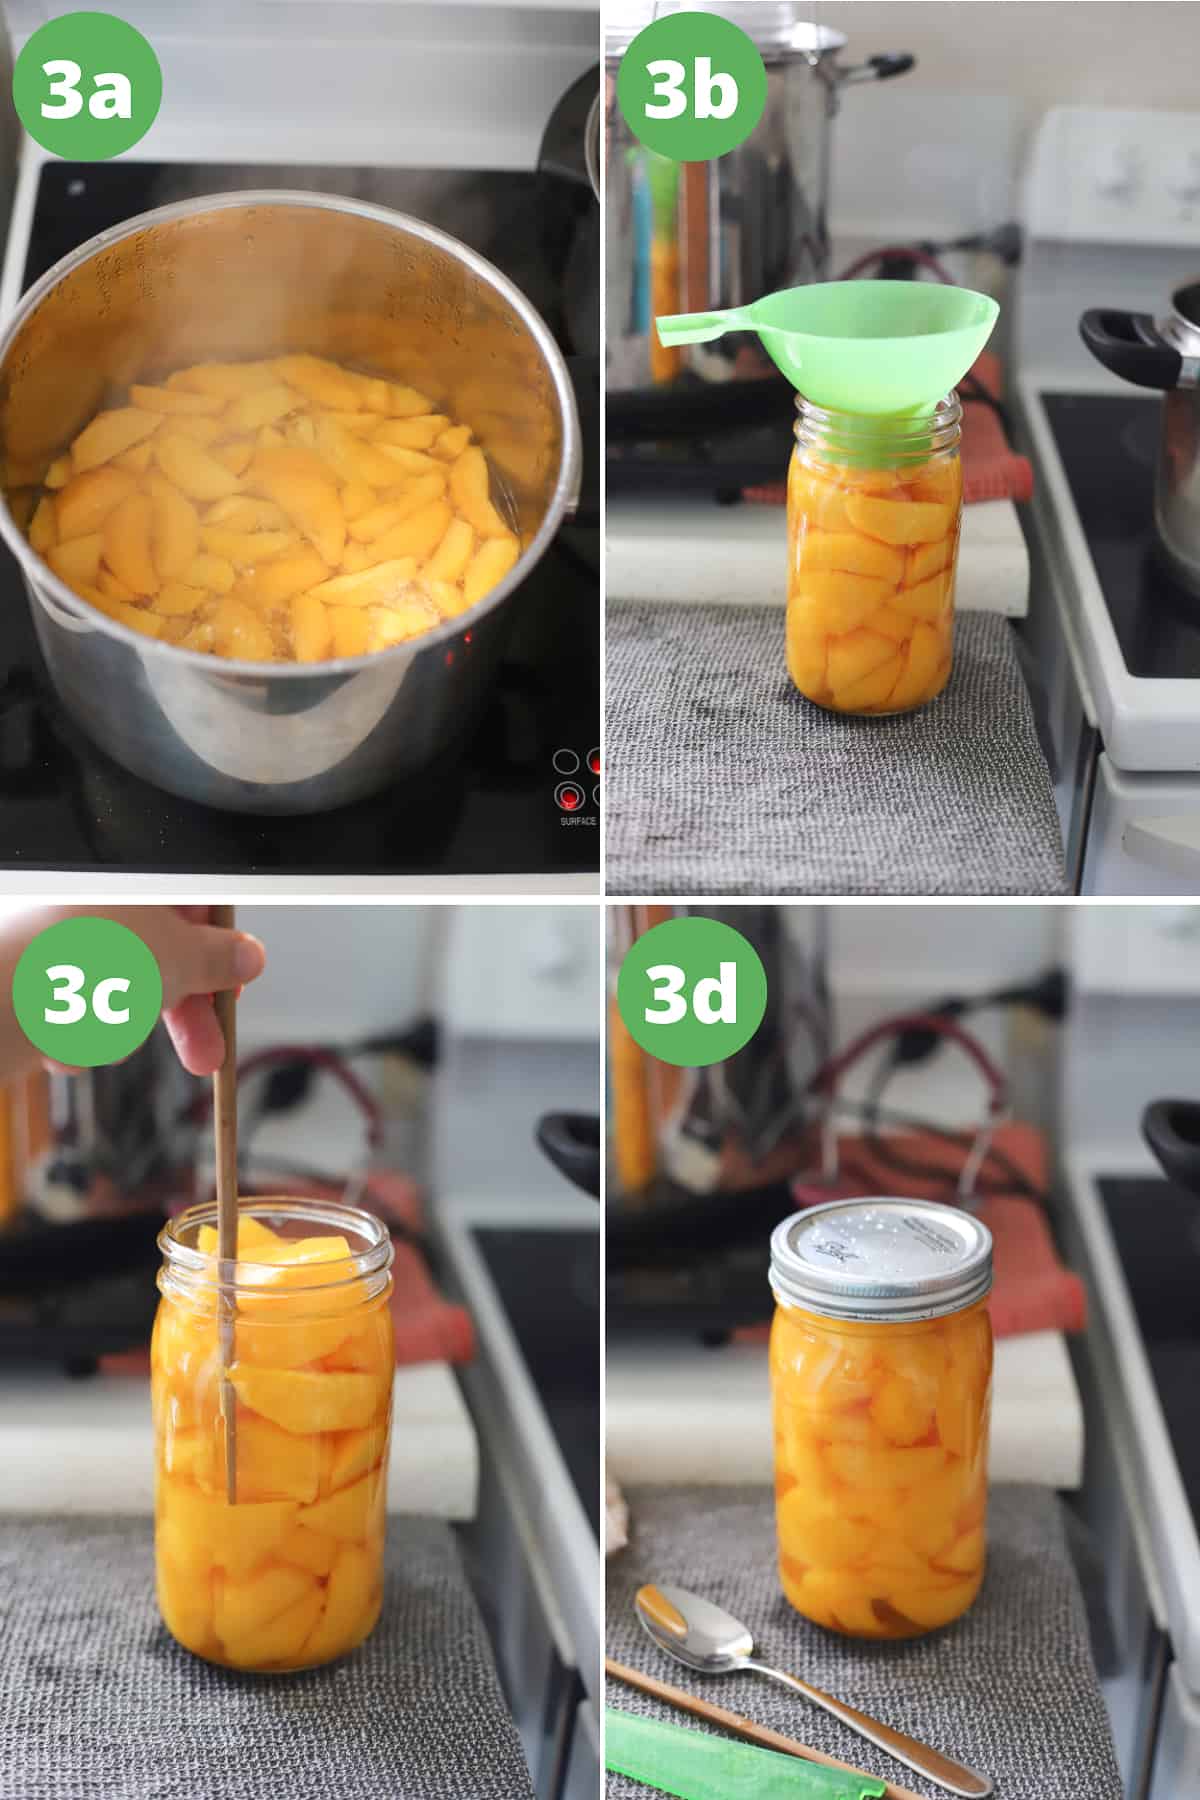
3a) Hot pack method only - cook the peach slices in the sugar syrup for 5 minutes
3b) Fill jars
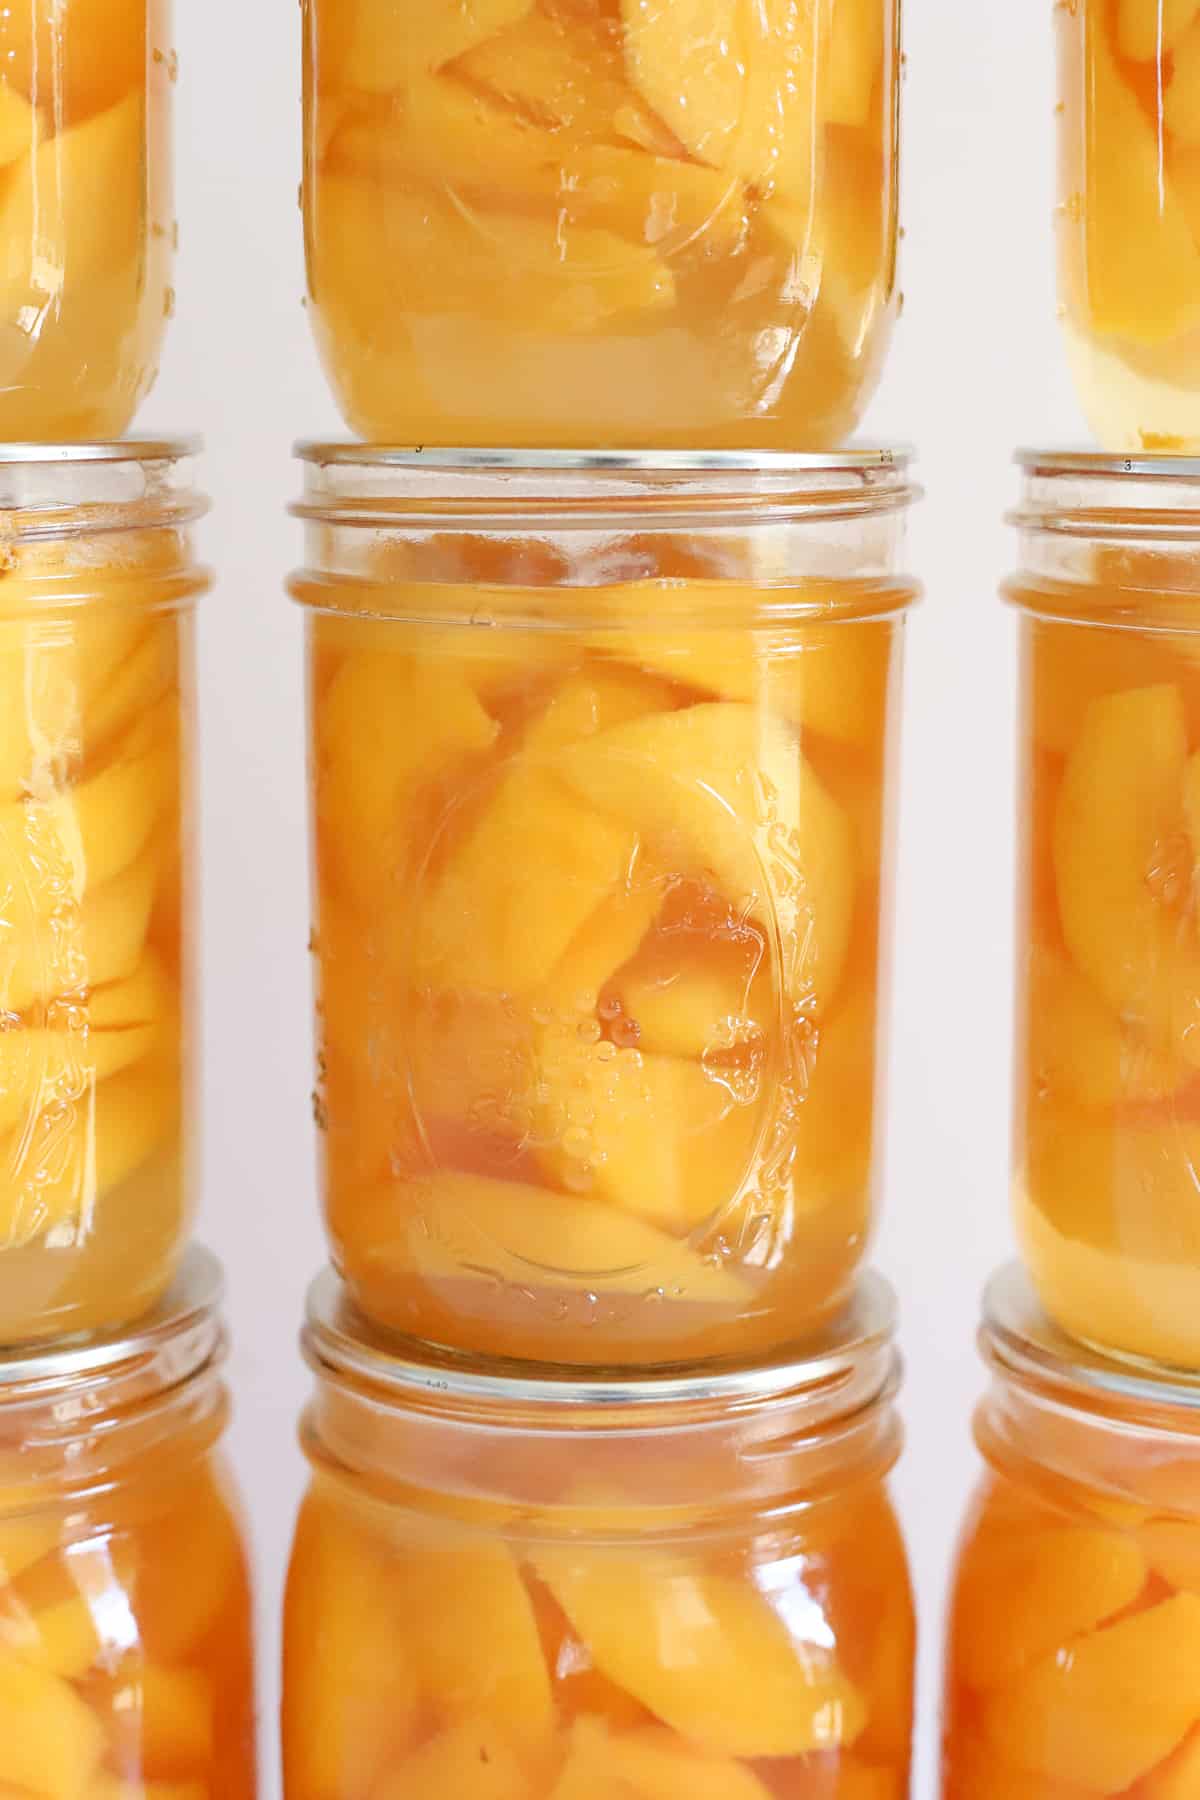
Use a slotted spoon to fill the jars with the cooked peach slices (hot pack method) or raw peach slices (cold/raw pack method) leaving 1-2cm at the top of the jar and top with the sugar syrup leaving 1.25cm (½ inch) at the top.
3c) Remove air bubbles & check headspace
Run a clean wooden chopstick or rubber spatula around inside the jar to release trapped air bubbles. You want to avoid knives as they can damage the glass.
Use a headspace checker or ruler to measure 1.25cm (½ inch) at the top of the jars. This amount of headspace is how the vacuum seal is created, sealing the jars.
3d) Wipe jars, put lids and bands on
Use a clean, damp cloth to clean any spillages from the mouth of the jar. Place the lid on the jar, apply the ring/band and adjust until fit is fingertip-tight (don't be tempted to screw it on too tight). Place the jar in the stockpot/canner.
Step 4: Process jars
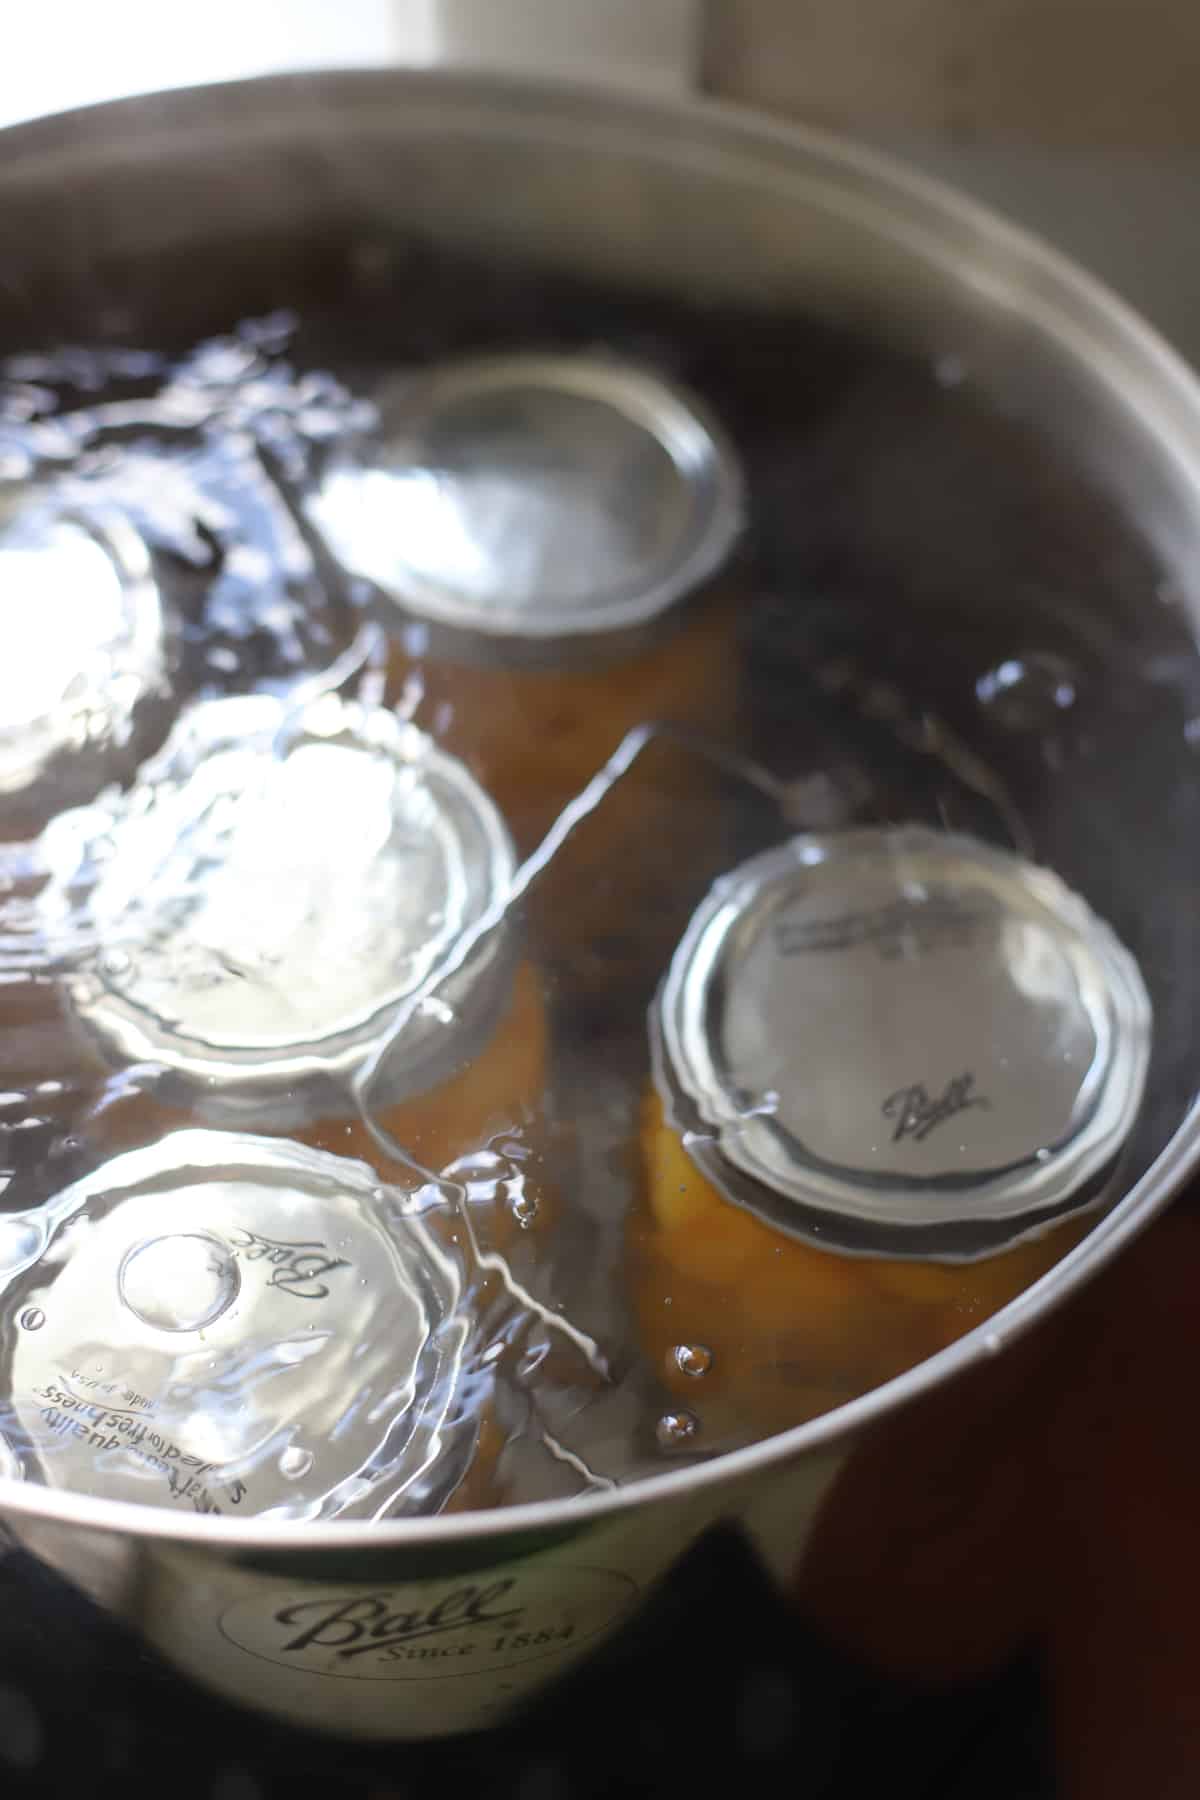
Once the jars have all been filled and are in the water bath, lower the rack so that the jars are submerged and are covered by at least 1 inch of water. Bring the water to a rolling boil and processs the jars for:
Hot pack
- 1L/quart jars - process for 25 minutes
- 500ml/pint jars - process for 20 minutes
Cold/raw pack
- 1L/quart jars - process for 30 minutes
- 500ml/pint jars - process for 25 minutes
Once the processing time is up, turn the heat off, lift the rack out of the water and leave the jars partially submerged for 5 minutes. This helps the jars adjust to the temperature outside of the water bath and can reduce siphoning.
After 5 minutes, use jar tongs to carefully remove the jars from the pot/canner and set on a clean tea towel on the bench (this is especially important if you have marble or granite benchtops as they can cause the hot jars to crack.)
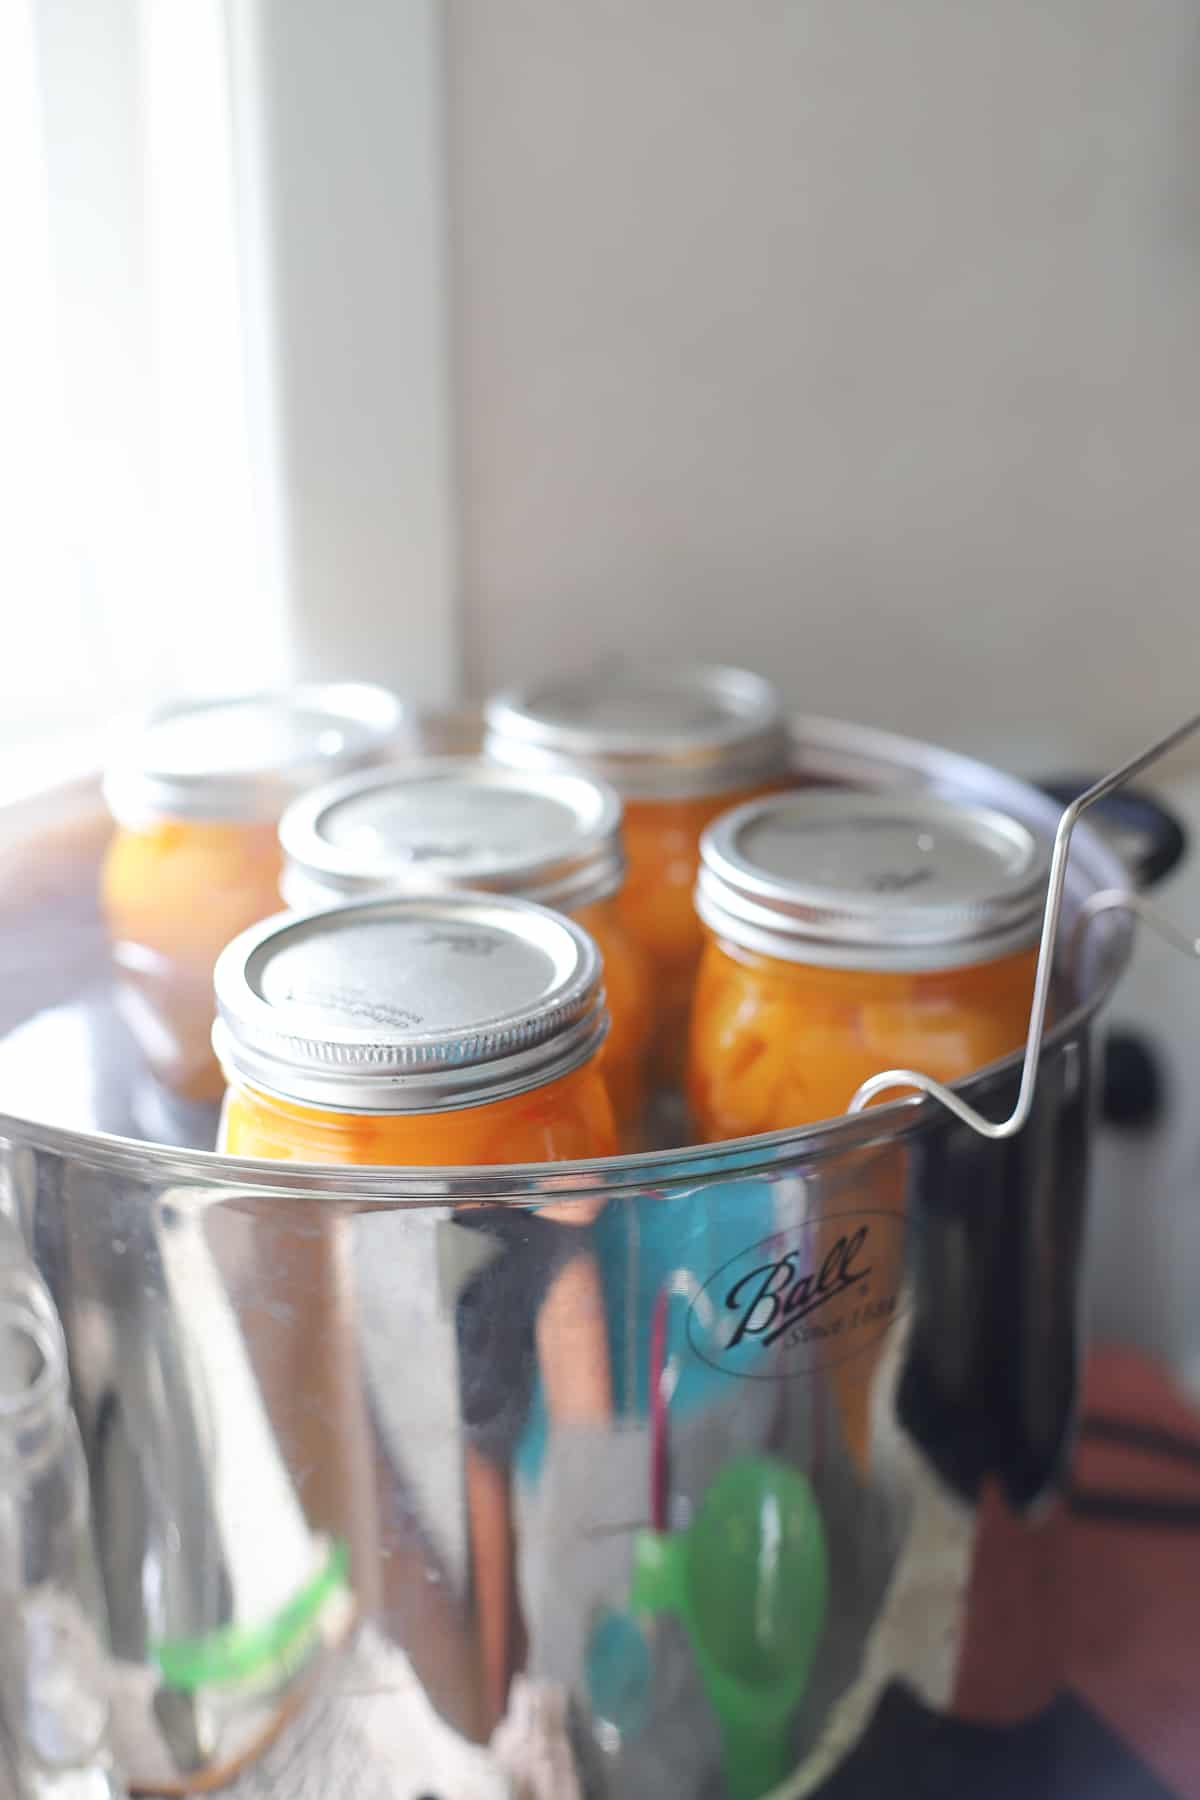
Step 5: Check the seals and store jars

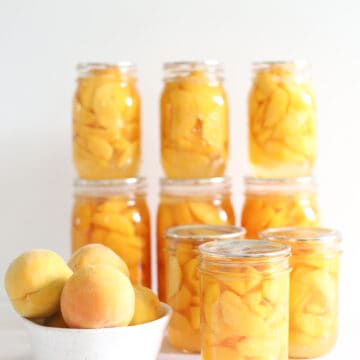
Leave jars undisturbed for 12 to 24 hours and hopefully you will start hearing the "ping" of lids sealing! When you press down on the centre of the lid, it should be concave and not flex. Remove the ring/band and try to prise the lid off with your fingers. If the jar has sealed properly, you won't be able to lift the lid. Wipe down the jars and lids (you don't need to store them with the rings/bands on) label the jars and store in a cool, dark place.
Sealed jars will last in the cupboard for years but the quality of the food will start to deteriorate over time. I work on most things being good for a couple of years. If the jar hasn't sealed in 24 hours, the contents of the jar needs to be either refrigerated and eaten within a couple of weeks or frozen.
FAQ's
Properly canned goods will last almost indefinitely on the shelf, but the quality will start to decline over time. I work on fruit being good for 2 or 3 years in the cupboard.
Occasionally jars will lose some of their liquid (called siphoning). This can be caused by the sudden change in temperature when jars are removed from the water bath and can sometimes happen in the water bath. As long as the jars have sealed properly, this is not a problem for storage, however I will use the jars with less liquid first.
Any jars that didn't seal need to be refrigerated and used within 7-10 days or frozen.
Yes, this is the same method I use to preserve all my fruit including plums, apricots and apple slices. The only thing that will change is the processing time
Yes you can, but I prefer not to. I don't tend to reuse jars for fruit simply because they're not big enough! But I definitely prefer to use Ball Mason or Agee jars that have new seals as this way, I am certain that I am using the best jars I can with the highest chance of them sealing and being safe. If you are not lucky enough to have inherited jars from your mum or Grandma (thanks Mum!) you can buy Agee (or Perfit) jars and seals at the supermarket or from Kiwi Family Kitchen (where I buy all my preserving equipment). She also stocks Ball Mason jars which are my preferred jars.
You can fill the jar with as many or as few peaches as you like, however you must make sure the jar is completely topped up with sugar syrup, leaving only ½ inch headspace. The reason for this is that this is the correct amount of headspace needed to form a vacuum seal. Any less liquid in the jars and you risk the jars not sealing.
No you don't. I have bottled peaches with the skins on and they are absolutely fine, I just prefer the overall texture of peeled peaches - they are much softer! If you are not peeling the peaches, just make sure they are very clean.


If you want more simple + delicious made from scratch recipes, subscribe to my newsletter and follow along on Facebook, Pinterest and Instagram
How to bottle peaches
Equipment
- Water bath canner
Ingredients
- 5.5 kilograms peaches (about 40 medium peaches) (I like Golden Queens)
- 6 cups water
- 1.5 cups sugar (see notes)
Instructions
Step 1: Get prepared
1a) Wash and sterilise jars
- Wash jars well in warm soapy water and sterilise your jars. To sterilise the jars you can either run them through the dishwasher on sterilise cycle or place them in the water bath and boil for 10 minutes. Keeping the jars hot prevents them from breaking when filled with hot food. Lids and bands can be at room temperature, just make sure they are clean.
- TIP: Always prepare more jars than you think you will need! There is nothing more annoying than running out of jars and having to wash/sterilise extras when you are mid way through the process!
1b) Prepare equipment
- Get your kitchen equipment ready - tea towels, knives, peeler, chopping boards and anything else you think you might need.
1c) Prepare waterbath
- Fill stockpot or water bath canner at least half-full with water. Cover and get it simmering - you will need enough water in the pot to cover the jars by 1 inch once they are in there.
1d) Make sugar syrup
- Add the sugar and water to a large pot and bring to the boil – boil for a couple of minutes until the sugar has dissolved and keep simmering until you are ready to use it. The liquid needs to be hot when it goes into the jars.
Step 2: Prepare peaches
2a) Wash peaches
- Place the peaches in a sink full of cold water and lightly wipe them clean.
2b) Peel peaches
- Peel the peaches using a vegetable peeler (or blanching them if you prefer that method)
2c) Slice peaches
- Slice peaches into thin slices or halves, depending on how you prefer them.
2d) Place peach slices in lemon water
- Fill a large bowl or container with cold water and squeeze in the juice from 1 lemon. As you slice the peaches, place them in the lemon water. This stops the slices from going brown while you are slicing the remaining peaches.
Step 3: Pack the jars
- Hot pack - the peach slices are cooked in syrup and then packed into jars together. This slightly lessens the processing time and I find that the peaches fit better into the jars this way.
- Cold/raw pack - the peach slices are packed into the jar and then you add the hot syrup. These jars require a slightly longer processing time.
3a) Hot pack method only
- Cook the peach slices in the sugar syrup for 5 minutes
3b) Fill jars
- Use a slotted spoon to fill the jars with the cooked peach slices (hot pack method) or raw peach slices (cold/raw pack method) leaving 1-2cm at the top of the jar and top with the sugar syrup leaving 1.25cm (½ inch) at the top.
3c) Remove air bubbles & check headspace
- Run a clean wooden chopstick or rubber spatula around inside the jar to release trapped air bubbles. You want to avoid knives as they can damage the glass.
- Use a headspace checker or ruler to measure 1.25cm (½ inch) at the top of the jars. This amount of headspace is how the vacuum seal is created, sealing the jars.
3d) Wipe jars, put lids and bands on
- Use a clean, damp cloth to clean any spillages from the mouth of the jar. Place the lid on the jar, apply the ring/band and adjust until fit is fingertip-tight (don't be tempted to screw it on too tight). Place the jar in the stockpot/canner.
Step 4: Process jars
- Once the jars have all been filled and are in the water bath, lower the rack so that the jars are submerged and are covered by at least 1 inch of water. Bring the water to a rolling boil and process the jars for:
Hot pack
- 1L/quart jars - process for 25 minutes
- 500ml/pint jars - process for 20 minutes
Cold/raw pack
- 1L/quart jars - process for 30 minutes
- 500ml/pint jars - process for 25 minutes
- Once the processing time is up, turn the heat off, lift the rack out of the water and leave the jars partially submerged for 5 minutes. This helps the jars adjust to the temperature outside of the water bath and can reduce siphoning.
- After 5 minutes, use jar tongs to carefully remove the jars from the pot/canner and set on a clean tea towel on the bench (this is especially important if you have marble or granite benchtops as they can cause the hot jars to crack.)
Step 5: Check the seals and store jars
- Leave jars undisturbed for 12 to 24 hours and hopefully you will start hearing the "ping" of lids sealing! When you press down on the centre of the lid, it should be concave and not flex. Remove the ring/band and try to prise the lid off with your fingers. If the jar has sealed properly, you won't be able to lift the lid. Wipe down the jars and lids (you don't need to store them with the rings/bands on) label the jars and store in a cool, dark place.
- Sealed jars will last in the cupboard for years but the quality of the food will start to deteriorate over time. I work on most things being good for a couple of years. If the jar hasn't sealed in 24 hours, the contents of the jar needs to be either refrigerated and eaten within a couple of weeks or frozen.
Notes
- Light syrup - 3 cups water to ½ cup sugar
- Medium syrup - 3 cups water to 1 cup sugar
- Heavy syrup - 3 cups water to 2 cups sugar
If you tried and loved this recipe, please leave a comment and a rating below!

Candice says
Hi, I’m pretty sure I’ve done it all right but I still have air bubbles in the tops of my jars of plums (cold packed with hot syrup and boiled about 20 -25 mins each). The jars came out looking like the seals were already slightly concave on top but I am leaving them on the bench undisturbed for 12 hours. I’m worried about the air bubbles though….
Laura says
As long as the jars have sealed, don't worry about the air bubbles! Mine often have them too!
Jacqui says
Hi, do I keep topping water level in the pan up as the time goes on or is this not necessary? Thanks
Laura says
It shouldn't be necessary but if the water level does drop so that there is less than 2.5cm water above the jars, you would need to top up with boiling water - I would pour it in straight out of the jug to keep it up to temperature
DarBar says
Excellent. Great texture. Taste. Instructions are clear and concise.
Heather says
Can I use honey instead of sugar?
Laura says
Yes you can!
Hannah says
Hi there- just a newbie canner trying to preserve my horde of peaches without killing anyone.. seeing as these are not pressure canned, should the syrup be of a certain strength in order to prevent growth of botulism/botulinum toxin? From what I've read online, relying on sugar content alone a syrup must be at least 1.4:1 sugar:water in order to reduce the water activity to below 0.91. By all my calculations even the heaviest syrup listed here is nowhere near that ratio. Are we also then relying on acidity from the lemon juice? Or are we just rolling the dice..
Laura says
Hi Hannah! Newbie canning can be super overwhelming!
The first thing you need to know is that when water bath canning, only foods that are high enough in acid can be safely canned. Peaches are a high acid food, so they can safely be water bath canned without relying on any extra acid. In this case, the sugar is purely for taste, it has no impact on the acidity level of the jar.
If a certain food does need extra acid to adjust the pH level to make it safe for canning, such as tomatoes, that will come in the form of vinegars added to relishes, or citric acid/bottled lemon juice added to each jar of tomatoes to adjust the pH level to make it safe.
I would recommend reading up on my water bath posts or checking out a website like Ball preserving which explains this all really well!
And feel free to email me if you need any more help!
Laura
Mia says
Hey Laura
I’m keen to give this a go! I don’t have a preserving bath can I just use a regular old stock pot to process the peaches? I don’t need to use a rack or anything to keep them touching the bottom? Thanks
Laura says
A regular stock pot is perfect! You will just need to use something to keep the jars off the bottom of the pot but you can use canning rings, an oven rack, one of those metal pizza plates with the holes in it, or even a tea towel (which is a little messy, but still does the job!)
Sonja says
Three out of five jars have buckled lids after the water bath. I'm not sure if I filled the jars too much (I'm used to the overflow method) or the lids were a tiny bit too small for the jars (old jars - new lids). Also, it was really hard to know when it came to the boil as my pot was so big. Your thoughts?
Laura says
Hi Sonja, you definitely need to make sure you leave the correct amount of headspace in the jars and as for the lids - it shouldn't matter if the lids are new and the jars are old as long as the lids are the right size for the jars you are using. What jar/lid combo did you use?
Janelle says
Hi Laura,
I’m keen to give preserving ago! Would your process times be the same for pears?
Thanks!
Laura says
Hi Janelle, yes I use the same times for pears!