A step by step guide to preserving food using the water bath canning / preserving method. A list of the equipment needed, why it is important and exactly how to do it!
I know, I know, back in the day our grandmothers all just filled up their jars, popped a lid on and called it a day. Nobody died (we hope!) and it was all good.
Well fast forward to today and we now know just a little bit more about how to process food safely to help it store longer and taste better.
Up until a several years ago, I had never even heard of the water bath method of canning or bottling. I did it just like my mum and grandmothers had done it - either using the overflow method or the microwave, which were typical methods for a household preserver in New Zealand. Nothing bad happened, a few jars here and there didn't seal, but no problems - they just went into the fridge.
But then I started reading about the water bath method of preserving and I learnt a few things:
- In America (where they have home canning guidelines, something we don't in New Zealand) the water bath method is the recommended way to preserve jars of food.
- It is totally scientific and based around heating the high acid food in a jar to a specific temperature to ensure that it is safe.
- It adds an extra level of protection and I have found that I have a much higher seal rate using this method.
- It is an extra step but it's not hard and you can use equipment you probably already have
So let's get into it - here is everything you need to know about the water bath canning method
What is the water bath method?
The water bath method is basically processing filled jars of food to be preserved in a large pot full of boiling water, bringing it to a rolling boil and then processing (leaving in the water) for the appropriate number of minutes required before removing from the water and allowing to cool on the bench as the jars seal.
Why do I need to water bath my bottles and jars?
The reason for water bath canning is to heat the contents of the jars to a high enough temperature to kill any bacteria, to seal the jar to make sure nothing can get into the jars and to ensure they can be safely stored at room temperature.
How does it work?
Water bath canning can only be used for high acid foods as the high acid environment is inhospitable to mould, yeast, bacteria and enzymes.
The jar of food to be preserved is placed in the boiling water bath for long enough to heat the contents of the jar to 100°C (212°F) killing any microorganisms that may be in the food. The heat expands the food, pushing out the air that is in the jar. When the jar is removed from the water bath and cools down, it contracts and forms a vacuum seal. This sealed environment keeps out microorganisms that could spoil the food.
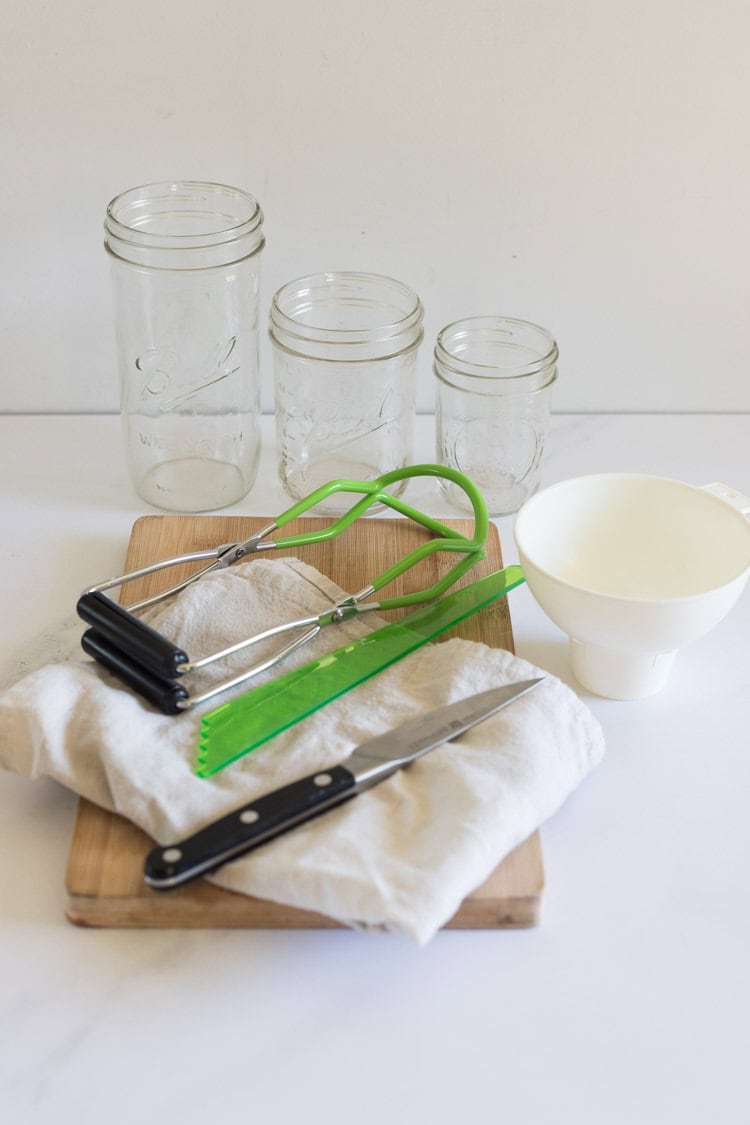
What equipment do I need?
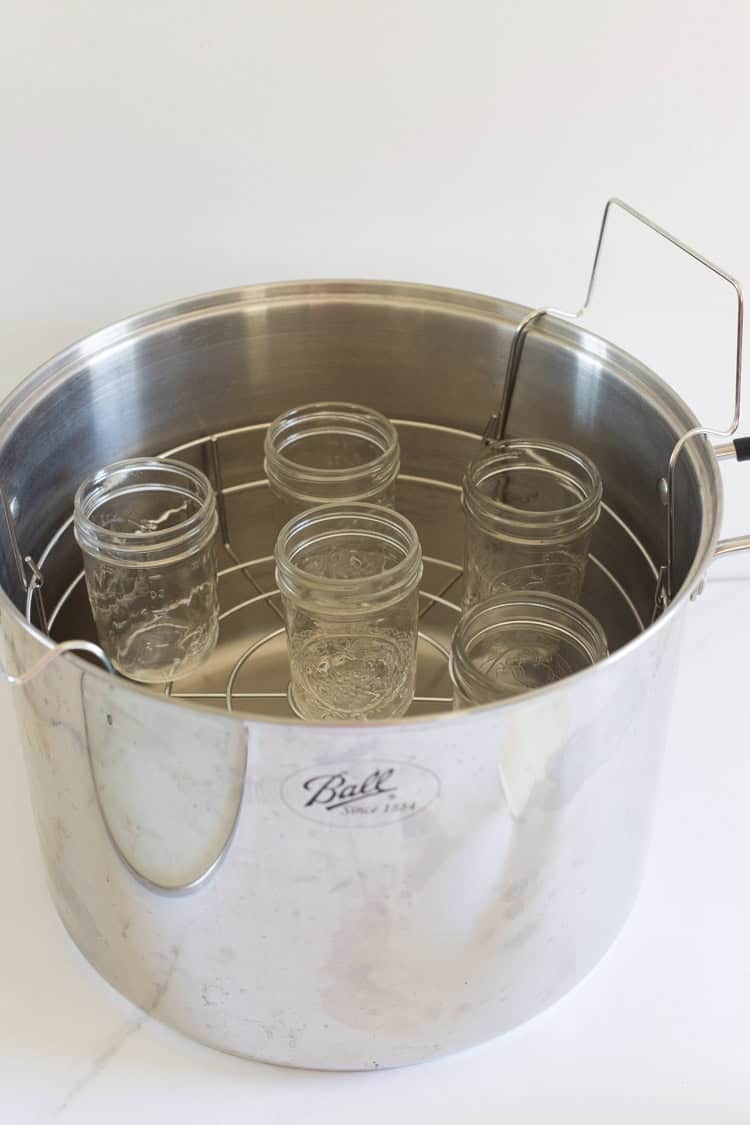
- A large stock pot with a lid - the pot needs to be tall enough for the jars to be covered with about 2.5cm of water for processing
- A rack/trivet that fits in the pot - you need something to keep the jars from directly sitting on the bottom of the pot. I have a rack that lifts out (highly recommend!) but when I was getting started, I used a tea towel in the bottom of the pot. It was a bit fiddly but did the job. If you can find a cooling rack that fits in your pot, that would work too, otherwise tie together extra bands/rings from jars that you won't be using and place them in the pot!
- Jar lifting tongs - not essential but they make it a whole lot easier!
Several years ago I splashed out on a Ball water bath canning kit from Kiwi Family Kitchen and I love it! Unfortunately these kits are no longer available. If you are planning on doing a fair bit of preserving, a large stock pot is a great investment but you would need to do some searching to find one.
Another option is to buy a pressure canner - this can be used for pressure canning low acid food (more on this another time) but also as a water bath canner, so if you can't find an appropriate stock pot, this is a great option to look at.
Do all foods need to be processed using a water bath?
Any food that you want to store in the cupboard should be processed using the water bath method. I have preserved jams, chutneys, pickles and fruit for years without using this method and have had very little trouble but I now use it for everything. I have better luck with more jars sealing using this method and I love the guarantee that my jars have been correctly processed and that they are safe for storing and eating.
What foods can't be processed using a water bath?
The water bath method is safe for processing high acid foods - any food that has a pH lower than 4.6. There are some fruits and vegetables that are lower in acid such as tomatoes and these require having citric acid added to the jars to get them to a safe level.
Low acid foods including meat, poultry, seafood and some vegetables can't be preserved using the water bath method, they require a much higher temperature and must be pressure canned.
How do I know which foods are safe to process using a water bath?
Basically, anything that you are preserving using the overflow method is going to be suitable for water bath canning:
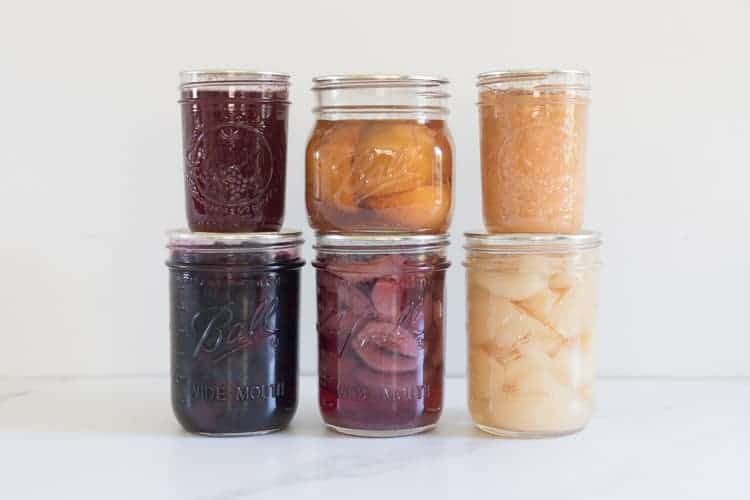
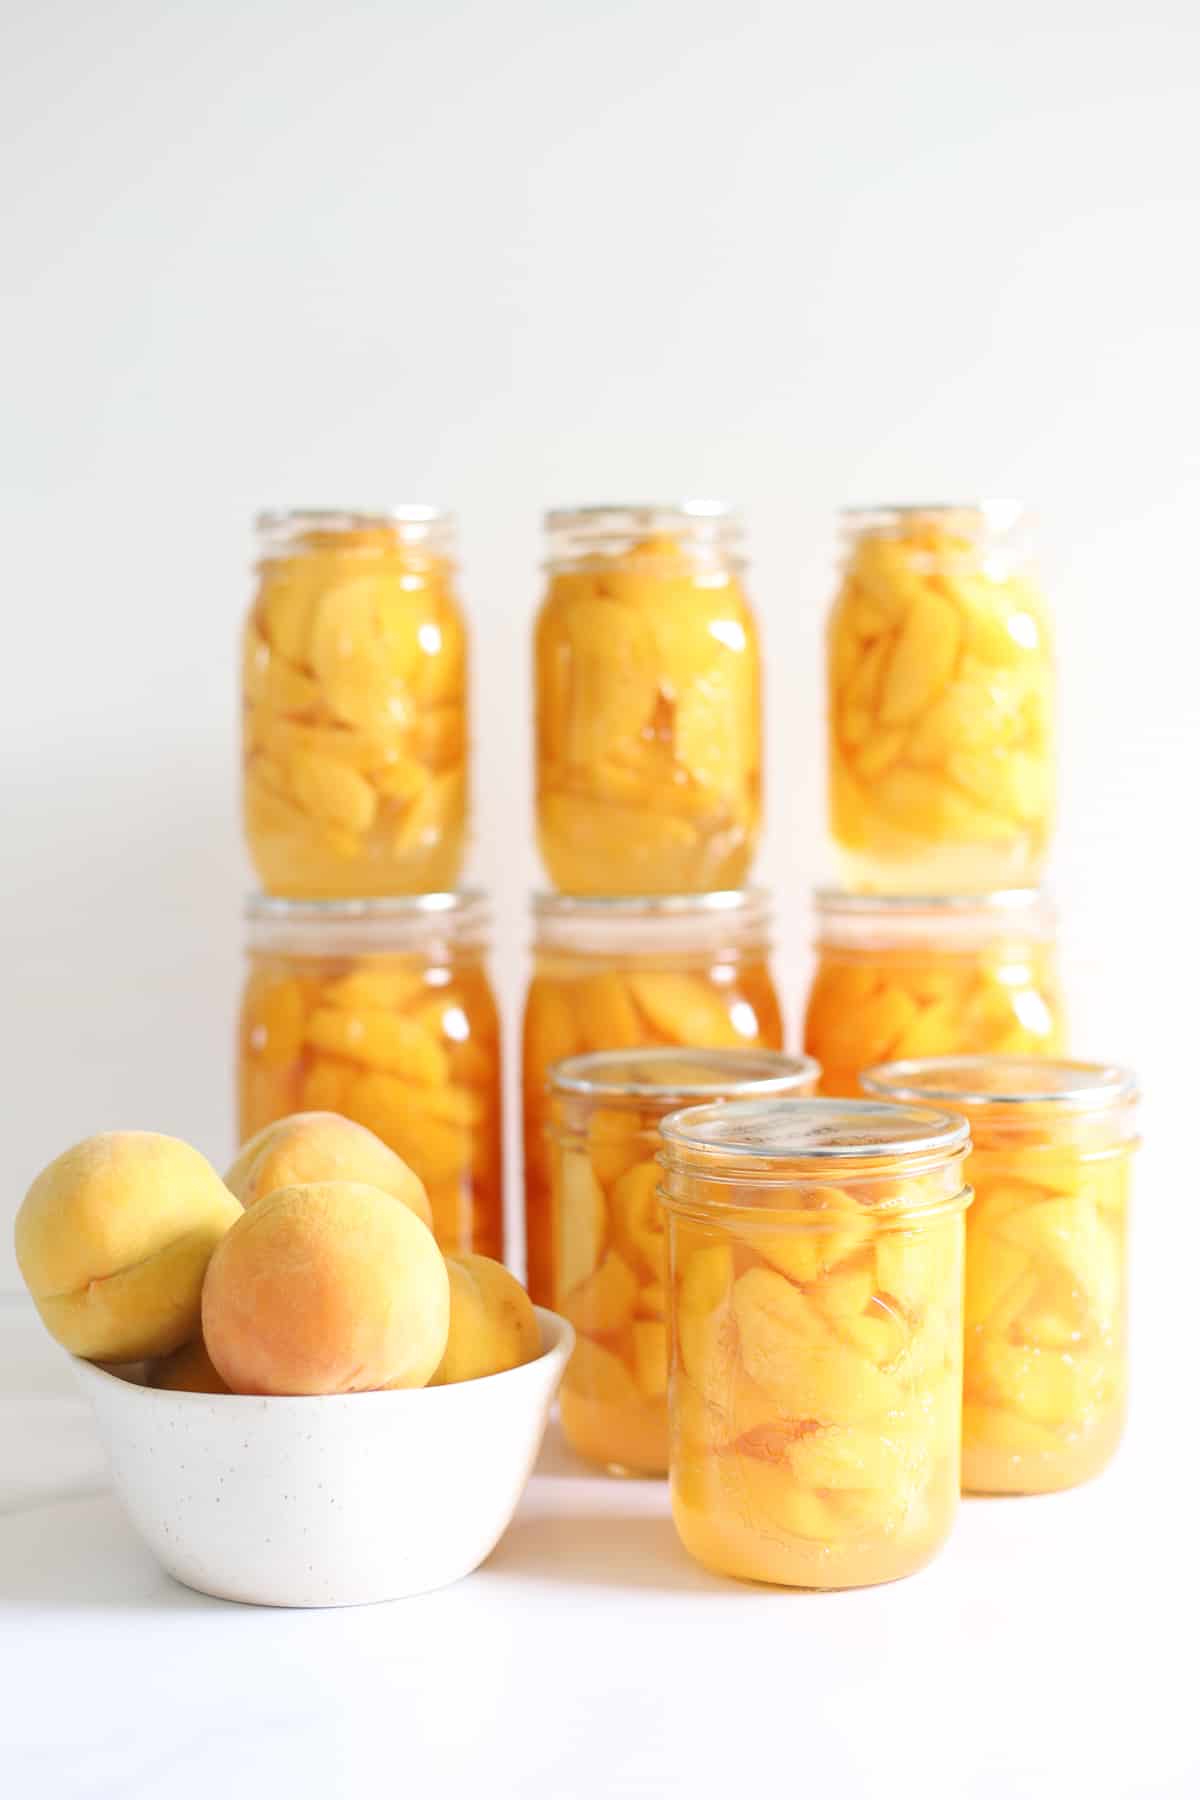
- Fruit, such as peaches and fruit juices
- Jams and jellies
- Tomato salsa
- Diced tomatoes (although these are the lower end of the safe pH scale so need citric acid added to them before canning)
- Pickles such as bottled gherkins, relishes and chutneys
- Sauces and pie fillings (as long as they don't contain flour or cornflour as a thickener)
Step by step method for water bath canning
Note: It is important to use a tested recipe when it comes to water bath canning. This is to make sure that the food in the jar has a high enough acidity level to be processed and stored safely. Before starting, read through the recipe and instructions and ensure you follow guidelines for preparation, jar size, preserving method, and processing time.
This is the method that I follow based on information from my Ball Canning book
Step 1. Prepare the water bath
Fill stockpot or water bath canner at least half-full with water. Cover and get it simmering - you will need enough water in the pot to cover the jars by 1 inch once they are in there.
Step 2. Prepare your jars
Check your jars for cracks or breakages as this can prevent sealing or cause the jars to break. Check that you are using new lids/seals and that the rings/bands fit on your jars. Wash everything in hot, soapy water.
Step 3. Sterilise your jars
To sterilise jars you can either run them through the dishwasher on sterilise cycle, heat them in the oven or place them in the water bath for 10 minutes before filling them with food. Keeping the jars hot prevents them from breaking when filled with hot food. Lids and bands can be at room temperature, just make sure they are clean.
If the jars have a processing time of more than 10 minutes, it is actually not necessary to sterilise the jars first, they just need to be clean. Because the jars need to be hot when you are filling them, I still prefer to place them in the water bath until I am ready for them.
Step 4. Prepare the food
Prepare the food for preserving according to the recipe.
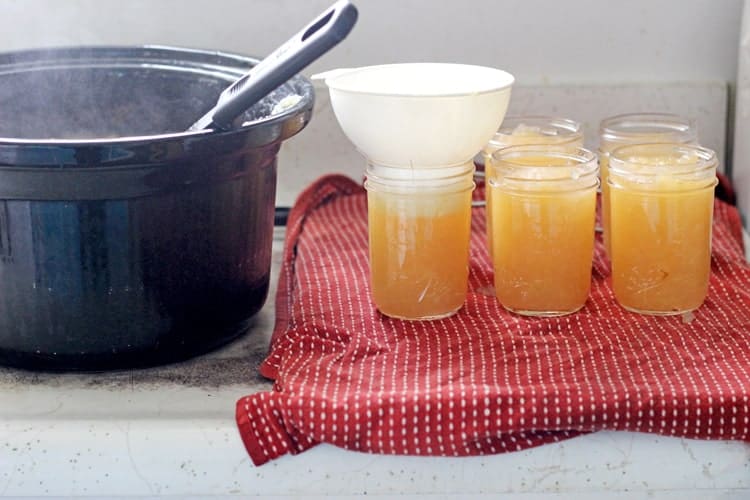
Step 5. Fill the jars
Fill one jar at a time with prepared food using a canning funnel (if you have one), making sure to leave head space at the top as recommended in recipe.
Remove any air bubbles from the jar by sliding a clean wooden chopstick or rubber spatula (you want to avoid knives as they can damage the glass) between the jar and food to release trapped air.
Use a clean, damp cloth to clean any spillages from the mouth of the jar.
Place the lid on the jar, apply the ring/band and adjust until fit is fingertip-tight (don't be tempted to screw it on too tight).
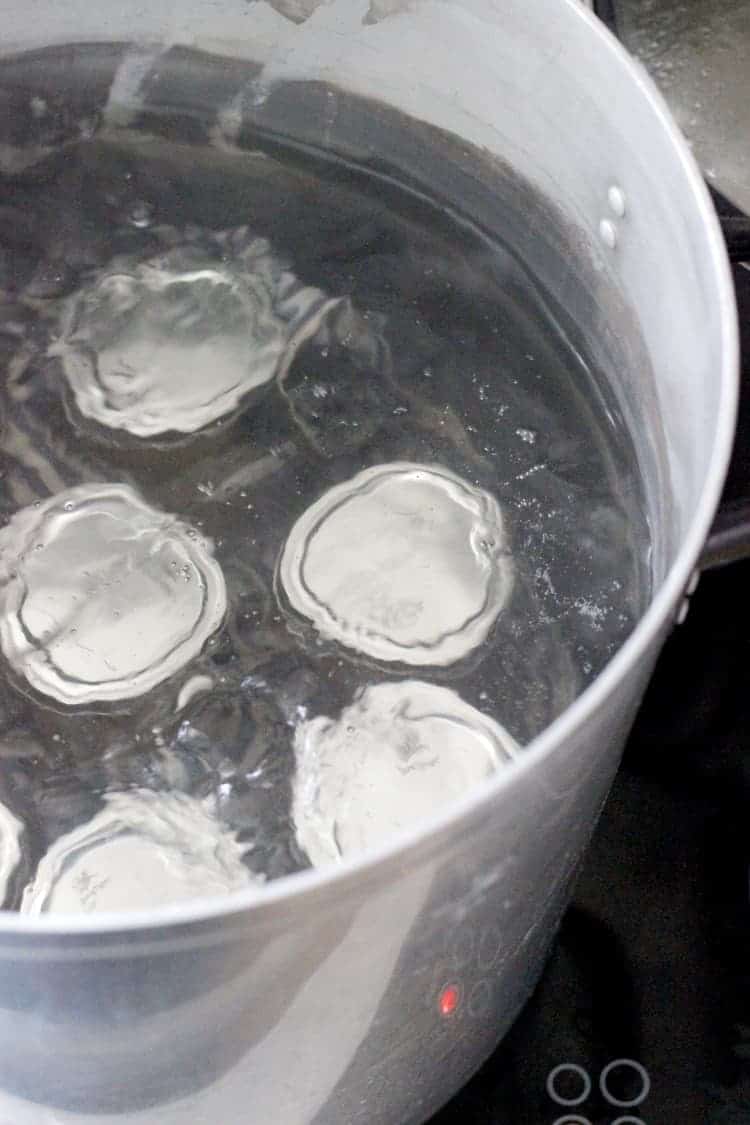
Place the jar in the stockpot/canner. Repeat until all jars are filled. Make sure the water covers the jars by at least 1 inch (2.5cm).
Step 6. Process the jars
Place the lid on water bath canner and bring water to a rolling boil. Process for the time stated in the recipe. When the time is up, carefully remove the jars from the pot/canner and set on a clean tea towel on the bench (this is especially important if you have marble or granite bench tops as they can cause the hot jars to crack.) Leave jars undisturbed for 12 to 24 hours and hopefully you will start hearing the "ping" of lids sealing!
Step 7. Check that the jars have sealed
When you press down on the centre of the lid, it should be concave and not flex. Remove the ring/band and try to prise the lid off with your fingers. If the jar has sealed properly, you won't be able to lift the lid.
Wipe down the jars and lids (you don't need to store them with the rings/bands on) label the jars and store in a cool, dark place. Sealed jars will last in the cupboard for years but the quality of the food will start to deteriorate over time. I work on most things being good for a couple of years.
If the jar hasn't sealed in 24 hours, the contents of the jar needs to be either refrigerated and eaten within a couple of weeks or frozen.
Step 8: Label your jars
Don't think that you will just remember what is in the jars! You'll be amazed at how things look similar and if nothing else, it's good to have dates on them so you know which jars to use first.
I like to write the date and the contents of the jar on the lid.
So there it is - a run down of what you need to know before embarking on your water bath canning journey! If you have any further questions, please leave a comment below and also check out the following resources that I have found especially helpful.
Recommended resources:
- The Kiwi Country Homestead Membership
- Food in Jars - website and books
- The All New Ball Book of Canning and Preserving (affiliate link)
- Ball Blue Book of Canning and Preserving
- Kiwi Family Kitchen for preserving equipment in New Zealand
Other FAQ's
There are many reasons jars don't seal but the main reasons are:
- The jars haven't been heat processed for long enough
- Wrong amount of head space left, either too much or not enough
- Screwing the band on either too tightly or not tight enough
- Food left on the jar rim - make sure to wipe the rim clean before placing the lid on
You can try to reseal them by basically starting over - empty the contents of the jars that haven't sealed back into the pot to reheat, clean out and sterilise the jars and start with new lids. Continue the process according to the recipe
Yes you can but in my experience, I have always had limited success using old supermarket jars.
I highly recommend using proper preserving jars with a band and a new seal. It is an investment but if you check Trademe, look in op shops or ask around, you can start to build up a collection. My collection includes my Grandma/Mum's old Agee jars and new Ball Mason jars purchased from Kiwi Family Kitchen (these are my favourite jars!)
Yes! You can reuse your jars and rings/bands over and over but you need to use brand new lids/seals each time. The reason for this is that a properly sealed jar can only be opened using a can opener, which damages the lid making it unusable again.

Lucy Murdock says
Hi Laura
I know this is old but if I’m using screw top preserving jars how do I know if they have sealed. As they don’t have the button
Thanks
Lucy
Laura says
That's a tricky one, there's not really a foolproof way to tell if they have sealed without a button which is why I would recommend using either a 2 piece system with a seal and a ring or a screw top lid with a button
angus says
Kia Ora, you mention that if jars don't seal it could be because one has left too much or too little headroom above the contents which is fair enough, however unless I have missed something you haven't advised (other than saying 'according to the recipe') what is a good amount of headroom? Is it a height or a percentage, is it linked to surface area or do you have a general amount you leave.... All thanks from the UK
Laura says
Hi Angus, the head space in the jars will depend on what you are preserving. Jams and chutneys need less headspace left than bottled fruit in syrup for example. I use my Ball preserving book to give me the correct headspace for whatever I am canning.
Susie says
A round silicone mat worked well at the base of the bath.
Trish says
I forgot to say I am delighted with the Mason 'Pur' jars from Mitre 10. They have a range of sizes too. I got them on special and the narrow ones are good as quite a few fit into the water bath at the same time versus only 4 Agees or old Masons fit. The only downside is my hand won't fit into the jar to arrange the fruit and I need to muck around with a spoon.
Trish the nutty bottler says
Hi Lisa, my Aussie friend who taught me water bathing says never to boil the water and that the temp should be no more than 88 degrees C. I find that over this temp my jars spew out the liquid and they don't seal. I have 2 water baths...both Fowlers Vacola and quite old. My husband put a thermostat on to my plastic urn....that is awesome. I load my raw, uncooked fruit into cold, un-sterilised but washed jars, top to within 1cm to the jar top with the syrup and only hand tighten the band, but not too tight. The air needs to escape. I fill the urn with cold water, set the thermostat, bring to the 88 degrees and time it for approx 20 - 30 minutes from when it reaches the temp. My friend always lets the jars cool down in the urn, but I'm too impatient for that. I carefully remove them with those tongs and then tighten the bands. Then it's always good to hear the 'pops' !!
Laura says
Hi Trish! Sounds like you are using something a little different to the traditional water bathing pot that I use. I'm glad you have a method that works for you, I always boil the water and that works for me!
Jo says
Hi wear in New Zealand can I buy your book for water canning please.
Laura says
Hi there, I would just google the title of the book and see where you can find it. Trademe might also be a good place to look!
Colleen King says
Can I ask what you do with the prepared food that does not fit into the water bath once it is full of jars? No-one seems to mention this. Do you bottle it then wait, or do you leave it in the pot to be either reheated and bottled later, or left to go cold and then bottled and reheated in the water bath? Does it affect the processing time?
Liz says
Hi Laura
Thank you for your informative website! What do you think of perfit jars for water bathing ( available from supermarkets)
Does the canning book recommended have a good salsa recipe?
Regards
Liz
Laura says
Hi Liz. I have been hearing very mixed things lately about the perfit jars and lids - they are not quite as good as they once were I don't think. I would check out Kiwi Family Kitchen - this is where I get most of my jars from and everything she has I would recommend! https://kiwifamilykitchen.co.nz/
And I have a salsa recipe that you might enjoy - https://www.thekiwicountrygirl.com/homemade-tomato-salsa-for-canning/
David parker says
Hi Laura where can I find a starter kit for water bathing
Do I have to buy from America or Nz
Laura says
Hi David, I purchased mine from Kiwi Family Kitchen in NZ
Kat Andrews says
Can this method be used for lemon or passionfruit curds? Even though I religiously sterilise my jars, and they sealed nicely after making, I’ve had some issues with mould growing inside the jar in the headspace gap of my curds. Would water-bathing stop that from happening? And is lemon curd shelf-stable? Or does it need to be refrigerated regardless?
Laura says
Hi Kat, because curds contain egg, to my knowledge they are not suitable for water bath canning. It will need to be refrigerated or frozen!
erica says
hello can someone tell me the correct jars to buy? and what does it mean by i need new lids each time?
Laura says
Hi Erica, any 3 piece preserving jar system will work. I would recommend either Agee jars or Ball Mason jars. You can reuse the jar time after time as well as the metal ring that holds the lid on, but you can only use the lids once. When you open the sealed jars, the lids get dented so are unable to be used again as they won't seal to the jar.
Helene Owen says
Thank you for such a wonderful guide to water-bath canning, for us kiwis! I just bought a Fowlers Vacola and I'm excited to try it out! (Mainly because I worry about huge pots, cracking or smashing the ceramic top stove) It came with a wonderful book. Something useful I learnt in it is that feijoas are a low acid fruit, so need some citric acid to bring up the acidity. (and it turns out, bottled feijoas are so much more delicious than frozen!)
Lisa says
I seen on several american websites that if you process in a water bath you don't actually need to sterilise your jars first. Do you know if this is correct?
Laura says
Hi Lisa, this is true IF you are water bath processing the jars for longer than 10 minutes. Anything under 10 minutes, the jars still need to be sterilised first. Laura