• Skip to primary navigation
  • Skip to main content
  • Skip to primary sidebar

The Kiwi Country Girl logo

  • Start Here
    • Our story
    • Family
    • Travel
  • Recipe Index
  • Farm & Garden
    • Farm
    • In the garden
  • DIY & Crafts
  • Shop
  • Freebies
    • Free 1 Week Meal Plan
    • Bread Baking Ebook
  • Blog
  • Join The Kiwi Country Homestead
  • Nav Social Menu

    • Facebook
    • Instagram
    • Pinterest
menu icon
go to homepage
subscribe
search icon
Homepage link
  • Recipe Index
  • Farm & Garden
  • DIY
  • About
  • Shop
  • Join The Kiwi Country Homestead
    • Facebook
    • Instagram
    • Pinterest
  • ×

    Home » In the garden » Polytunnel/Tunnelhouse 101

    Polytunnel/Tunnelhouse 101

    Published: Jun 28, 2020 · Modified: Jun 10, 2021 by Laura · This post may contain affiliate links.

    Something I get asked a lot about is our polytunnel. I am always happy to talk about it as we love it SO much so I thought it was time I answered a few common questions I get about our specific tunnel and about growing in a polytunnel in general so here it is: everything you need to know about building or buying and growing in a polytunnel or tunnel house!

    Buying a polytunnel

    We bought a very cheap kitset polytunnel from Trademe in 2014. You can see what it looked like originally in this post.

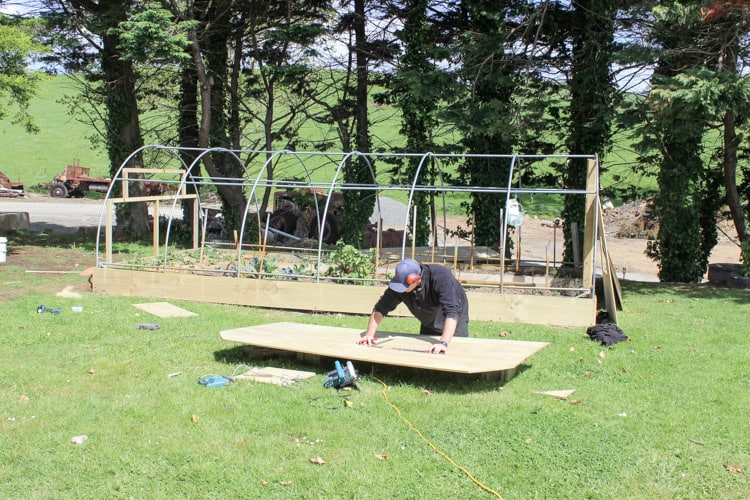
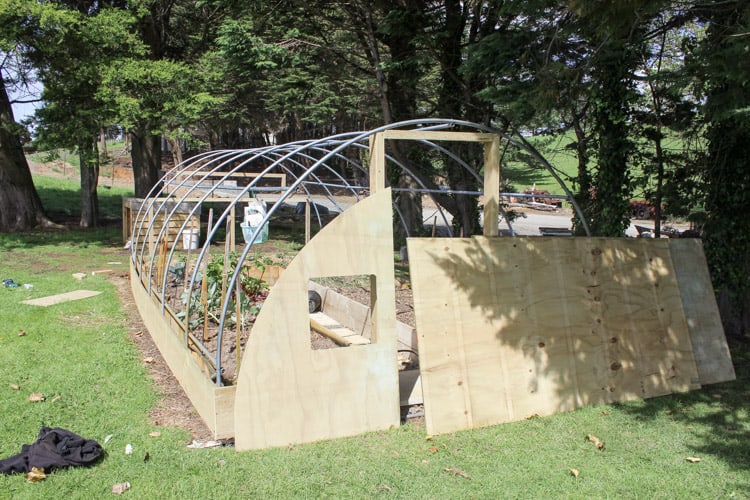
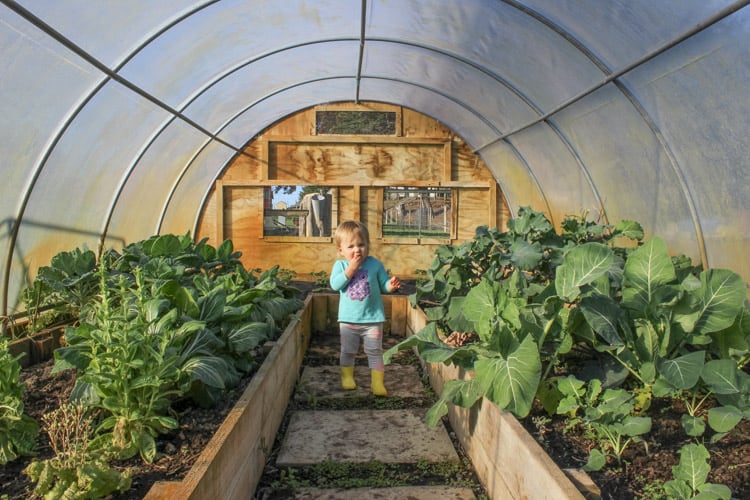
    After a couple of seasons, the cover started to disintegrate and we got frustrated with having to roll up the door each time we went in there, so we made the decision to modify it.

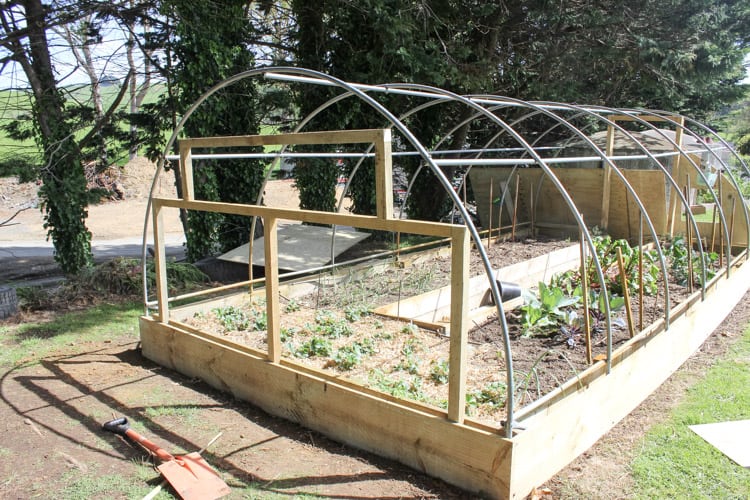
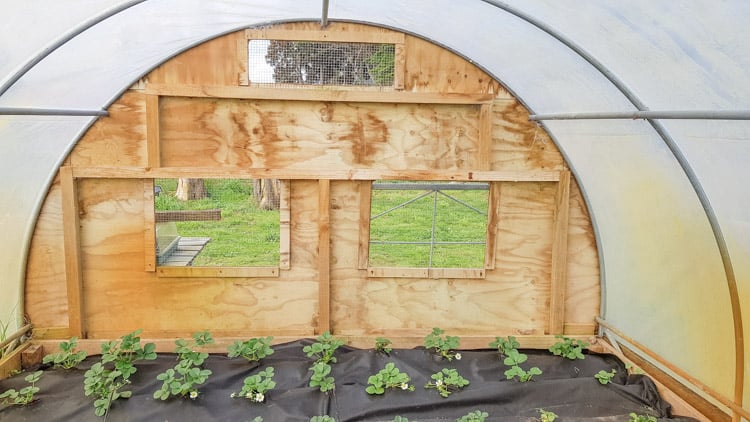
    Josh built a front and back out of plywood with a hinged door at the front and windows for ventilation at each end which we covered in wire mesh. We then covered the tunnel with UV resistant polythene that we purchased off Trademe.

    This was a perfect work around what we had, however if we were to do it all again we would purchase a better quality polytunnel from the start. It is hard for me to recommend a brand but from reviews from friends and others I know with tunnel houses, I would go for either of these:

    Morrifield Greenhouses (my neighbour has just put up one of these so I'll update when I've checked it out!)

    Redpath New Zealand - these also came highly recommended when I asked around

    Things to consider when choosing your polytunnel

    • How much space do you have?
    • Do you want to build raised beds or grow in the ground?
    • Do you want shelving for starting seeds?
    • What sort of ventilation does it have?
    • Do you live in a high wind area?

    Positioning your polytunnel

    You want to choose a level piece of ground to build the polytunnel on. I would also recommend choosing a spot in full sun if possible, as this is going to help reduce mould and moss growing on the inside of the polytunnel on those dark and damp winter days.

    Ease of use

    The more expensive polytunnels you can purchase have sliding or hinged doors, which I can highly recommend. Ours originally had a roll up door which was very frustrating, especially if you just wanted to pop in to pick something.

    We also had to roll up the windows for ventilation which was frustrating as I would often forget and the tunnel would be closed up for long periods of time. Now we have wire mesh windows on the front and back which means we don't need to worry - it is well ventilated all the time.

    Ventilation

    Ventilation is essental for 2 reasons:

    1. To keep airflow going so that the tunnel doesn't get too damp in winter or too hot in summer
    2. To assist with pollination

    The tunnel houses you can buy have various options for ventilation including louvres, roof vents and doors. I would recommend something that you can leave open all the time such as a window. This way you can have the door open while you are out in the garden but you can close it up and still have airflow in and out of the tunnel.

    Something to keep in mind if you choose the DIY route is ensuring the mesh is small enough that pesky bugs and insects like white butterflies can't get through. The trade off with this is that bees can't get through easily but having the door open occassionally works fine for this.

    If you want to grow plants in the polytunnel that need bees to pollinate them (cucumbers, zucchini, pumpkins etc) you might want to consider having windows that can be left open for bees to get inside.

    Raised beds or growing in ground?

    I originally thought we would just grow in ground but Josh built raised beds for the polytunnel which I LOVE! Although it is an added expense, they are much easier to garden and being raised beds they drain better, the soil stays warmer and I think they make it look much nicer!

    Irrigation

    One of the most important things to consider! You can opt to just hand water but I would highly recommend looking into setting up a simple irrigation system. We are planning on re doing our irrigation this spring so I will share when we do that!

    You can buy all the pipe, sprinklers and accesories you need from Mitre 10 or Bunnings and they are reasonably inexpensive.

    We set up a sprinkler system which has worked really well for us. We are planning to change over to a drip line system this year though, as I have found that as some plants grow quite large, they are blocking the water from getting to some parts of the garden. Watering from the base of plants is the most recommended way to do it, so we will be trying this out.

    Spring onions growing in polytunnel with sprinkler

    What can you plant in the polytunnel?

    Almost anything!! My favourite things to have in the polytunnel are:

    All year round:

    • Herbs - parsley, thyme, rosemary, oregano
    • Lettuces
    • Spinach
    • Carrots

    Spring/Summer:

    • Strawberries (number 1 favourite, they do SO well in here!)
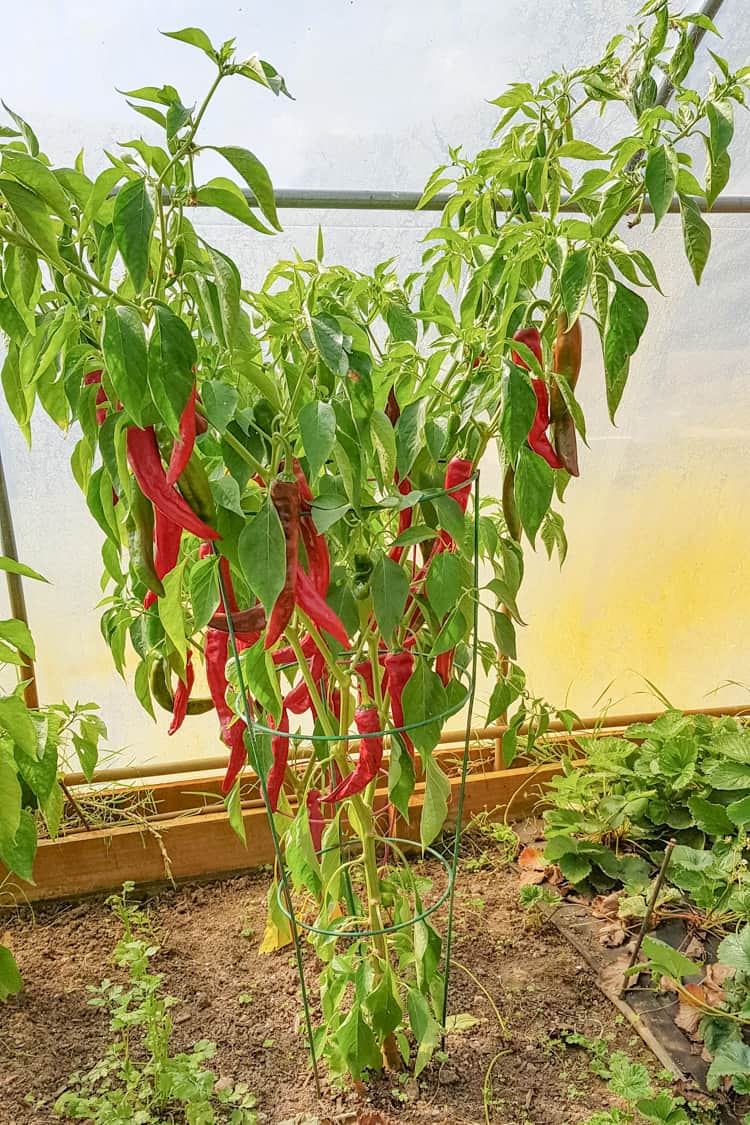
    • Peppers and chillies - we get a really long season out of these as the tunnel protects them from the frost that ruins all the fruit!
    • Cherry tomatoes
    • Basil
    • Brassicas - broccoli, cabbages (great for protecting against white butterflies)
    • Carrots

    Autumn/Winter:

    • Silverbeet
    • Coriander
    • Brassicas - broccoli, cauliflower, brocoflower, cabbages
    • Radishes
    • Spring onions
    • Beetroot

    Things I haven't had any luck with in the polytunnel

    • Cucumbers (due to not being able to be pollinated, although you could do this yourself using the paintbrush method)
    • Zucchini (same issue as cucumbers)
    • Beans
    • Anything that takes up a lot of room

    Things I am undecided on:

    Big tomatoes - they grow for longer in the polytunnel but I have definitely always had better harvests from my outside tomato plants which again I think is due to the lack of pollination. I still put a couple of plants in the polytunnel to keep our harvest going through until about May though. Cherry tomatoes do particularly well in there though.

    Things I am planning to try this year:

    • Potatoes
    • Blueberries
    • Raspberries

    Maintenance and Cleaning

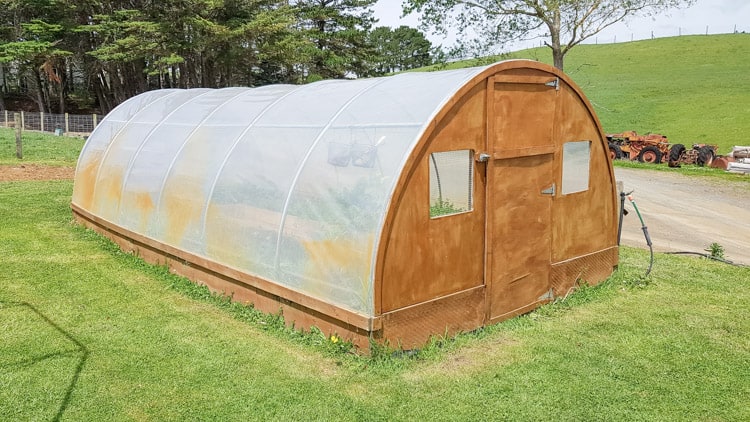
    To be honest, we don't do a whole lot of maintenance on our polytunnel - it doesn't really need it! The plastic covering has a few claw marks in it thanks to our excitable labrador and the base of the plastic near where the sprinklers are is a little discoloured thanks to the bore water we use to water the garden but other than that, because it is adequately ventilated all the time and is in full sun, we don't have problems with mould or mildew.

    Lighting/heating

    We don't have any form of lighting or heating in our polytunnel and we haven't needed it, however we live in the Waikato which only gets a few good frosts every winter so it's pretty mild. It's worth keeping in mind that if you live somewhere it snows or gets extremely heavy frosts, your plants and the ground can still freeze so you may want the option of closing up the tunnel completely to help.

    If we were to use any type of heating in the polytunnel it would be heat pads for starting seeds on shelves but I still prefer to start my seeds inside in early spring.

    Comment below if you have any other questions about polytunnels/tunnelhouses and I'll do my best to answer them.

    Happy growing!

    « Life with Macey - 7-8 months
    Life with Macey - 9-10 months »

    Reader Interactions

    Comments

    1. brendan bird says

      August 20, 2022 at 5:20 pm

      Hi Laura. we are inspired. Can i ask why you went for clear plastic sheeting and was you original setup covered in a green PE mesh cloth and if so how was that for growing?? cheers pie , brendan & lelly.

      Reply
      • Laura says

        September 16, 2022 at 9:30 pm

        Hi Brendan. Yes the original was the green mesh looking plastic and it disintegrated after only a couple of years - we opted for the more heavy duty as we get a lot of wind and occasionally sea spray and this has proven to be very durable, we still don't need to replace it and it's been a good 5 years now since we put this on! Laura

        Reply
    2. Liss says

      July 31, 2022 at 3:06 pm

      Hi,
      We got an awesome polytunnel about 7 years ago from Polythene and PVC in Gore. They also do really reasonable replacement covers. Ours has roll up sides to let the air flow with mesh covering the openings to keep bugs out, nice big doors at each end and it has held up to plenty of snow and strong wind. I've seen Morrifield ones, which don't have such good features as the Polythene & PVC ones but have a great reputation. We also had a Redpath one (50m long) for calves which was awesome but again, not as good as the Polythene & PVC.

      Reply
    3. Tania says

      June 15, 2022 at 4:17 pm

      Hi

      Any new updates/reviews?
      I am trying to decide between Morrifield and Redpath, which one holds up better in severe winds. Price comparison on say a 10m long tunnel house, it seems Redpath is cheaper.

      Tania

      Reply
      • Laura says

        June 17, 2022 at 7:42 am

        Hi Tania, my neighbour (who also lives in a high wind zone) loves his Morrifield. I don't personally know anyone who has a Redpath though sorry!

        Reply
    4. Tania says

      May 17, 2022 at 8:26 am

      Love your post. I am looking at Redpath and Morrifield and don't know which to go for. Have you got any updates? We are I a high wind area. I had green shield bugs destroy my tomatoes this year, so want to keep bugs out of a tunnel but would like bees in.

      Reply
      • Laura says

        June 14, 2022 at 10:49 am

        Hi Tania, my neighbour loves his Morrifield! We are in a high wind area too and it's definitely standing up!

        Reply
    5. Trudy Norris says

      March 31, 2022 at 2:38 pm

      Hi , love what you have done with your tunnel house , just added a poly tunnel to my garden in the north waikato , and was wondering what the ideal temp would have to be please ,
      Great post cheers Trudy

      Reply
      • Laura says

        June 14, 2022 at 12:34 pm

        Hi Trudy! It depends on what you are wanting to grow really! I have never actually monitored the temperature in my polytunnel. If you were to check the temperature of something, I would keep an eye on the soil temperature though as this will give you a good indication of what will grow in that temperature soil!

        Reply
    6. Bernie Moloney says

      January 23, 2022 at 8:40 am

      Hi, Laura, I love this polytunnel. It is exactly what I'm looking for. Could you please tell me how you attached the plywood to the frame. Thanks so much.
      Bernie M.

      Reply
    7. Denise Drummond says

      January 17, 2022 at 12:44 pm

      Hi,
      I am also considering buying a Morrifield, I want raised beds but am unsure what soil to put in?
      Thanks
      Denise

      Reply
      • Laura says

        June 14, 2022 at 10:18 am

        Hi Denise, we bought a load of topsoil to fill ours and that is what I would recommend doing.

        Reply
    8. Courtney Williams says

      November 16, 2021 at 9:38 am

      Hey Laura, we are doing the same with ours. How did he secure the plastic at each end where the ply is?

      Reply
      • Laura says

        June 14, 2022 at 10:07 am

        Hi Courtney, the plastic is secured in between 2 pieces of ply, so he ran another thin piece on the front and screwed them together with the plastic in between.

        Reply
    9. Lionel Neal says

      August 20, 2021 at 10:09 am

      Morning Laura,
      Nice job on the tunnel. I have frame from the one I got from tradetested. It was a garage for my mini. The cover has become a tad sad and I want to repurpose as a tunnelhouse.
      You used 2mx25m plastic to recover
      How did you secure it to the frame?
      Did you use all-weather tape?
      Lionel

      Reply
      • Laura says

        January 05, 2022 at 8:00 am

        Hi Lionel, we sandwiched the plastic in between 2 pieces of plywood. If you look at the picture of the front, we have the ply wall but there is a strip around the top, this is where we have secured the plastic at the top. Along the sides, the plastic is between the wooden garden beds and the strip of ply running along the bottom of the tunnel on the outside. And we used screws to go through the lot. It's worked really well for us but if you are not using wood at all, I would definitely give all weather tape a go - no reason that shouldn't work perfectly!

        Reply
    10. Kristina says

      August 02, 2021 at 6:33 pm

      I can feel your enthusiasm! I have a Merrifield poly which I love. I do have one issue though. Bees get into my tunnel through vent and the door and then they can't get out! They don't seem to head back out the door. Any ideas! The door is facing away from the evening sun so they don't seem to head in that direction.

      Reply
      • Laura says

        June 14, 2022 at 9:49 am

        Hi Kristina! Do you know, that is probably the only issue we have too! There is definitely not a lot of bee action that happens in our tunnel but it doesn't seem to have a negative impact on the plants which is great! Over summer I often leave the door open to let some of the heat out and then they can come in and out a bit more!

        Reply
    11. Lorraine M says

      February 02, 2021 at 1:38 pm

      We purchased a Redpath late December. I also included the screen door as we have cats and free ranging chooks. The solar kit opens and closes the vent at certain temps. It works with wax beads inside that expand in heat and shrink in colder temps and is just ideal as I can’t reach the vent. Friend assembled it and said he admired the design but would have preferred flat ground rather than garden between retaining walls. It was easy enough to erect but do read the instructions.

      Reply
    12. Claire says

      November 22, 2020 at 7:14 am

      Hi. I am trying to decide what tunnel house to go for. Any feedback on the Morrifield your neighbour purchased? Thanks

      Reply
      • Laura says

        March 08, 2021 at 2:29 pm

        Hi Claire! My neighbour loves his Morrifield one! I have checked it out and it is awesome, so if we were buying one new, that's definitely what we would go for!

        Reply
      • BREIGE ANN RENDELL says

        April 02, 2022 at 7:44 pm

        I have purchased a 6 meter morriefield tunnel recently its awesom well worth the investment .
        2 doors a screen on one 2 ceiling vents erected by 4 of us in 4 hours.

        Reply
    13. Marion says

      November 05, 2020 at 4:03 pm

      Do you leave your strawberries with just the weedmat on them like the photo in your polytunnel, or do you put straw around them later?

      Reply
      • Laura says

        November 10, 2020 at 11:06 am

        Hi Marion, I just leave them like the photo but if you have problems with bugs/slugs etc adding straw around them can really help! Laura

        Reply
    14. Clare Rahman says

      August 11, 2020 at 8:03 am

      Hi, I live in Andalucia, Spain. How would crops grow in the heat we have in the Summer? Is there a book you could recommend which explains the principles of poly tunnels. A simple one which an idiot can understand.

      Reply
      • Laura says

        August 16, 2020 at 11:29 am

        Hi Claire, I imagine you would need to make sure you had good ventilation to make sure it didn't get too hot in there! What temperatures do you get? Unfortunately I don't have any recommendations for books sorry! Laura

        Reply
    15. Bron says

      June 30, 2020 at 9:48 pm

      Just wanted to ask questions in regards to wind..
      With what you guys did.. provided it was well secured to the ground.. would the plastic stand up to strong winds.. or would it be better to have a reinforcing protective layer??
      Just wanted to know your thoughts.
      Can get up to 120 km winds at times... but i do have a hip height fence around the area.. that may protect it..
      I also get extremes.. down to -12 so far in winter.. up to 41 in summer..
      Would i be be better to look at other options?
      I have never had a poy tunnel... so i dont know..

      Reply
      • Laura says

        August 16, 2020 at 11:45 am

        Hi Bron! We are in a very high wind area and the plastic does hold up, however we have the plywood front facing the direction our wind comes from. I think temperature wise, as long as you could close it up in winter and make sure it could be adequately ventilated in summer you should have no problems! Laura

        Reply
    16. Wendy Schwartfeger says

      June 29, 2020 at 9:04 pm

      Thanks for the great info Laura. We had a polytunnel 14 years ago... I LOVED it. It blew away. So much for the guarantee!!

      so we settled on the little greenhouse...but the plan is to put a polytunnel down the back. You've saved us a lot of leg work.
      Thanks so much! Great info, really appreciate.
      Aunty Wendy XX

      Reply

    Leave a Reply Cancel reply

    Your email address will not be published. Required fields are marked *

    Recipe Rating


    This site uses Akismet to reduce spam. Learn how your comment data is processed.

    Primary Sidebar

    Hi, I'm Laura!

    I live on a farm in rural New Zealand with my husband Josh, our kids Sadie, Macey & Finlay and our black lab Sage. We're all about simple & delicious, family friendly recipes that are made from scratch as well as tasty treats! Read More…

    • Facebook
    • Instagram
    • Pinterest
    • Twitter

    Multi Cooker Recipes

    Bowl of bacon bone and vegetable soup on table with slice of buttered bread

    Bacon Hock and Vegetable Soup (slow cooker and instant pot)

    White rice in a bowl with Crock Pot Multi cooker

    Multi Cooker Rice (Instant Pot)

    Shredded chipotle chicken in a bowl

    Multi Cooker Shredded Chipotle Chicken (instant pot or slow cooker)

    Plate of hard boiled eggs

    Multi Cooker Hard Boiled Eggs (Instant Pot)

    Pan of devilled sausages with mashed potato

    Devilled Sausages

    Whole pumpkin in instant pot/multi cooker

    Instant Pot Pumpkin Puree (Multi Cooker)

    Popular Recipes

    Pan of devilled sausages with mashed potato

    Devilled Sausages

    Overhead of bowl with potato salad, chives and tea towel in background

    Easy Potato Salad Recipe

    Homemade beef burger with fries in the background

    Homemade Burger Patties (Josh's secret recipe)

    Close up of scoop of cheesy mince pasta with herbs on top

    Cheesy One Pan Mince Pasta

    My all time favourite Carrot Cake recipe - loaded with grated carrot, crushed pineapple and crunchy walnuts and smothered in cream cheese frosting, this will become your favourite carrot cake recipe too! | thekiwicountrygirl.com

    My Favourite Carrot Cake Recipe

    Homemade Burrito Spice Mix (or taco seasoning) - the perfect blend of spices to make your favourite Mexican meal in minutes! Perfect for beef burritos, nachos, chicken strips for tacos, refried beans or anything Mexican! | thekiwicountrygirl.com

    Homemade Burrito Spice Mix (with free printable labels)

    • Recipe Index
    • Privacy Policy
    • Contact me

    Footer

    ↑ back to top

    About

    • Privacy Policy
    • Accessibility Policy

    Newsletter

    • Sign Up! for emails and updates

    Contact

    • Contact

    As a Mighty Ape Affiliate I earn from qualifying purchases.

    Copyright © 2022 Brunch Pro on the Brunch Pro Theme

    • Pinterest
    • Facebook
    • Email
    • Print