• Skip to primary navigation
  • Skip to main content
  • Skip to primary sidebar

The Kiwi Country Girl logo

  • Start Here
    • Our story
    • Family
    • Travel
  • Recipe Index
  • Farm & Garden
    • Farm
    • In the garden
  • DIY & Crafts
  • Shop
  • Free Downloads
    • Freezer Meal Storage Guide
    • Free 1 Week Meal Plan
    • Bread Baking Ebook
  • Blog
  • Join The Kiwi Country Homestead
  • Nav Social Menu

    • Facebook
    • Instagram
    • Pinterest
menu icon
go to homepage
subscribe
search icon
Homepage link
  • Recipe Index
  • Farm & Garden
  • DIY
  • About
  • Shop
  • Join The Kiwi Country Homestead
  • Free Downloads
    • Facebook
    • Instagram
    • Pinterest
  • ×

    Home » In the kitchen » Homemade Muesli Bars

    Homemade Muesli Bars

    Published: Feb 6, 2020 · Modified: Jul 7, 2021 by Laura · This post may contain affiliate links.

    Jump to Recipe Print Recipe
    Homemade muesli bars on white background
    Homemade muesli bars on white background

    This super easy recipe for 6 ingredient, one bowl no bake homemade muesli bars is going to be your kids new favourite snack! Perfect for lunchboxes, they only take 10 minutes to make!

    Homemade muesli bars on white background

    When it comes to muesli bars I feel like there are 2 distinct camps. The people who make really healthy bars that involve dates and a food processor and the people who decide that it's too hard to make your own muesli bars and just buy them.

    Well to start with, neither of these are bad options! There are some amazing recipes out there but I am just not a huge fan of dates in bars as I find they make them so much sweeter than sugar and Sadie doesn't particularly like them either. And if you do your research there are definitely some great options for buying bars too.

    But as you know, we are all about homemade over here and if I can make it easy to make something yourself, that's the goal!

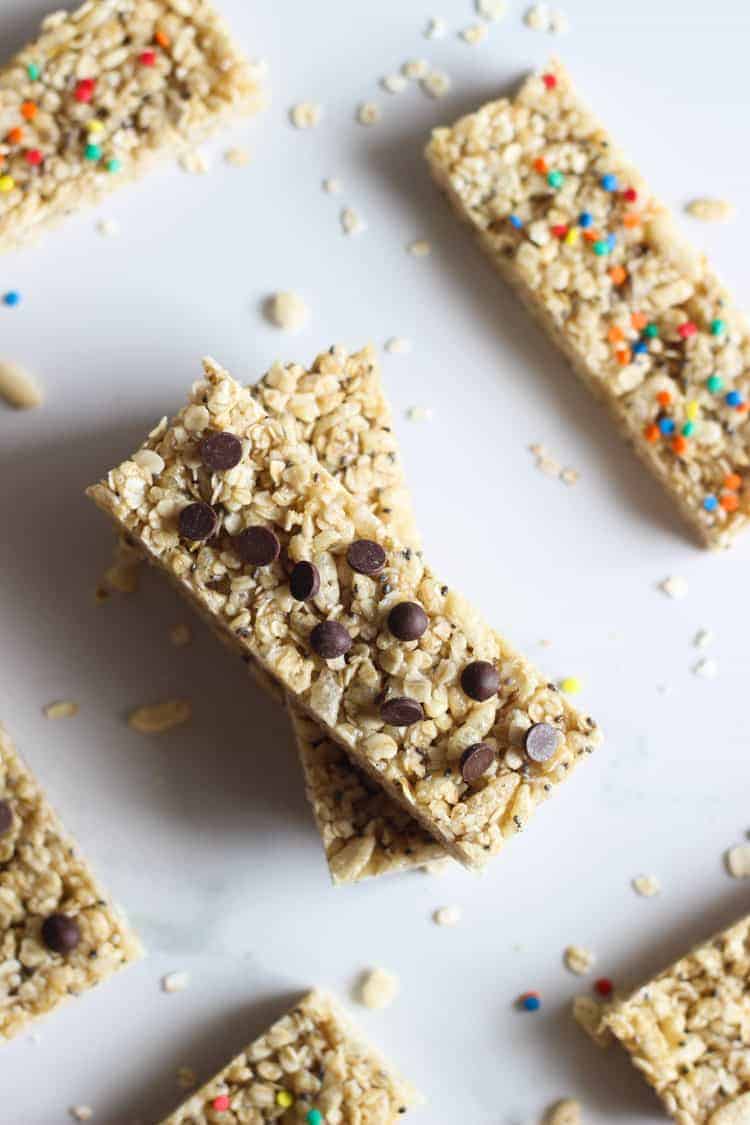
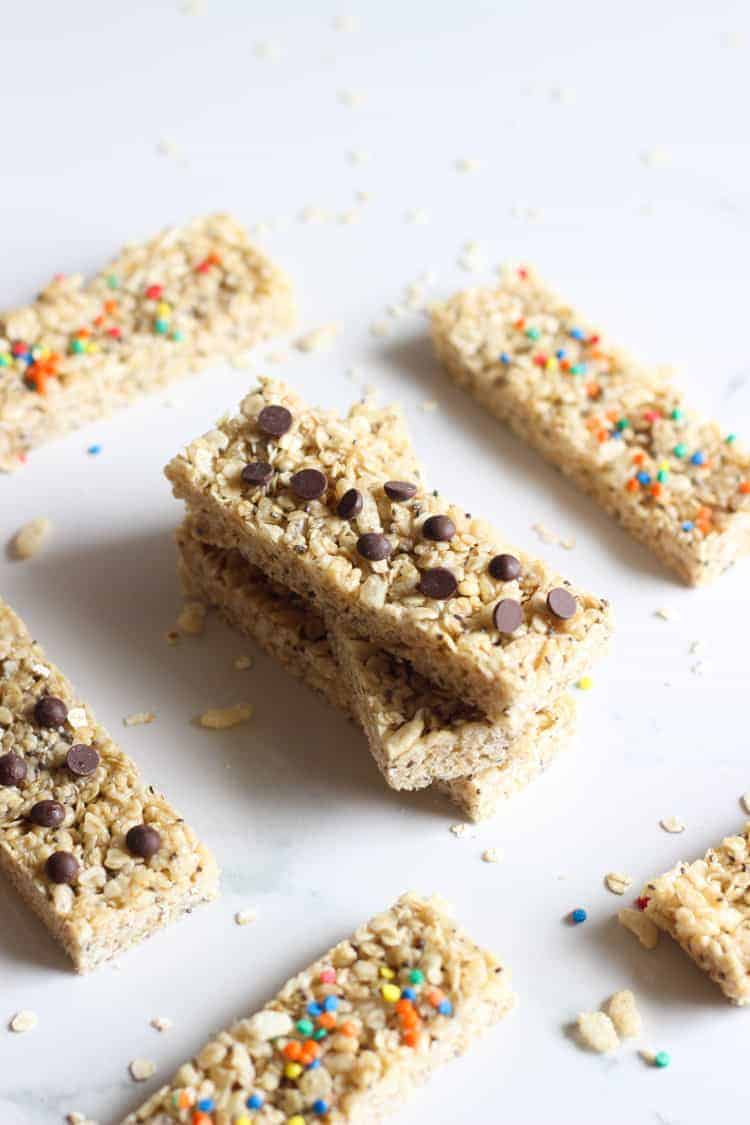
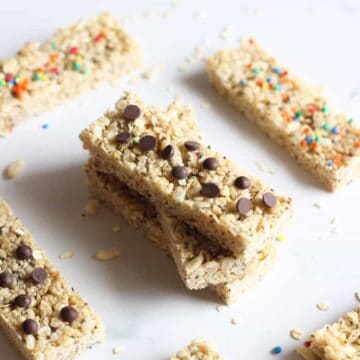
    I like to call these homemade muesli bars the middle ground bar! They have a very simple list of ingredients - rolled oats, rice bubbles, coconut oil, honey, a small amount of brown sugar and salt.

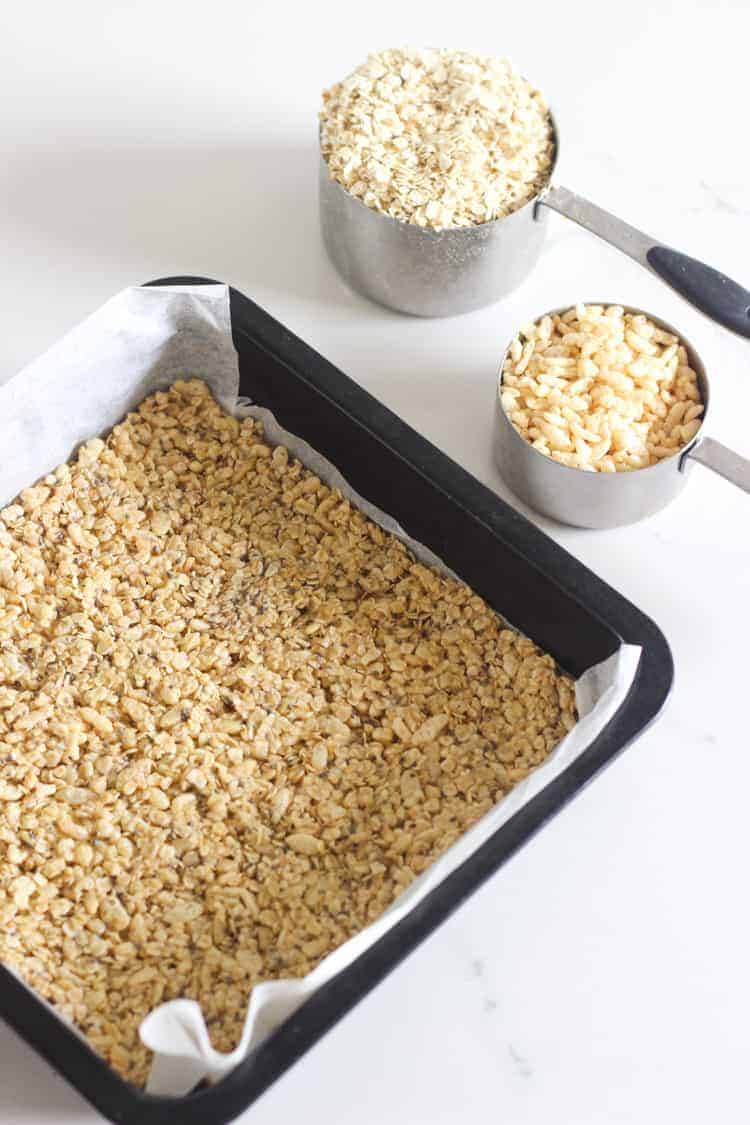
    They are made in one bowl and are so simple to throw together. Just melt the honey, coconut oil and brown sugar together, stir through the oats and rice bubbles and press really firmly into a tin lined with baking paper. This helps the bars hold together better when they have set.

    Tray of homemade muesli bars

    Are they sugar free?

    No, these bars are not sugar free. They have honey for sweetness as well as a small amount of brown sugar which helps hold the bars together. I have tested them with and without the sugar and I found that the 1 tablespoon of brown sugar made them much easier to press into the tin and after sitting out of the fridge for a while, helped them hold together slightly better than without it. But try both ways and choose which you prefer!

    And although they do have sugar in them, they are almost certainly still better than the bars you buy from the supermarket, so I'm calling this a win!

    Homemade muesli bar on white background

    Can I add extras?

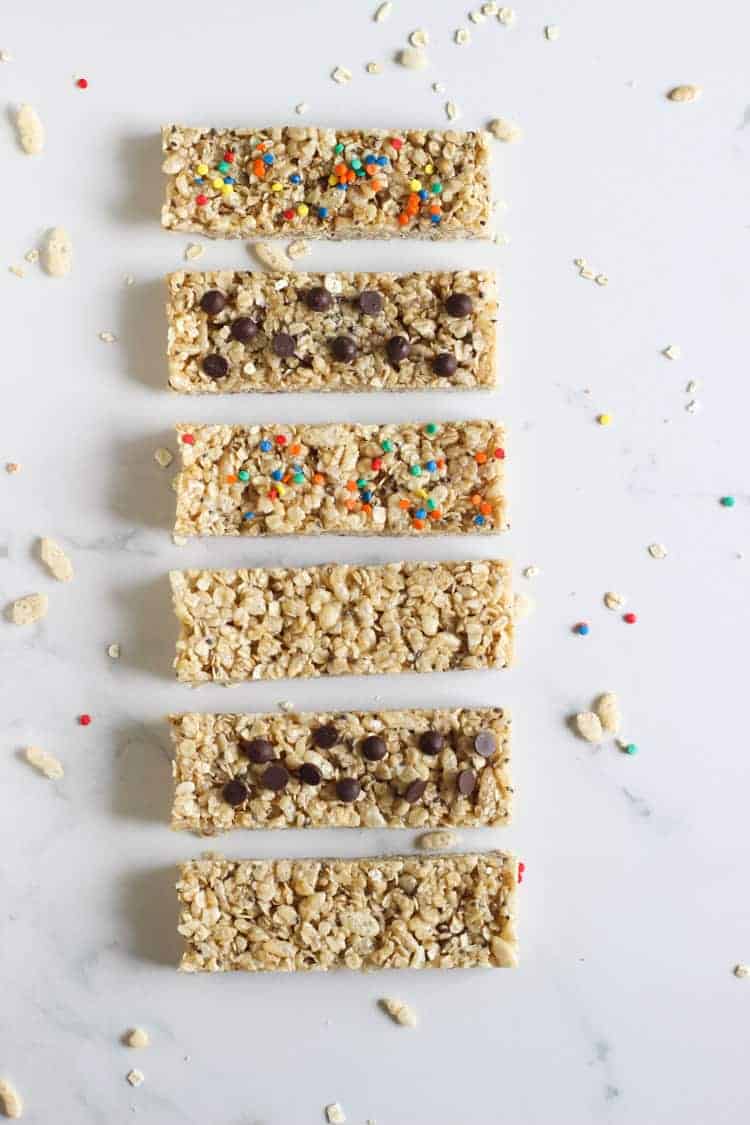
    Yes of course! You could add dessicated coconut, dried cranberries or chopped apricots or chocolate chips. I would only add about ⅓ cup of extras as otherwise they won't hold together quite so well.

    I also sometimes add 2 teaspoons of chia seeds for extra nutritional value and I find they also help hold the bars together a little better too.

    Homemade muesli bars on white background

    How do you store them?

    I store these bars in the fridge as it keeps the coconut oil solid and helps the bars hold together better and keep for longer. I have kept them in the fridge for up to 2 weeks.

    Do they hold together as well as bought bars?

    No they don't. These bars are firm out of the fridge but after about 30 minutes (in summer) out of the fridge, they start to go quite soft. This isn't a problem, they still taste delicious! If you wanted them to hold together for longer, place the bars in the freezer and put a frozen bar in your kids lunchbox!

    Other lunchbox ideas:

    • Mini banana chocolate chip muffins
    • Ham & cheese pizza rolls
    • Easy slice & bake cookies (9 flavour ideas)
    • Healthy banana oatmeal muffins
    • No bake peanut butter chia bars
    • Easy cheese scones

    Your kids will love these bars - and you will feel good putting them in their lunchboxes!

    Homemade muesli bars on white background

    SHOP THE RECIPE

    Some of the links in this post are affiliate links, which pay me a small commission for my referral at no extra cost to you! Thank you for supporting The Kiwi Country Girl.

    Here are some items I used to make this recipe:

    Square slice tin| Measuring cups | Rubber spatula

    Homemade muesli bars on white background

    Homemade Muesli Bars

    This super easy recipe for 5 ingredient, one bowl no bake homemade muesli bars is going to be your kids new favourite snack! Perfect for lunchboxes, they only take 10 minutes to make!
    4.75 from 12 votes
    Print Pin Rate
    Prep Time: 10 minutes
    Chilling time: 30 minutes
    Total Time: 40 minutes
    Servings: 12 bars
    Author: Laura

    Ingredients

    • ¼ cup coconut oil
    • ¼ cup honey
    • 1 Tablespoon brown sugar (optional, see recipe note 1)
    • ⅛ teaspoon salt
    • 1 cup rolled oats (see recipe note 2)
    • 1 cup rice bubbles (see recipe note 2)

    Instructions

    • Line a 20cm x 20cm (8" x 8") square baking tin with baking paper.
    • In a medium sized pot combine coconut oil, honey, brown sugar, vanilla and salt. Cook over a medium heat until the mixture is melted and starts to bubble, then allow to bubble for 1 or 2 minutes.
    • Take the pot off the heat and stir through the rolled oats and rice bubbles along with any mix ins you are using (except chocolate chips - if adding these, allow the mixture to cool for 15 minutes before stirring through) Make sure the mixture is well combined.
    • Tip into the prepared baking tin and using your hands or the back of a spoon press the mixture down very firmly - this will help the bars to stick together.
    • Refrigerate for 30 minutes before carefully removing from the tin and slicing into bars.
    • Store in the fridge for one week.

    Notes

    1. I have tested them with and without the sugar and I found that the 1 tablespoon of brown sugar made them much easier to press into the tin and after sitting out of the fridge for a while, helped them hold together slightly better than without it. But try both ways and choose which you prefer!
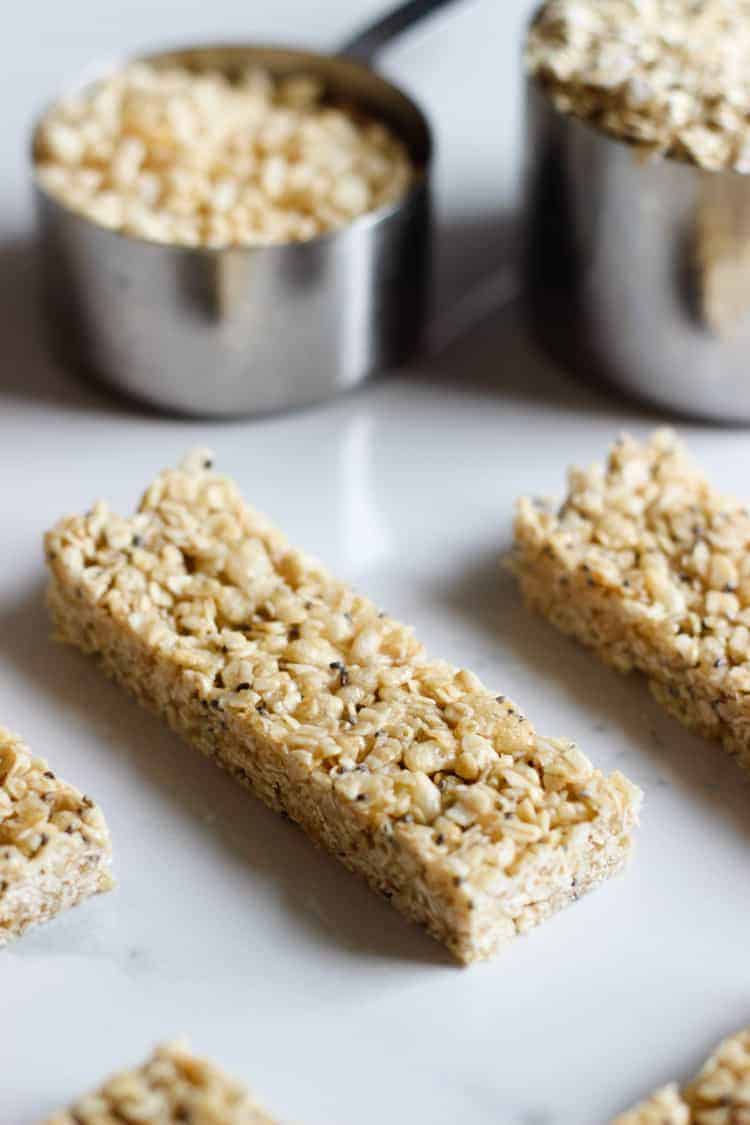
    2. I have tried these with a few different combinations of oats and rice bubbles - you can do all oats for extra chewy bars, 1 ½ cup oats and ½ cup rice bubbles for bars with a bit of crunch and 1 cup of each for a happy medium!

    Nutrition

    Calories: 99kcal | Carbohydrates: 13g | Protein: 1g | Fat: 5g | Saturated Fat: 4g | Sodium: 37mg | Potassium: 28mg | Fiber: 1g | Sugar: 7g | Vitamin A: 155IU | Vitamin C: 1mg | Calcium: 4mg | Iron: 1mg
    Tried this Recipe? Tag me Today!Tag @thekiwicountrygirl or tag #thekiwicountrygirl!
    If you tried and loved this recipe, please leave a comment and a rating below!
    « Life with Macey - 5 months
    Homemade Lemonade »

    Reader Interactions

    Comments

    1. Emily says

      November 15, 2022 at 11:35 am

      Love making these, they're a regular in the lunchbox now. I make a double batch and drizzle melted dark chocolate on top, so good 🤤

      Reply
    2. Anna says

      August 05, 2022 at 11:46 am

      5 stars
      Love making these so easy I add in some nuts and seeds hubby even likes them saves buying boxes of bars. Double the batch and freeze for convenience

      Reply
    3. Liz says

      January 09, 2022 at 5:39 pm

      Hi Laura, Could I use vegetable oil instead of coconut oil (I don't have coconut oil)? Thanks 🙂

      Reply
      • Laura says

        April 02, 2022 at 2:22 pm

        Hi Lizzie, vegetable oil won't work as the coconut oil hardens when cool which helps them hold together, but you could use butter instead!

        Reply
    4. Jess says

      September 17, 2021 at 4:17 pm

      Could these be made with brown rice syrup instead of honey?

      Reply
      • Laura says

        January 01, 2022 at 2:21 pm

        Hi Jess, I've never used brown rice syrup but it would be worth a try!

        Reply
    5. Kirsten says

      August 25, 2021 at 10:12 am

      Hi Laura,
      What sort of coconut oil do you recommend.
      Cold pressed - I think that’s the one that tastes like coconut or the one that’s unflavoured?

      Thanks 🙂

      Reply
      • Laura says

        January 05, 2022 at 7:55 am

        Hi Kirsten, I use Blue Coconut coconut oil, just the regular one from the supermarket, not the cold pressed one. I don't find this one has a flavour at all but any coconut oil you have will work fine!

        Reply
        • Katherine says

          September 06, 2022 at 9:02 pm

          3 stars
          These were really yum but unfortunately fell apart in the kids lunchboxes by morning tea time, even when they'd been in the freezer. Perfect for eating straight out of the fridge or freezer though.

    6. Dana Gillard says

      August 14, 2021 at 3:38 pm

      YUMMM!! Have made these a couple of times now and are a hit with the fam not to mention super easy to make and better than the bought stuff. So good! Thanks for sharing.

      Reply
    7. Vicky says

      June 23, 2021 at 12:30 pm

      If adding Chia Seeds, do you soak the chia seeds first? Or just add them dry?

      Reply
      • Laura says

        July 05, 2021 at 9:35 pm

        Hi Vicky, I just add them dry 🙂

        Reply
    8. rebecca webb says

      May 19, 2021 at 3:23 pm

      5 stars
      So easy and quick to make! Very tasty

      Reply
    9. Emily says

      April 18, 2021 at 1:23 pm

      5 stars
      I made these last week to take to work, I didn't have rice bubbles but used my light and tasty and they came out great! Definitely will be making these again! So quick and easy to wip up!

      Reply
    10. Maria Jacobs says

      February 09, 2021 at 11:12 am

      How much vanilla? 🙂

      Reply
      • Laura says

        March 08, 2021 at 3:11 pm

        Whoops, in the method but not the ingredients list! It's an optional ingredient but I'd add 1 teaspoon!

        Reply
    11. Maria Jacobs says

      February 09, 2021 at 11:06 am

      5 stars
      Huge hit in our house. My daughter asked me this morning. Where is my muesli bar? So making again now 🙂
      Hit; dont be impatient,follow directions let cool before adding choc chips

      Reply
    12. Trish says

      February 07, 2021 at 9:43 pm

      4 stars
      Made these tonight using maple syrup instead of honey. Quite sweet but yum! Will definitely make them for the grandchildren! 😆

      Reply
    13. Steph says

      November 26, 2020 at 8:17 pm

      Hi, will these freeze ok? Thanks

      Reply
      • Laura says

        November 29, 2020 at 4:37 pm

        Yes, absolutely!

        Reply
    14. Pia says

      May 28, 2020 at 7:53 am

      These were great for the kids and adults alike. We did one batch with 100’s and thousands and another topped with chocolate chips. They will be added to the rotation for sure!

      Reply

    Leave a Reply Cancel reply

    Your email address will not be published. Required fields are marked *

    Recipe Rating


    This site uses Akismet to reduce spam. Learn how your comment data is processed.

    Primary Sidebar

    Hi, I'm Laura!

    I live on a farm in rural New Zealand with my husband Josh, our kids Sadie, Macey & Finlay and our black lab Sage. We're all about simple & delicious, family friendly recipes that are made from scratch as well as tasty treats! Read More…

    • Facebook
    • Instagram
    • Pinterest
    • Twitter

    Multi Cooker Recipes

    Bowl of bacon bone and vegetable soup on table with slice of buttered bread

    Bacon Hock and Vegetable Soup (slow cooker and instant pot)

    White rice in a bowl with Crock Pot Multi cooker

    Multi Cooker Rice (Instant Pot)

    Shredded chipotle chicken in a bowl

    Multi Cooker Shredded Chipotle Chicken (instant pot or slow cooker)

    Plate of hard boiled eggs

    Multi Cooker Hard Boiled Eggs (Instant Pot)

    Pan of devilled sausages with mashed potato

    Devilled Sausages

    Whole pumpkin in instant pot/multi cooker

    Instant Pot Pumpkin Puree (Multi Cooker)

    Popular Recipes

    Pan of devilled sausages with mashed potato

    Devilled Sausages

    Overhead of bowl with potato salad, chives and tea towel in background

    Easy Potato Salad Recipe

    Homemade beef burger with fries in the background

    Homemade Burger Patties (Josh's secret recipe)

    Close up of scoop of cheesy mince pasta with herbs on top

    Cheesy One Pan Mince Pasta

    My all time favourite Carrot Cake recipe - loaded with grated carrot, crushed pineapple and crunchy walnuts and smothered in cream cheese frosting, this will become your favourite carrot cake recipe too! | thekiwicountrygirl.com

    My Favourite Carrot Cake Recipe

    Homemade Burrito Spice Mix (or taco seasoning) - the perfect blend of spices to make your favourite Mexican meal in minutes! Perfect for beef burritos, nachos, chicken strips for tacos, refried beans or anything Mexican! | thekiwicountrygirl.com

    Homemade Burrito Spice Mix (with free printable labels)

    • Recipe Index
    • Privacy Policy
    • Contact me

    Footer

    ↑ back to top

    About

    • Privacy Policy
    • Accessibility Policy

    Newsletter

    • Sign Up! for emails and updates

    Contact

    • Contact

    As a Mighty Ape Affiliate I earn from qualifying purchases.

    Copyright © 2022 Brunch Pro on the Brunch Pro Theme

    353 shares
    • Pinterest
    • Facebook
    • Email
    • Print
    353 shares