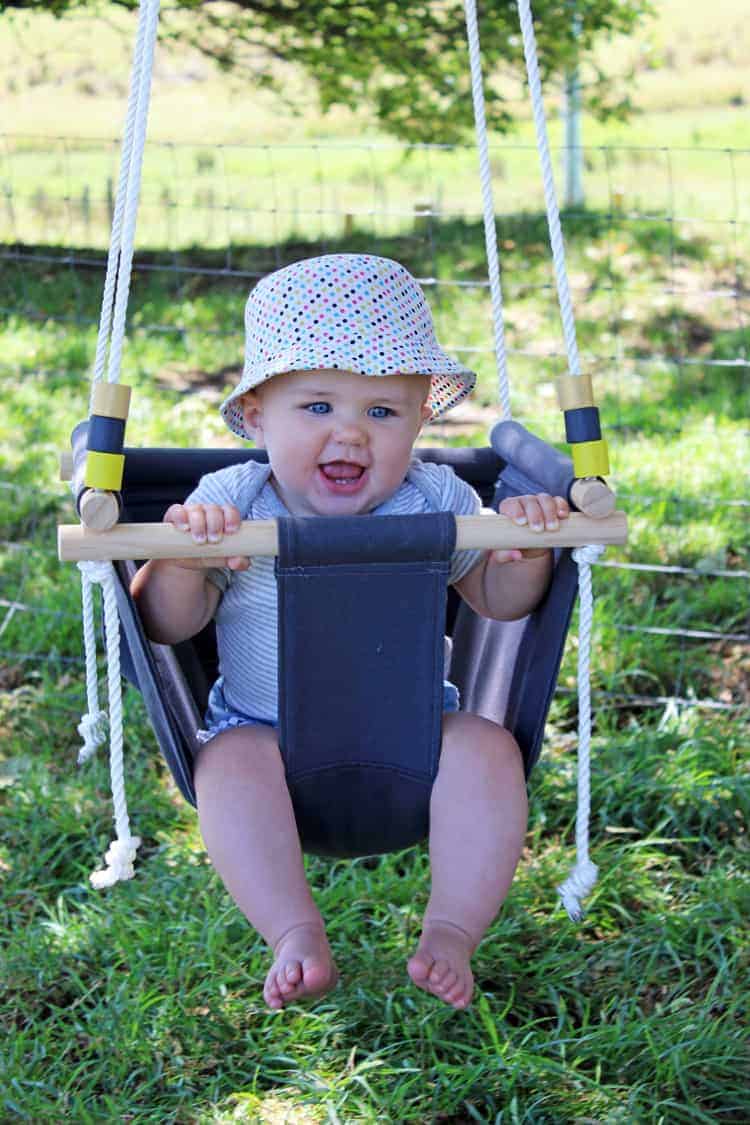
How to make a DIY baby swing. Step by step photos and an easy to follow tutorial to make a canvas swing perfect for babies and toddlers that will give them hours of fun!
I'm pretty sure this was the project that got me all sorts of excited about DIY projects.
It was one of those times where I knew exactly what I wanted to give Sadie for her first Christmas - a cool canvas swing for her to play in for hours at a time (dreaming?) under the shade of the big oak tree while I sat by drinking a mojito or something - but didn't want to pay the $220 for a ready made one. The battle was that I wasn't willing to compromise on how much I wanted a canvas swing and pay $50 for a plastic one that would probably fall apart in a couple of years. So I did a bit of searching and came across a tutorial showing step by step how to make one of these swings - and it looked surprisingly easy! I gave it a go, and it really was pretty simple. Sewing in a straight line. Drilling a few holes in some dowel and attaching some rope (thanks Josh). Hanging from a tree. And what ensued was actually blissful hours of swinging in a beautiful canvas swing under the oak tree! Not to mention the extreme satisfaction that came from Josh & I making Sadie's Christmas present together - how very Little House on the Prairie of us!
The original tutorial came from A Beautiful Mess - it's a fantastic post but as they are USA based, all measurements are in feet and inches so I thought I would do it in metric measurements to make it easy!
I spent about $90 on good quality materials for this swing so even though it is a slightly pricey DIY project, it was still a lot cheaper than buying a ready made one and it will last for years. You could cut costs by buying polypropylene rope instead of nylon and just tying it onto a single caribena rather than using rope clamps and thimbles if you wanted to but I think that if you're going to do it, do it properly the first time and make it strong enough to last. If you have any questions about substituting materials, please leave a comment below and I will do my best to help.
I got the material from Spotlight and the other fixings from Mitre 10 Mega. If you ask (and show pictures) at either place, someone will be able to help you find what you need.
Important to note: I used outdoor furnishing canvas material. It's designed for wear and tear but we still bring our swing inside when we are not using it - this is just so it will last longer and stay dry.
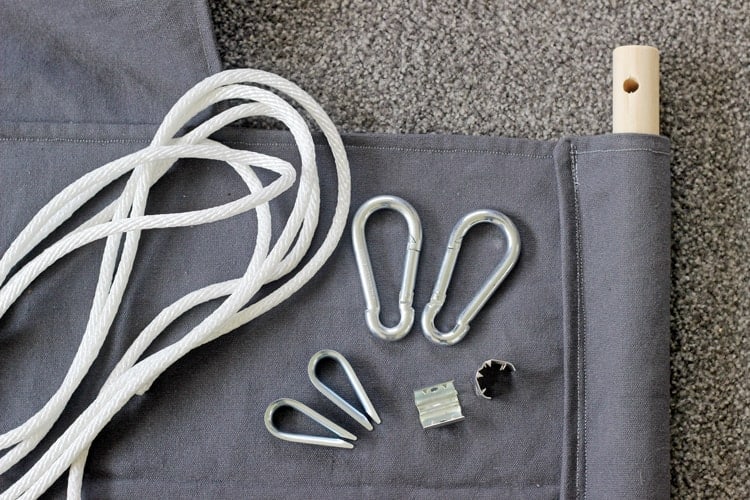
Materials needed:
- Heavy duty outdoor canvas material - 150cm x 70cm
- One 25mm x 1800mm piece of pine dowel
- 6 metres of 7mm thick braided nylon rope or similar - recommended nylon rather than poly for strength. I purchased the rope per metre from Mitre 10 and it was about $4.70 per metre.
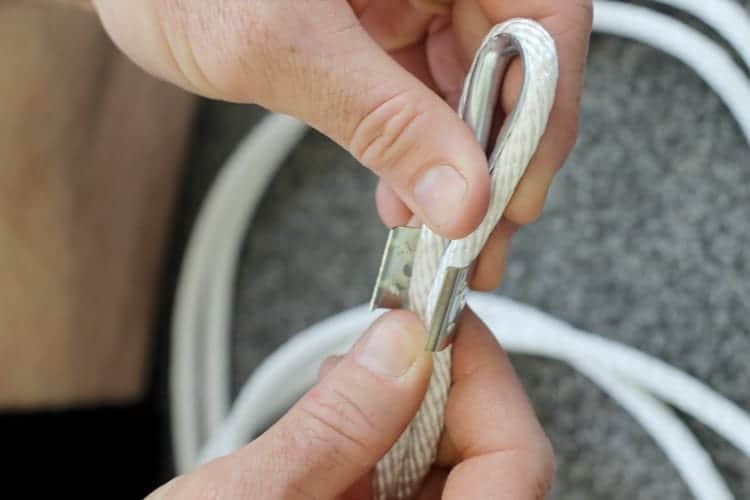
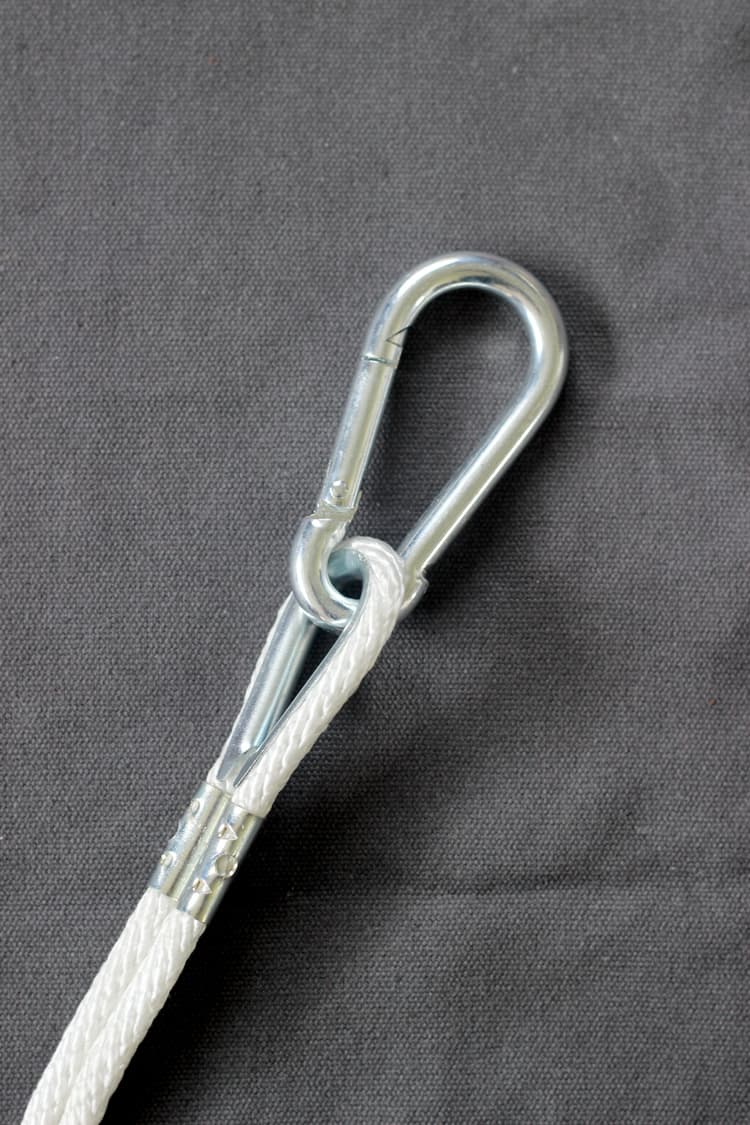
- Two rope thimbles and clamps (see picture) Make sure the thimble is wide enough for the rope to thread through.
- Two 8mm carabiners
Tools:
- Sewing machine and thread (same colour as fabric)
- Tape measure
- Chalk
- Sewing scissors
- Pins
- Saw (hand held or electric)
- Electric drill with 9mm drill bit (this made the hole big enough for the rope to easily thread through)
- 120 grit sandpaper (or whatever sandpaper you have on hand. Optional but makes the cut dowel smoother)
- Paintbrush and paints for the decorative beads (optional)
Instructions:
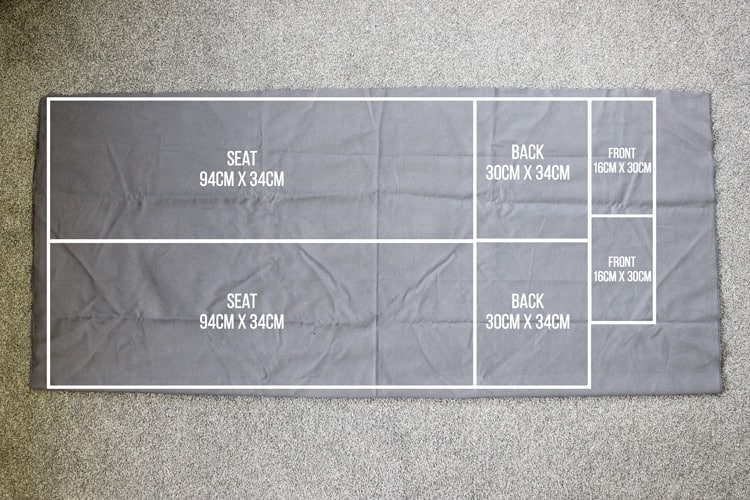
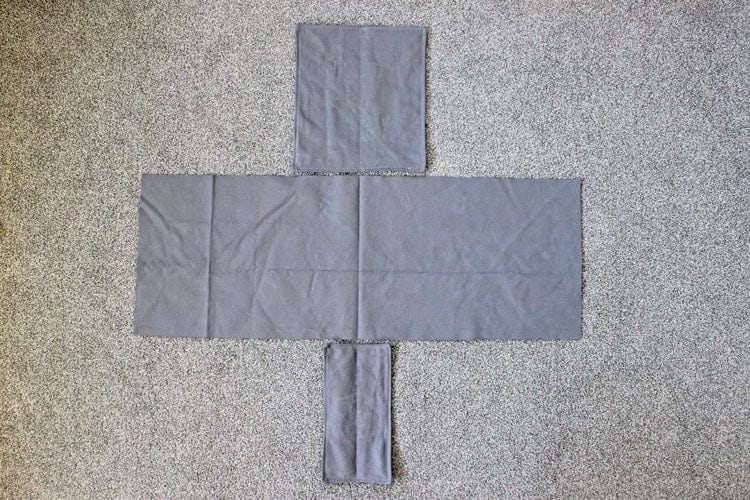
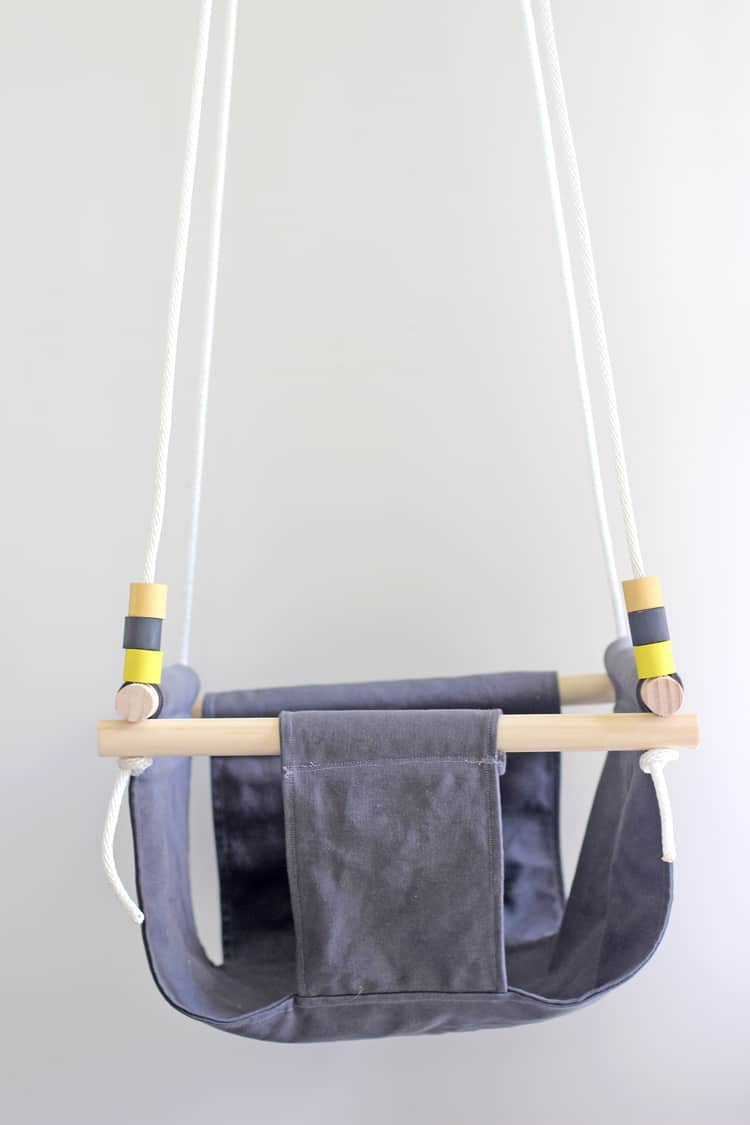
Step 1: Cut out from your fabric two 94cm x 34cm pieces (for the seat) two 34cm x 30cm pieces (for the back) and two 30cm x 16cm pieces (for the front).

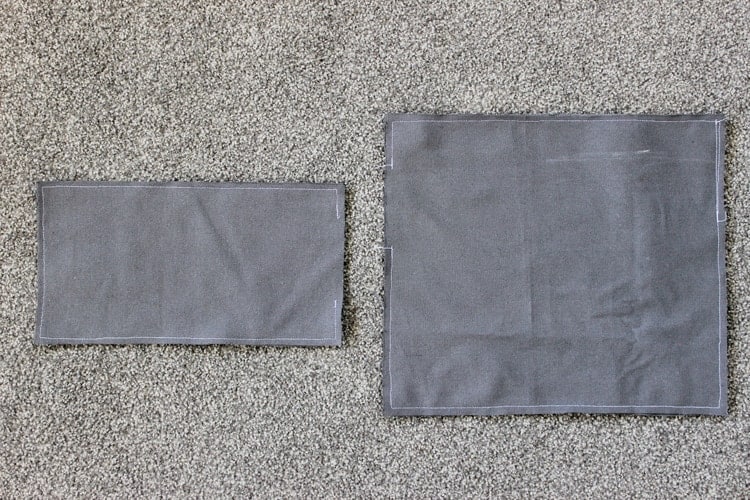
Step 2: Pin together the 2 front panel pieces (with the pattern on the inside if using patterned fabric). Starting 2cm in from the corner on one of the short edges of the front panel, sew all the way around using a 5mm seam allowance, stopping about 8cm from where you started. Remove the pins and turn the panel inside out, using a pencil to poke out the corners to maintain the rectangle shape, and then sew all the way around the panel - this will close up the gap. Repeat with the back panels but not with the seat panels.
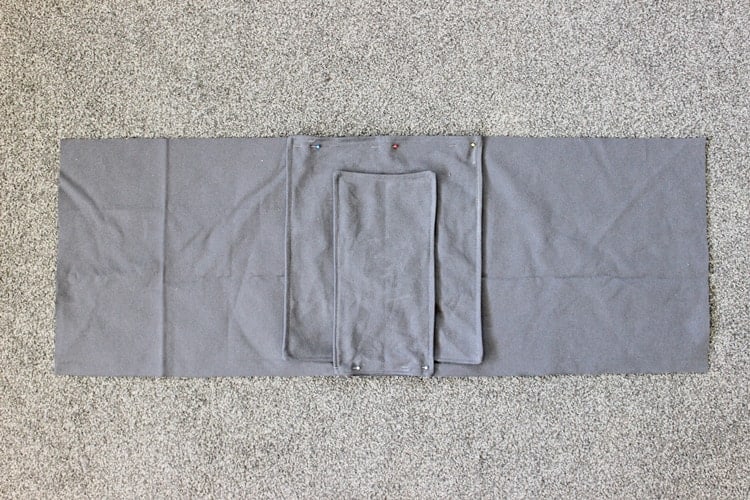
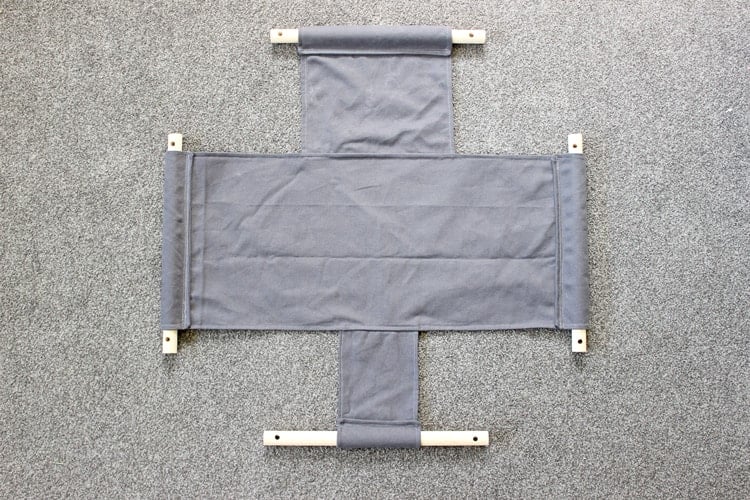
Step 3: Lie one of the seat pieces on the floor (patterned side facing up if applicable) and line up the front and back panels in the centre as shown in the picture.
Fold the back panel onto the seat panel and align the short edge of the back panel with the edge of the seat panel and pin together. Then place the front panel on to the seat panel, and do the same, align the short edge with the seat panel edge and pin together. The two panels will overlap but this won't matter as they are only pinned along the edges where they meet the seat panel.
Step 4: Place the second seat panel on top of the other pieces (patterned side facing down if applicable) and line up the edges. Pin the whole way around the edges. When you get to the place where the front and back panels are already pinned on to the bottom seat panel, carefully pull the pins out and pin them back through all the layers of fabric.
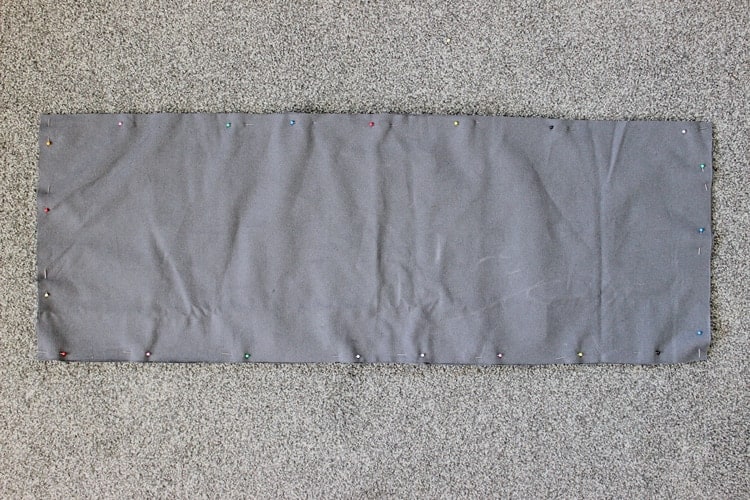
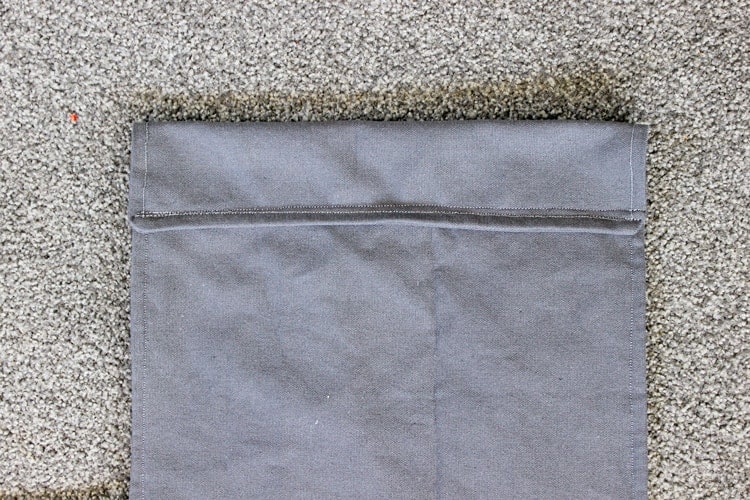
Starting 6cm in from the corner on one of the short edges, sew all the way around, stopping about 10cm from where you started. Remove all the pins and like in step two, turn inside out and poke the corners out with a pencil. Remove pins that held the front and back panels in place. Flatten the fabric (you may need to iron it depending on your fabric) and sew all around the seat panel. This will close the gap and make the seat stronger.
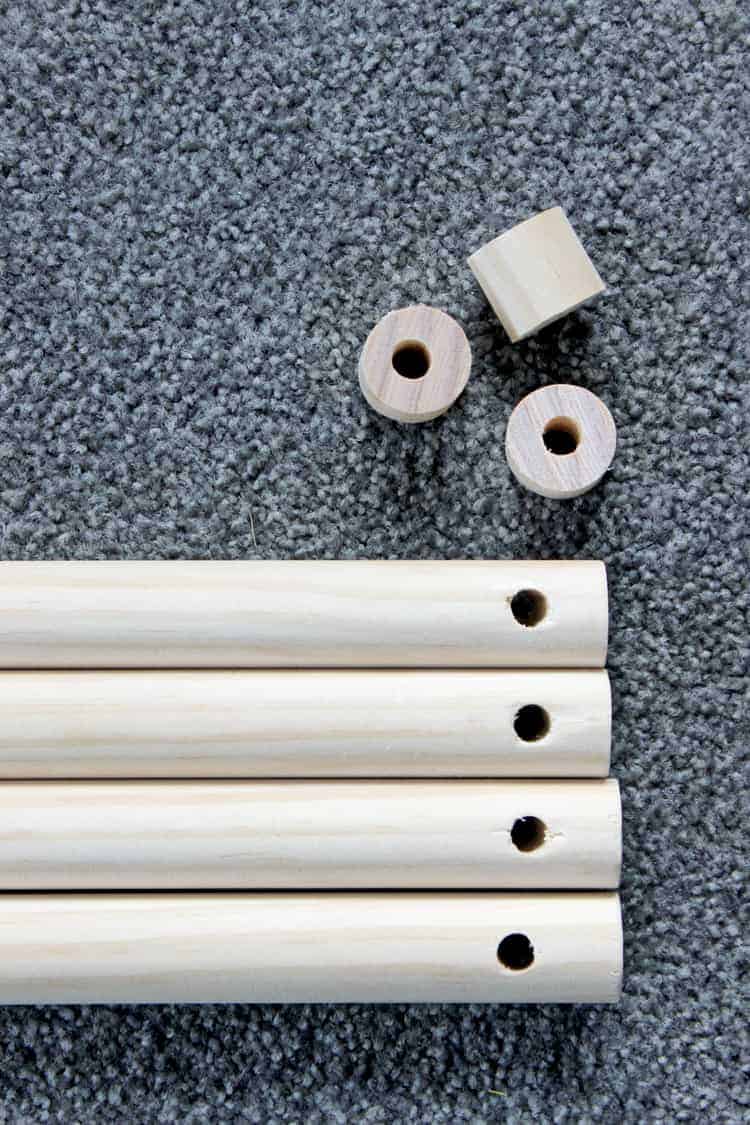
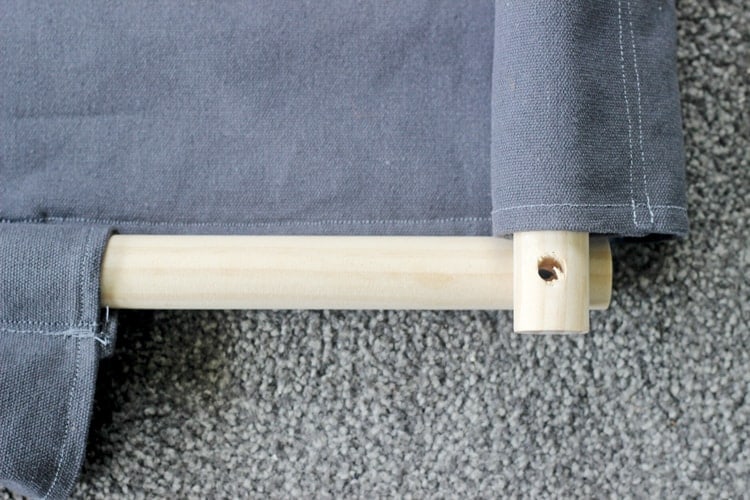
Step 5: Cut your dowel into four 40cm lengths. Measure 2 ½ cm in from each end and make a mark. Drill a hole in each mark. Use sandpaper to smooth the drill holes and the ends of the dowel.
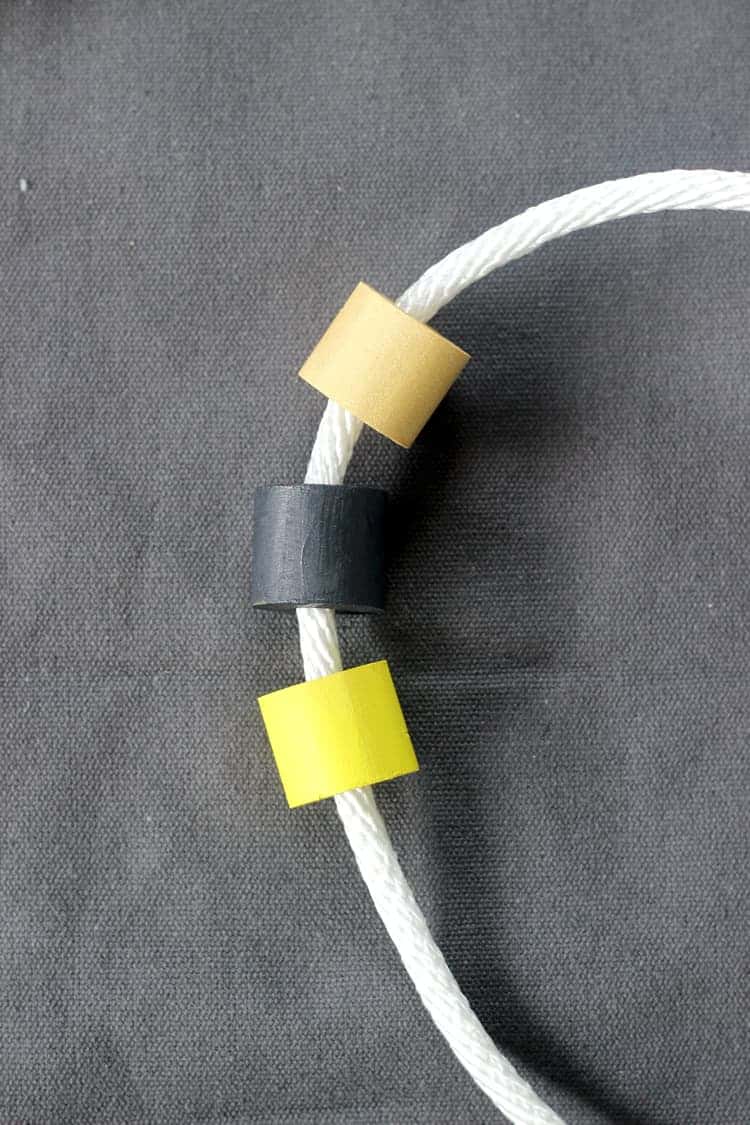
Optional: You can use the remaining dowel and cut six 2cm pieces to use as decorative beads on the swing. Drill a hole through the middle of the dowel and use the same sandpaper to smooth the edges.
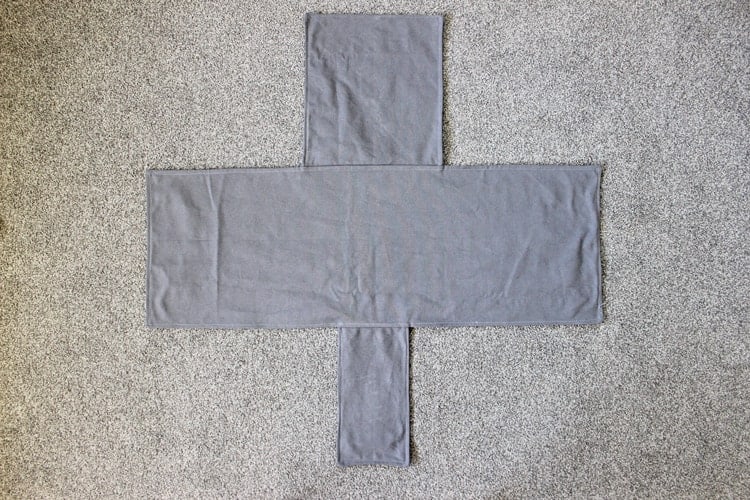
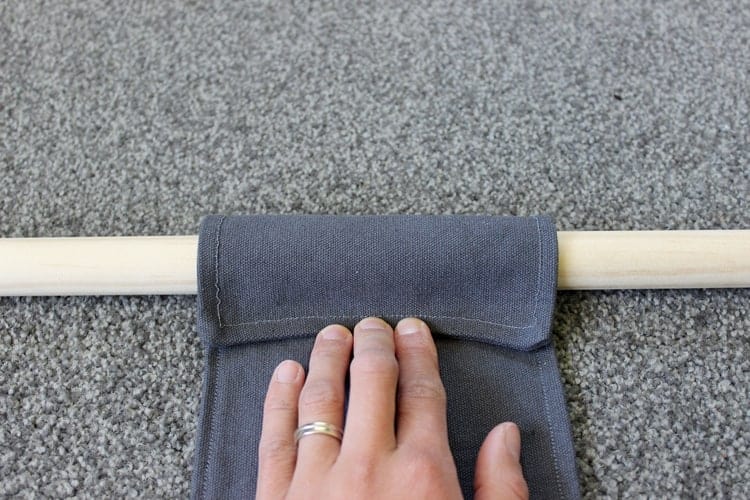
Step 6: Take a piece of dowel and fold the end of one of the panels over the dowel to the inside of the swing so that the dowel will fit snugly. Hold the fabric in place, remove the dowel and pin the fabric together. Sew two parallel lines (for extra strength) to form the pocket that the dowel will go through. Repeat with the other 3 panels and remove all pins. Once all pockets have been sewn, insert the dowel rods.
Almost done and it's starting to take shape!
Step 7: Cut the rope in half so that you have two 3m lengths and use a lighter to burn the edges to stop them from fraying.
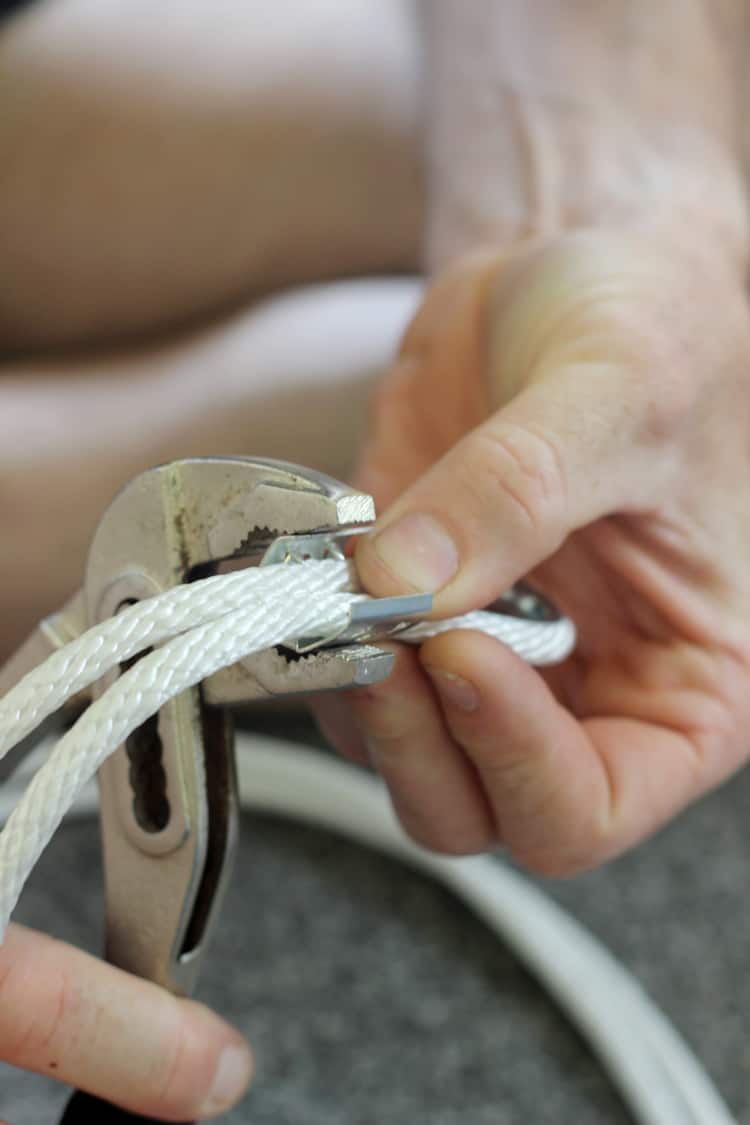
Step 8: Take one length of rope and fold in half. Thread the rope through the thimble where it is folded in half and line up the rope clamp. Using a pair of pliers, crimp the edges of the clamp in together so that it tightens around the rope and holds it in place. Repeat with the second piece of rope.
Step 9: Time to thread the rope through the dowel on the swing. The pieces of dowel that go through the seat panel will sit on top of the dowels that go through the front and back panels. Thread the beads (if using) onto the rope ends that will be at the front of the swing before threading through the dowel. Thread the rope down through both pieces of dowel and tie a loose knot. Repeat with the 3 remaining corners. Once you have all rope threaded through, check that the swing is level and tie the knots tight. We tied two knots, just to be extra sure!
Step 10: To hang the swing, clip the caribenas onto the thimbles at the top of the swing. You can either screw a hook into a wooden beam in your house or on your porch, or what we do is have a rope loop around a strong branch in a tree and clip the caribenas onto that. You can also throw the swing rope over a beam or even the washing line and clip the caribena back onto the swing rope.
This swing is the perfect present for someone about to have a baby or as a birthday or Christmas present for your own kids or nieces and nephews!
Click here to pin this post to your DIY/crafts board on Pinterest to save it for later
[mc4wp_form]

Helen says
Thank you so much for this tutorial. I also got excited by the idea of a beautiful swing in our new home for our baby, then recoiled at the ridiculous price of $200. I contemplated buying one to copy then returning it for a refund, no need to do that anymore. I can’t wait to grab some bits and get making. What a beautiful idea for a gift too, everyone in my mums group might be getting one for their 1st birthday!
Kathy Greensides says
Can you please post a photo of the top of the rope. Not sure how to hang it.
Laura says
Hi Kathy, we just tied a loop of rope around a big tree branch and clipped the caribenas onto that. You can also throw the swing rope over a beam or even the washing line and clip the caribena back onto the swing rope.
Ingeborg says
And all the way in the Netherlands I made one to! Thank you very much for the very fine pictures and explanation. Hope I didn't make mistakes in my language😉.
Correne E Paver says
I do not "sew" but have used a machine for straight stitch crafty things. I have now made 3 of these swings and am so proud of myself. My new mommies love them. They feel unique and special. The first one took a little longer because I was nervous, but now I can finish in just a few hours. I find that if I buy 2 yards there is enough left to make a back pillow. A super fun DIY! Thank you!
Kat says
Had anyone adapted this to make a buckle?
Peach Jonzon says
Lovely tutorial! Made one for my daughter and she is LOVING it!!
Ruth says
How long did it take you to make please? 🙂
Laura says
Oh I can't actually remember! I think I did it over a few days so probably a few hours total!
Sharon Bailey says
Hi there, thank you so much for posting the pattern on your website. Very easy to read instructions and even I was able to make this a lovely swing chair for my first grandchild 🥰. Thanks again much appreciated. Sharon
Jo says
Can I ask what kind of thread you used?
Laura says
Hi Jo, I just used cotton thread - nothing special, just what you can buy from Spotlight. Laura
Caitlin skein says
Thankyou we made one for our daughter and I love it 🙂 I wish I could insert a photo to show you
Michele says
Chica! OMG this is SO well written! I am going to follow your directions to test run teaching this as a STEAM project with 2nd - 5th graders to make for their siblings! Great lesson for some Distance Learning.
Maite Batalla Milesi says
Thank you so much! 🙂
Gabi says
Two questions
what is the max weight on a swing such as this and how does one clean it the swing/Material?
Laura says
Hi Gabi, my 3 year old daughter still swings in this at 16kg but I probably won't let her swing in it much longer!! I've never actually cleaned ours as we bring it inside when it's not in use but you could either spot clean it using a cloth or if it needed a good clean, take out the wood and run it through the washing machine! Laura
Jacqui Brown says
Hi.
Thank you sooo much for your amazing swing pattern. I have made 2 already as my daughter is having a baby in October. I made one to keep at home too.
I was just wondering if I extended the side panel and made the dowels longer would it be possible to make a sleeping hammock with the pattern too?
I live in South Africa
Many thanks,
Jackie
Laura says
Hi Jackie, I'm so glad you love the pattern! A sleeping hammock for a baby or an older child? I personally wouldn't recommend letting a baby sleep in something like this but it would be easy enough to alter the measurements as you have suggested! Laura
Rhonda says
thanks so much for a sweet tutorial. Make one today,adorable.
Sela says
Love this tutorial, so easy to follow instructions. THANK YOU!!!
Heather says
Thanks for this tutorial!! I whipped up one of these for my nephew this morning, and I'm planning to make another one for our family to keep. So simple and easy to make.