One of my favourite things is the smell of freshly baked bread - there is something about it that is so inviting. And I think that farmhouse kitchens and freshly baked bread go together so well! Like peanut butter & chocolate, Ross & Rachel, BBQ's & beer...you get the idea.
One of my absolute favourite kinds of bread to make and eat is focaccia bread. It is not difficult to make and is so versatile - you can eat it for any meal of the day and add whatever toppings you have on hand. It's the perfect accompaniment to a summer BBQ, a winter soup or just as a snack.
You do have to plan ahead to make this bread as the total time from start to finish is about 3 hours, however the majority of the time is spent waiting for the bread to rise. Perfect if you are throwing a dinner party.

To start you must activate the yeast. Mix lukewarm water and sugar in a large bowl (I use the bowl for my stand mixer as I will use the mixer for the next step) and sprinkle the yeast on top.

In about 10 minutes the yeast will start to froth and will look like this.

Next you will add flour, salt and olive oil and mix until smooth and silky. I use my stand mixer with the dough hook attachment but it is also fine to do this by hand. Add the rest of the flour and combine until the dough comes together and is not too sticky. You may need to add a little more flour than the recipe calls for at this point, but no more than an extra ¼ cup. Knead the dough for about 10 minutes. I use my mixer for about 8 minutes but I then like to take it out and knead by hand for a couple of minutes...it feels more authentic that way!
Place the kneaded dough ball in a lightly oiled bowl, cover with a tea towel that has been dampened in warm water and leave to rise. In summer I put the dough in a sunny spot either indoors or out. When the weather is cooler I preheat the oven to 100°C, turn it off and put the dough in there. As long as you keep the door closed, the heat will stay in the oven.


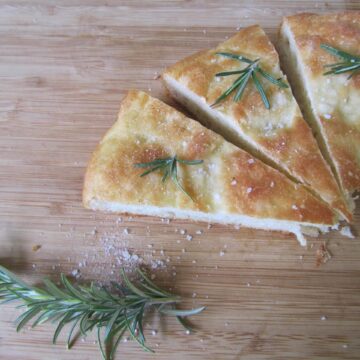
It is up to you how you shape your loaf. I prefer to make my focaccia bread in a 10 inch round cake tin but I have also made it very successfully in a rectangle baking dish.
The most fun part is choosing which toppings to add - sun-dried tomatoes, olives, mushrooms, dried or fresh herbs are all great options...I like to keep it simple so my topping of choice is always a generous sprinkling of rock salt and fresh rosemary.
I put a good covering of olive oil in the bottom of the cake tin as well as drizzling oil on top of the bread. The oil adds great flavour, keeps the bread moist and creates a beautiful crunchy crust on the top and bottom of the loaf.
Once shaped and topped, let the loaf rise for another 30 minutes and then bake until golden brown.
And then try not to eat the whole loaf in one sitting. Don't laugh - it's harder that you think!


Focaccia Bread
Ingredients
- 1 ½ cups warm water about 43°C/110°F
- 2 teaspoons active dry yeast
- 1 teaspoon sugar
- 3 ½ cups plain flour
- 1 teaspoon salt
- 2 Tablespoons olive oil
For topping
- 2 Tablespoons olive oil
- Fresh rosemary
- Sea salt flakes
Instructions
- Combine water and sugar and sprinkle the yeast on top. Leave for 10 minutes until the yeast starts to froth.
- Add 1½ cups of the flour into the yeast mixture along with the salt and olive oil. Mix well for about 3 minutes until the mixture is a silky texture. Gradually add the remaining flour and mix until incorporated.
- Knead the dough, either on a lightly floured board by hand or in a stand mixer with the dough hook attachment for 10 minutes, until the dough is soft and elastic. The dough should spring back when lightly pressed.
- Lightly oil a bowl and roll the ball of dough to coat. Cover with a tea towel that has been dampened with warm water and leave in a warm place until doubled in size. This usually takes around 1½ hours.
- Remove from the bowl, knock the dough back using a fist and shape it into a round. Cover the bottom of a 10 inch round cake tin with olive oil (3-4mm) and place the dough into the tin. Spread the dough out so that it reaches the edges of the tin.
- Using your fingertips make indentations into the top of the loaf and drizzle with olive oil. Sprinkle sea salt and rosemary, or any other topping choice and cover again with the re-dampened tea towel. Leave in a warm place for 30 minutes (on top of the oven is fine). Preheat the oven to 200°C.
- Bake for 25-40 minutes (depending on thickness of loaf) until the top is golden brown and crisp. Remove from oven and serve immediately.
- Focaccia bread is best eaten on the day it is baked, but stored in an airtight container it will keep for a couple of days...if it is not eaten before then!


Julie says
Perfect, easy to do family loved it
Chelina says
I love this recipe, it works every time. I finish it with a topping of caramelised onions, cherry tomatoes, feta and olives. It’s the perfect side or main meal!
Thank you for sharing 🤍
Anita says
Simply delicious! Just like a brought one but way better. My family raved about it. Made in the bread maker then baked. Perfect recipe.
Jennifer says
Hi. What a great easy recipe!. Others I have made take a long time, but this was good. Looks a nice crunchy top!. Made it for my daughter, but she is missing a corner of it.... lovely, thankyou.
Timothy Osborne says
This was exceptionally easy to make and didn’t use up too much flour. Only make it when you have friends over or you will eat the whole thing yourself ha ha.
Shirlene Mita says
This is such an easy simple recipe, thank you so much. I’m now confident to try other creations
Cynthia Checkley says
This is the best bread recipe ever. It's even good toasted.
Shari Kelley says
This bread looks wonderful! I love rosemary paired with bread. I am in the process of overcoming my fear of yeast. I would love to try this recipe!
Laura says
Thanks so much for the lovely comment! I think this would be an ideal recipe to try in terms of overcoming a fear of yeast (fear of yeast sounds like such a funny thing but I totally get it!) I'm so excited about the recipe post, thanks so much again for your help and for stopping by!