A step by step tutorial showing you exactly how to make delicious sugar free homemade stewed apples and how to can applesauce - the perfect way to preserve the apple harvest and great to have on hand for roast pork, baby food or quick desserts!

Some of the links in this post are affiliate links, which pay me a small commission for my referral at no extra cost to you! Thank you for supporting The Kiwi Country Girl.
After a little break from all the preserving fruit and veggies I did over summer I'm back at it with the autumn harvest! And can I just say, canning (or bottling) is so much more enjoyable when it's not 30°C and you are leaning over a hot stove!
Canning applesauce is the most fun!
I've always stewed apples to have around for roast pork, baby food options or just to add to a quick apple crumble over winter but I've always frozen it. Nothing wrong with that method (in fact, I did some like that this year too) but I always forget to take it out of the freezer in time so end up having to hurriedly try and defrost it right as I'm serving up. Not ideal!
Since learning about the wonders of water bath canning, I knew it was time to try again with apples. And it worked a TREAT!
I used the method in the Ball Blue Book of Preserving and it worked so well. It was very simple and took no time at all! Let me walk you through the steps.
You need:
- Jars with sealable lids (I use half pint Ball Mason Jars but Agee jars also work well) I have reused old jars but I have a much lower success rate with them sealing than the new jars, although the Pic's Peanut Butter Jars worked really well in this instance!
- A large stockpot to use as a water bath plus a rack to fit in the bottom or a clean tea towel (something so that the jars aren't in direct contact with the bottom of the pot)
- Apples (as many as you can get)
- Water
- Crockpot or multi cooker/instant pot is helpful, but you can also cook them on the stove in a large pot
- A few basic kitchen things such as a peeler, apple corer (or apple peeler/corer if you have one), chopping board, knife, ladle, wide mouth funnel and a couple of tea towels. Jar tongs are also really helpful here.
Step 1: Sterilise your jars and wash lids/seals
I find the easiest way to sterilise your jars or bottles is to run them through the dishwasher on the hottest wash (ours is called hygiene but it may be called sterilise on your machine) This washes and sterilises them and as long as you keep the door shut until you are ready for the jars, it will keep them warm too! If you don’t have a dishwasher, wash them thoroughly in hot soapy water and place them in the oven at 150°C for at least 15 minutes or until you need them.
Tip: Always prepare more jars than you think you will need. It is easier to put them back in the cupboard than to try to wash and sterilise one or two extras.
The Ball Mason jar lids and seals don't need to be sterilised so I just wash them thoroughly in hot soapy water and leave them until I need them.
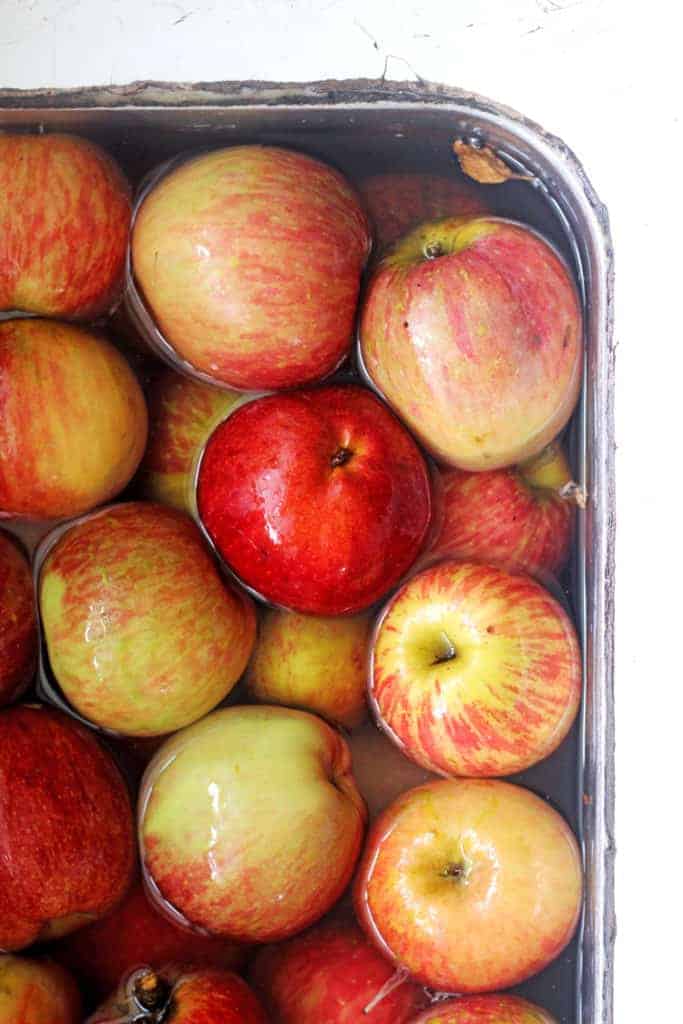
Step 2: Wash & prepare the fruit
I just give the apples a quick wash by filling up a large bowl or my sink (that has been cleaned!) with water, and giving the fruit a light wipe down. Once the apples have been cleaned I peel, core and slice them into roughly 8 pieces and place them in a large pot covered with water to help stop them going brown while you prepare the rest of the apples.
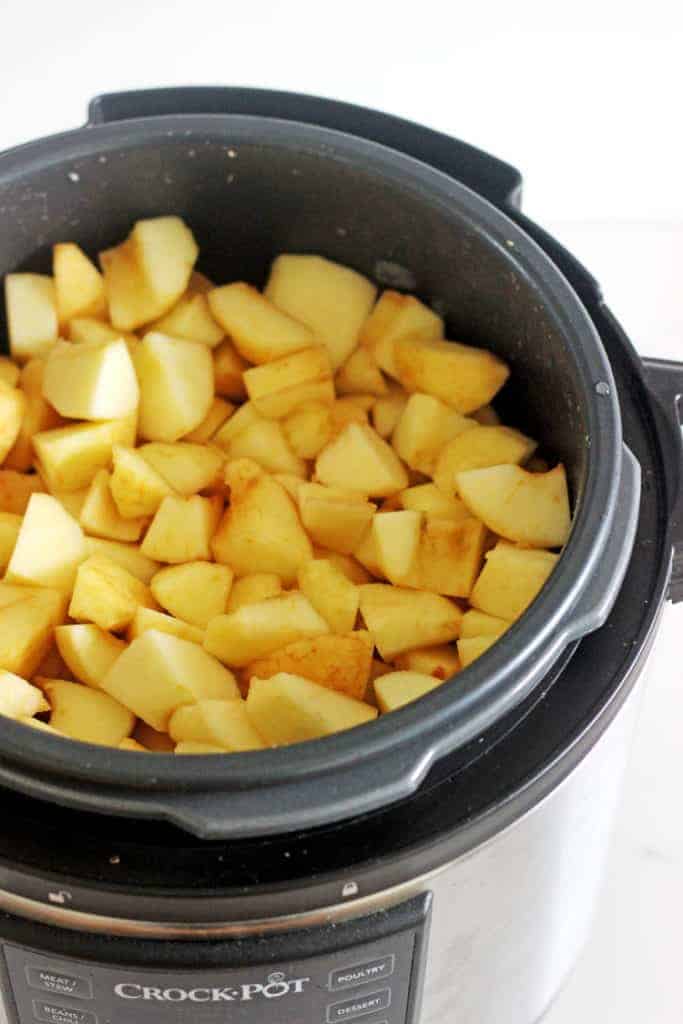
Step 3: Cook the apples
You have 3 options for cooking the apples here:
- Instant pot/multi cooker (my prefered method)
- Slow cooker (full post on this method here)
- Pot on the stove
The aim of the game is to cook the apples with a small amount of water until they are soft enough to be mashed into sauce. I have always done it in the slow cooker (as per the method in this post) as it is entirely hands off. It takes about 4 hours but you can set it in advance and leave it.
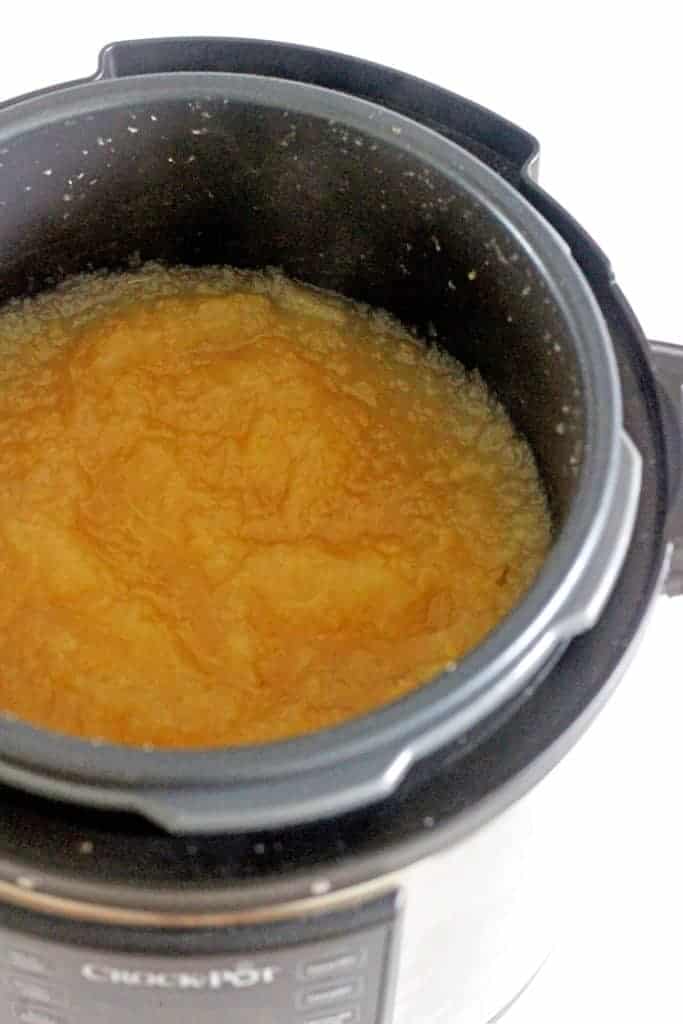
Since buying my multi cooker (instant pot) I have started using this as you simply add the apples and water, set it to manual pressure cook for 8 minutes and leave it to do it's thing! So quick and easy and because the apples are pressure cooked, they also essential mash themselves so that all is needed to do is stir them and they are ready to go into jars!
To cook the apples on the stove, add the apples and water to a large pot and cook over a low heat (covered, but checking and stirring regularly to ensure they don't stick to the bottom of the pot) for about 45 minutes. Once cooked, use a potato masher or stick mixer (immersion blender) to puree the apples to a sauce consistency.
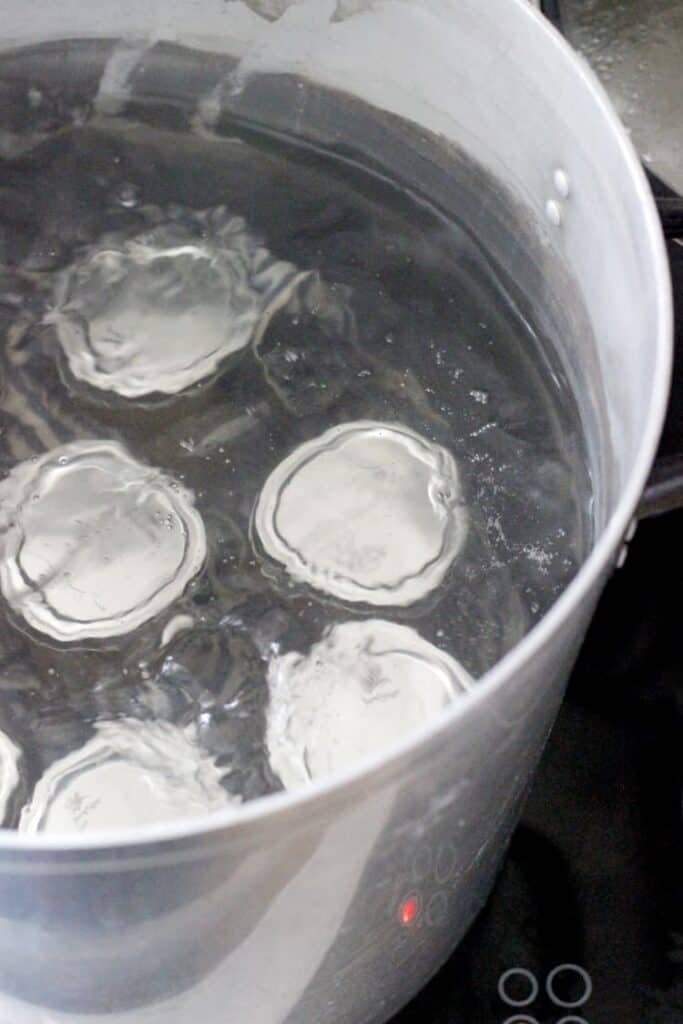
Step 4: Prepare the water bath
The important thing to note with using a water bath is that the jars need to be covered with at least 1 inch of water while they are processing. I like to place one of the empty jars that I will be using in the bottom of the pot as I am filling it up with water to make sure I add enough. It's easier to take some water out than add more water later and bring it back to the boil.
Add enough hot water to the pot and bring it to the boil (covered makes it quicker) This can take some time depending on the size of the pot you are using so allow at least 30 minutes for it to come to the boil.
Place the rack or a clean tea towel in the bottom of the pot - this is to keep the jars from being in direct contact with the bottom of the pot.
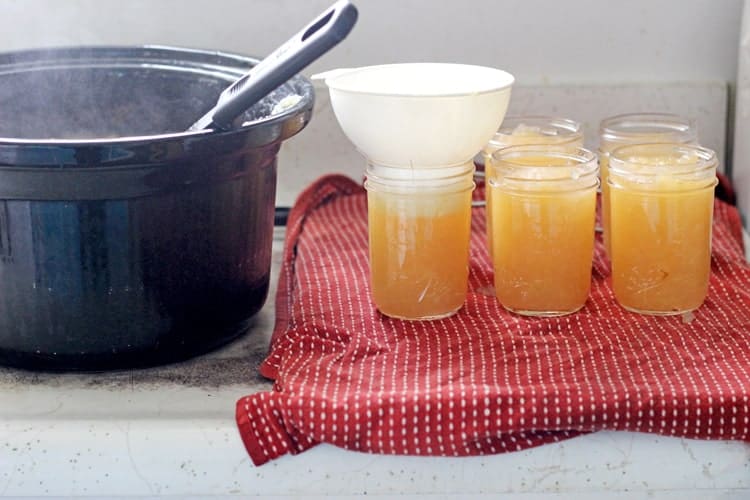
Step 5: Bottle the apples
The important thing to remember here is that both the jars and the apples need to be hot. Adding hot fruit into cold jars is when breakages happen, so make sure you leave the jars in either the dishwasher or oven until you are ready to use them.
I place a clean tea towel on the bench next to the pot of apples and line up the jars out of the dishwasher on that.
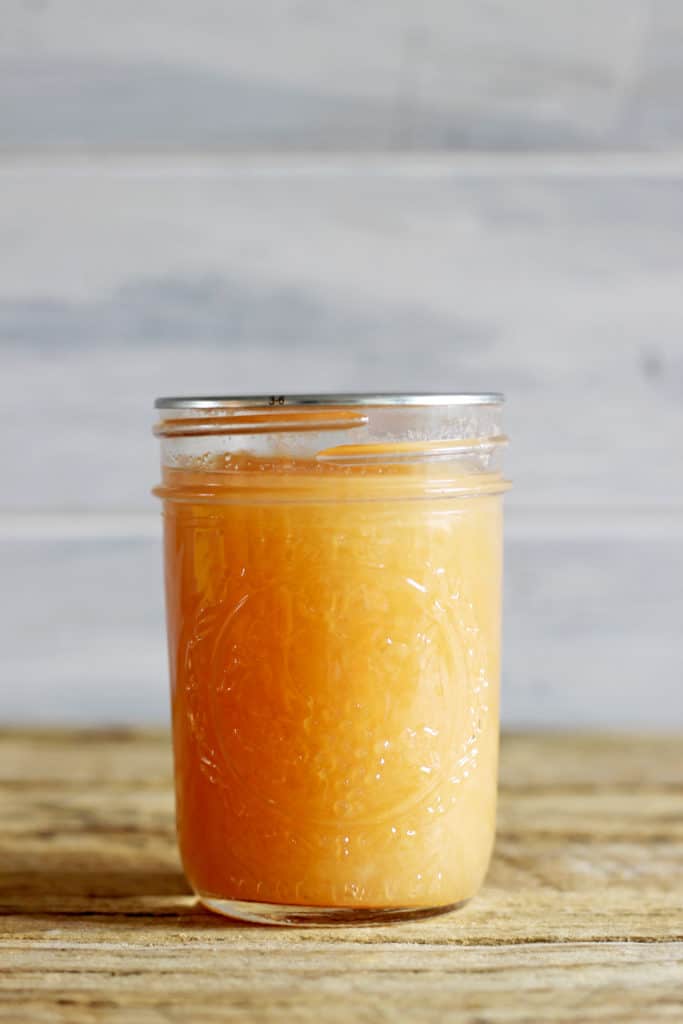
Use a ladle and a canning funnel if you have one and fill the jars almost to the top (leaving about 1.5cm) and then run a clean butter knife or small rubber spatula (I usually run this through the dishwasher with the jars) around the inside of the jar to make sure there are no air bubbles in the jar. Use a clean damp cloth to wipe around the rim of the jar.
Carefully place a seal on the jar and tighten the ring around it until you just meet resistance. Repeat until you have run out of fruit. If I have a small amount of fruit left or have run out of jars, I put the remaining applesauce in small snaplock bags or ice cube trays in the freezer.

Step 5: Processing the jars
Using jar tongs if you have them lower the jars carefully into the water bath making sure that they are sitting on the rack or the tea towel.
Add as many jars as will fit without them touching each other.
Place the lid on the pot and bring the water back to the boil, then time 15 minutes for the apples to process. Once the 15 minutes is up, take the pot off the heat and allow to sit for 5 minutes before removing the jars from the water and placing them on the bench on a clean tea towel - this is to prevent breakages as sometimes cool benchtops (i.e. marble or granite) can cause the hot glass jars to smash.
If you have more jars to process, place the pot back on the element and bring back to the boil before processing the remaining jars.
Hopefully you will start to hear the "ping" as the seals on the jars form - it is SUCH a satisfying sound!
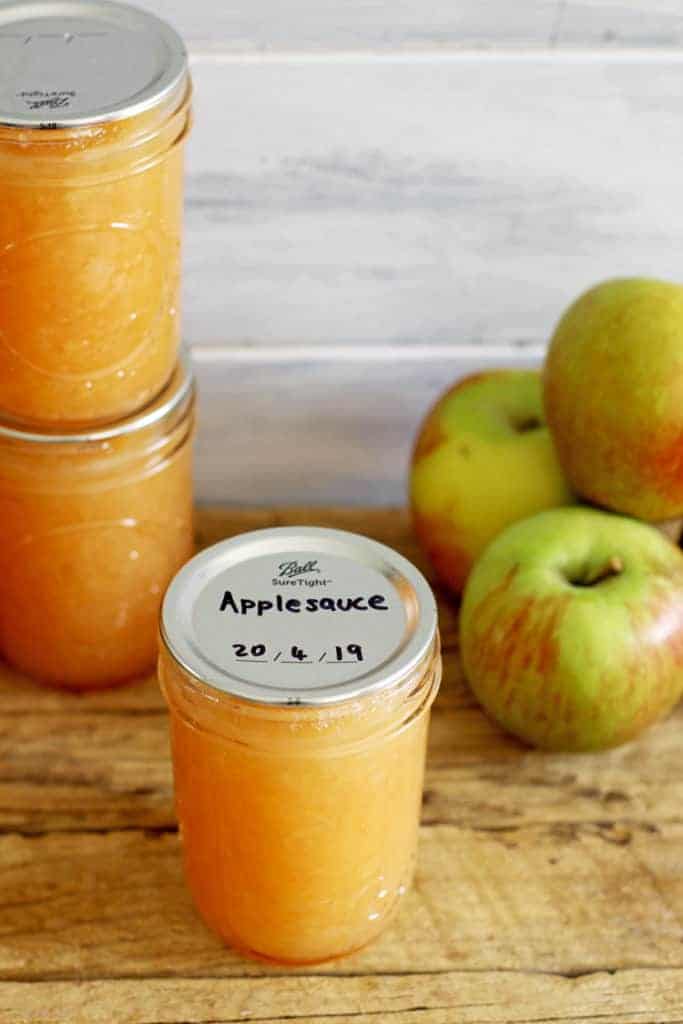
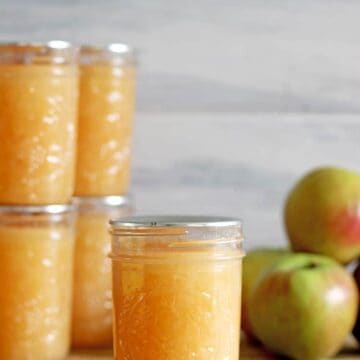
Leave the jars overnight and check in the morning to see that the jars have sealed. Remove the rings from the jars and if they have sealed, the seal will be concave and you won’t be able to prise it off using your finger. If the jar has sealed, give the jar a clean with a damp cloth and store in a cool dark place. Properly sealed jars will keep for at least a year and I have kept fruit for 2 years with no problems.
All done! Now you have delicious stewed apples ready to eat at a moments notice! Don't forget to label the jars - just in case you forget what it is and when you made it!
Made this recipe? Tag me on Instagram @thekiwicountrygirl and hashtag it #thekiwicountrygirl.
How to Can Applesauce (Bottle Stewed Apples)
Ingredients
- 15 cups apples (about 15-20 medium apples)
- 3 cups water
Instructions
Step 1: Sterilise your jars and wash lids/seals
- 2 hours before you need the jars, run them through the dishwasher on the hottest wash (ours is called hygiene but it may be called sterilise on your machine) Keep the door shut until you are ready for the jars as it will keep them warm until you are ready to use them. If you don’t have a dishwasher, wash the jars thoroughly in hot soapy water and place them in the oven at 150°C for at least 15 minutes or until you need them.Wash the lids and seals thoroughly in hot soapy water and leave to drain until you need them.
Step 2: Wash & prepare the fruit
- Give the apples a quick wash by filling up a large bowl or a clean sink with water, and giving the fruit a light wipe down. Once the apples have been cleaned, peel, core and slice them into roughly 8 pieces and place them in a large pot covered with water to help stop them going brown while you prepare the rest of the apples.
Step 3: Cook the apples
- You have 3 options for cooking the apples here:Instant pot/multi cooker (my prefered method)Add the apples and water to the instant pot, set it to manual pressure cook for 8 minutes and let it manually release pressure for 10 minutes. Stir the apples and they are ready to go into jars.
Slow cookerAdd the apples and water to the slow cooker and cook for 4 hours on high until soft. Once cooked, use a potato masher or stick mixer (immersion blender) to puree the apples to a sauce consistency.
Pot on the stoveAdd the apples and water to a large pot and cook over a low heat (covered, but checking and stirring regularly to ensure they don’t stick to the bottom of the pot) for about 45 minutes. Once cooked, use a potato masher or stick mixer (immersion blender) to puree the apples to a sauce consistency.
Step 4: Prepare the water bath
- While the apples are cooking, add enough hot water to the pot to ensure that the jars will be covered by at least 1 inch of water and bring it to the boil (covered makes it quicker) This can take some time depending on the size of the pot you are using so allow at least 30 minutes for it to come to the boil.Place the rack or a clean tea towel in the bottom of the pot – this is to keep the jars from being in direct contact with the bottom of the pot.
Step 5: Bottle the apples
- Place a clean tea towel on the bench next to the pot of apples and line up the jars out of the dishwasher. Use a ladle and a canning funnel if you have one and fill the jars almost to the top (leaving about 1.5cm) and then run a clean butter knife or small rubber spatula (I usually run this through the dishwasher with the jars) around the inside of the jar to make sure there are no air bubbles in the jar. Use a clean damp cloth to wipe around the rim of the jar.Carefully place a seal on the jar and tighten the ring around it until you just meet resistance. Repeat until you have run out of fruit.
Step 6: Process the jars
- Using jar tongs if you have them lower the jars carefully into the water bath making sure that they are sitting on the rack or the tea towel.Add as many jars as will fit without them touching each other.Place the lid on the pot and bring the water back to the boil, then time 15 minutes for the apples to process. Once the 15 minutes is up, take the pot off the heat and allow to sit for 5 minutes before removing the jars from the water and placing them on the bench on a clean tea towel – this is to prevent breakages as sometimes cool benchtops (i.e. marble or granite) can cause the glass jars to smash.If you have more jars to process, place the pot back on the element and bring back to the boil before processing the remaining jars.
Step 7: Check the seals
- To check the seals, remove the rings from the jars and gently try to prise the lid off using your finger. If they have sealed, the seals will be concave and you won't be able to move the lid. Give the jar a clean with a damp cloth and store in a cool dark place. Properly sealed jars will keep for at least a year and I have kept fruit for 2 years with no problems.If the jars haven’t sealed they cannot be stored at room temperature but they are still safe to eat. Just place the jar in the fridge and eat within a week. Depending on the type of jar you have used (Ball Mason Jars freeze well but I haven’t tried with Agee Jars) you can pop the whole jar in the freezer, or you could transfer the contents of the jar to a freezer proof container and store them in there.
If you tried and loved this recipe, please leave a comment and a rating below!

Tink says
Hi Laura do you have to do the water bath part ?
Laura says
If you want it to be shelf stable, yes. If you don't want to water bath it, you can freeze it instead.
Shirlene says
Hi
Thanks for your review if I just want to do stewed apples not apple sauce do I just leave out the boiling in water bath step?
Laura says
Stewed apples and apple sauce are the same thing! You can skip water bathing them and just freeze it if you prefer but if you want to keep the jars in the pantry, they need to be water bathed to be shelf stable!
Teresa says
Oh, I also forgot to ask, if I just wanted to bottle the stewed apples, without taking them to the sauce stage, should I just fill the bottles with the liquid I stewed them in?
Laura says
Hi Teresa, if you mean bottling the cooked apple slices then yes! Or adding more hot water to the jar would work too.
Teresa says
It’s funny that in my search for preserving recipes/instructions, I keep coming across kiwi girls giving the best info! Not surprising really I suppose 😊
I’m just so pleased that I can still find out about the things that my mum used to do now that she’s not around to ask 🙂
Laura says
Hi Teresa! I'm so pleased you are finding lots of good information out there! It is a joy to share what I learnt from my mum (who is also no longer around to ask!)
Nikki Dagger says
Absolutely brilliant and so easy. Thank you so much x
Erin says
Hi Laura
Many thanks your sound advice re use of Instant Pot Multi-Cooker! I made two batches yesterday, one of unsweetened Apple Pulp and the other as sweetened Apple Sauce. My apples (Envy variety), however, did not mush so had to mash them anyway and as pulp seemed a little runny, I used just two cups of water with the sauce batch. For the record, I bottled 6 x 500ml jars for the pulp and 12 x 250ml jars for the sauce. I didn't use your waterbath method, instead I poured straight from Instant Pot bowl into oven heated jars, capped them immediately, and amazingly, all my jars sealed!
Kind Regards