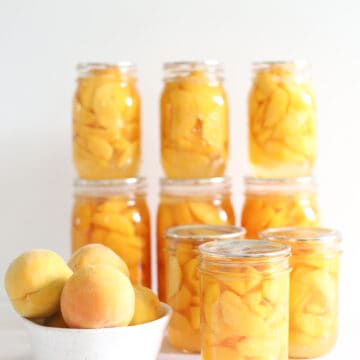
How to bottle peaches
A step by step guide to canning/bottling peaches using a water bath canner. Perfect for beginners, home canned peaches are a delicious way to enjoy in season peaches year round.
Print
Pin
Servings: 5 quart/1L jars
Equipment
- Water bath canner
Ingredients
- 5.5 kilograms peaches (about 40 medium peaches) (I like Golden Queens)
- 6 cups water
- 1.5 cups sugar (see notes)
Instructions
Step 1: Get prepared
1a) Wash and sterilise jars
- Wash jars well in warm soapy water and sterilise your jars. To sterilise the jars you can either run them through the dishwasher on sterilise cycle or place them in the water bath and boil for 10 minutes. Keeping the jars hot prevents them from breaking when filled with hot food. Lids and bands can be at room temperature, just make sure they are clean.
- TIP: Always prepare more jars than you think you will need! There is nothing more annoying than running out of jars and having to wash/sterilise extras when you are mid way through the process!
1b) Prepare equipment
- Get your kitchen equipment ready - tea towels, knives, peeler, chopping boards and anything else you think you might need.
1c) Prepare waterbath
- Fill stockpot or water bath canner at least half-full with water. Cover and get it simmering - you will need enough water in the pot to cover the jars by 1 inch once they are in there.
1d) Make sugar syrup
- Add the sugar and water to a large pot and bring to the boil – boil for a couple of minutes until the sugar has dissolved and keep simmering until you are ready to use it. The liquid needs to be hot when it goes into the jars.
Step 2: Prepare peaches
2a) Wash peaches
- Place the peaches in a sink full of cold water and lightly wipe them clean.
2b) Peel peaches
- Peel the peaches using a vegetable peeler (or blanching them if you prefer that method)
2c) Slice peaches
- Slice peaches into thin slices or halves, depending on how you prefer them.
2d) Place peach slices in lemon water
- Fill a large bowl or container with cold water and squeeze in the juice from 1 lemon. As you slice the peaches, place them in the lemon water. This stops the slices from going brown while you are slicing the remaining peaches.
Step 3: Pack the jars
- Hot pack - the peach slices are cooked in syrup and then packed into jars together. This slightly lessens the processing time and I find that the peaches fit better into the jars this way.
- Cold/raw pack - the peach slices are packed into the jar and then you add the hot syrup. These jars require a slightly longer processing time.
3a) Hot pack method only
- Cook the peach slices in the sugar syrup for 5 minutes
3b) Fill jars
- Use a slotted spoon to fill the jars with the cooked peach slices (hot pack method) or raw peach slices (cold/raw pack method) leaving 1-2cm at the top of the jar and top with the sugar syrup leaving 1.25cm (½ inch) at the top.
3c) Remove air bubbles & check headspace
- Run a clean wooden chopstick or rubber spatula around inside the jar to release trapped air bubbles. You want to avoid knives as they can damage the glass.
- Use a headspace checker or ruler to measure 1.25cm (½ inch) at the top of the jars. This amount of headspace is how the vacuum seal is created, sealing the jars.
3d) Wipe jars, put lids and bands on
- Use a clean, damp cloth to clean any spillages from the mouth of the jar. Place the lid on the jar, apply the ring/band and adjust until fit is fingertip-tight (don't be tempted to screw it on too tight). Place the jar in the stockpot/canner.
Step 4: Process jars
- Once the jars have all been filled and are in the water bath, lower the rack so that the jars are submerged and are covered by at least 1 inch of water. Bring the water to a rolling boil and process the jars for:
Hot pack
- 1L/quart jars - process for 25 minutes
- 500ml/pint jars - process for 20 minutes
Cold/raw pack
- 1L/quart jars - process for 30 minutes
- 500ml/pint jars - process for 25 minutes
- Once the processing time is up, turn the heat off, lift the rack out of the water and leave the jars partially submerged for 5 minutes. This helps the jars adjust to the temperature outside of the water bath and can reduce siphoning.
- After 5 minutes, use jar tongs to carefully remove the jars from the pot/canner and set on a clean tea towel on the bench (this is especially important if you have marble or granite benchtops as they can cause the hot jars to crack.)
Step 5: Check the seals and store jars
- Leave jars undisturbed for 12 to 24 hours and hopefully you will start hearing the "ping" of lids sealing! When you press down on the centre of the lid, it should be concave and not flex. Remove the ring/band and try to prise the lid off with your fingers. If the jar has sealed properly, you won't be able to lift the lid. Wipe down the jars and lids (you don't need to store them with the rings/bands on) label the jars and store in a cool, dark place.
- Sealed jars will last in the cupboard for years but the quality of the food will start to deteriorate over time. I work on most things being good for a couple of years. If the jar hasn't sealed in 24 hours, the contents of the jar needs to be either refrigerated and eaten within a couple of weeks or frozen.
Notes
Sugar syrup ratios
- Light syrup - 3 cups water to ½ cup sugar
- Medium syrup - 3 cups water to 1 cup sugar
- Heavy syrup - 3 cups water to 2 cups sugar
Nutrition Facts
How to bottle peaches
Amount per Serving
Calories
693
% Daily Value*
Fat
3
g
5
%
Saturated Fat
1
g
6
%
Polyunsaturated Fat
1
g
Monounsaturated Fat
1
g
Sodium
158
mg
7
%
Potassium
1343
mg
38
%
Carbohydrates
171
g
57
%
Fiber
17
g
71
%
Sugar
152
g
169
%
Protein
10
g
20
%
Vitamin A
3586
IU
72
%
Vitamin C
45
mg
55
%
Calcium
53
mg
5
%
Iron
4
mg
22
%
* Percent Daily Values are based on a 2000 calorie diet.
Tried this Recipe? Tag me Today!Tag @thekiwicountrygirl or tag #thekiwicountrygirl!